Packet loss can occur during data transmission over both local networks and the internet. Depending on the nature of the connection, the absence of session control mechanisms may either lead to retransmissions or result in missing data. When packets are lost and need to be retransmitted, it leads to additional network traffic, which increases transmission completion time and causes inefficiency, costing both time and resources.
Interactive Applications
In typical applications, slow response times due to occasional packet loss may not be highly disruptive, though it slightly increases network traffic. However, in the case of interactive applications, such as VoIP, video streaming, and video conferencing, packet loss becomes far more problematic. These applications generate large volumes of traffic, even if the data is delivered successfully. The retransmission of lost packets only adds to the burden, worsening the overall experience.
VoIP and Video Conferencing: Handling Packet Loss
For VoIP and video conferencing, retransmitting lost packets is not a viable option due to the real-time nature of these services. There simply isn’t enough time to wait for the missing packet before continuing data delivery. Fortunately, each lost packet represents only a small portion of the voice or video stream, and its absence typically goes unnoticed. However, when packet loss is frequent or a series of packets are lost, it negatively impacts the quality of sound or video, leading to interruptions, distortions, or a poor overall user experience.
Video Streaming: Buffering as a Solution
Video streaming platforms approach packet loss differently. Unlike interactive applications, which require real-time delivery, video streaming services can afford some delay. These platforms utilize buffering, storing several minutes of footage before playback begins. The buffering time is adjusted according to the connection’s bit rate, with additional buffer space to account for potential packet loss. In cases of high packet loss, if the buffer runs out, the video playback will pause until enough data is received.
The Dual Effects of Packet Loss
Packet loss severely impacts interactive applications, leading to poor audio and video quality. For video streaming, it results in buffering and potential pauses in playback. Both scenarios highlight the importance of maintaining a stable and efficient network connection.
Related post: Fix Packet Loss in 8 Steps
Session control
There are two strategies for managing the transmission of data across a network and these are both Transport Layer protocols. The first of these is the Transmission Control Protocol (TCP), which is a “connection-oriented” system. TCP includes procedures for checking that packets arrive and then request a replacement for a lost packet. The other system is the User Datagram Protocol (UDP). This does not establish a session and so it is called “connectionless.” UDP has no way to enable receivers to request retransmission.
TCP is great, but it creates a lot of overhead. Interactive applications can’t afford the time a session adds on, so those systems tend to be based on UDP. They either implement transmission control up in the application or they just don’t bother with it.
These two approaches to transmissions and the choice of the application developer over whether to use TCP or UDP explain why packet loss creates extra traffic in some cases but not in others. So, in some cases, it causes a poor quality of service and in others, it creates a slow service. In all cases, packet loss is a bad thing.
Detecting packet loss
If you are running a business network that is expected to carry a lot of voice and video traffic, you need to be sure that your cable and network devices have enough capacity to carry all of the traffic that user demand will generate.
Packet loss can’t be completely eliminated, so it is normal to calculate extra capacity requirements to take account of that occurrence. Remember, you won’t get any re-transmission of VoIP and video conferencing traffic, but there will be extra traffic volumes for video streaming applications due to packet loss.
It is better to detect a packet loss rate on your network and on transmission from particular sources before you put a new multi-media application live for the users to access. Thus, trial an application before releasing it.
It is also possible to check for packet loss through the operating system, without involving the new application. This is a worthwhile exercise because it helps you work out whether the apparent packet loss is actually occurring on the network. It can also mean there are some settings in the new application that make it seem that packet loss is occurring, even though there isn’t any real problem on the network.
For more information, see our guide on checking and fixing packet loss.
Packet loss detection utilities
There are a number of network management systems that include utilities to identify packet loss. Some of these system monitors will even give you an alert when they detect a larger than expected packet loss rate. In these cases, you can leave the tool to get on with constantly watching network performance, freeing up your time for other tasks.
All of these monitoring systems base their detection of packet loss on methods that are built into the operating system on which they run. Those detection systems can be accessed directly by the user. So, whether or not you have a network monitoring tool, you can get to see the packet loss data that those monitors use for their system investigations.
Accessing system monitoring utilities
The utilities that you need in order to investigate packet loss are all part of the operating system that lies beneath the Windows interface. You need to open a Command Prompt window to access them.
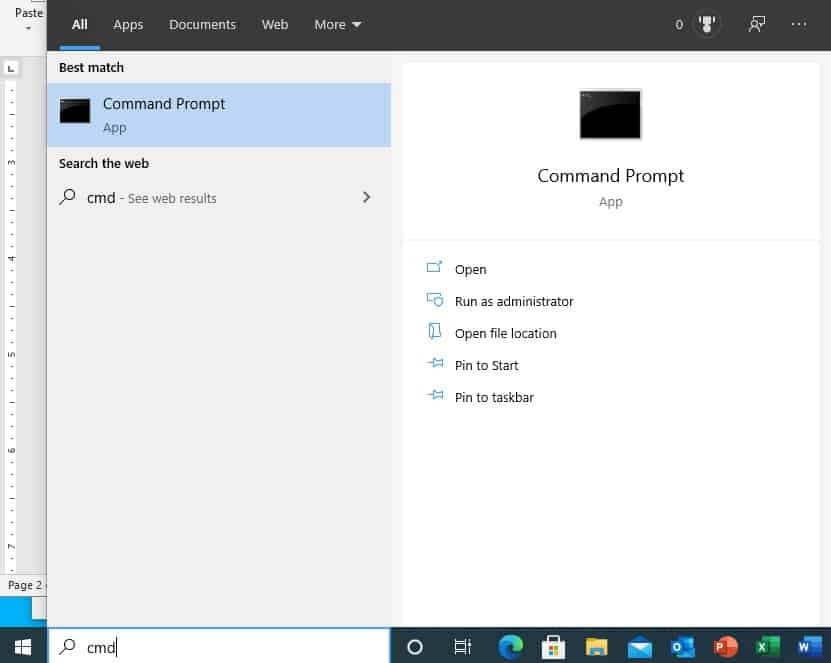
Click in the Start Menu search bar and type cmd. Click on Command Prompt in the results list.
This opens a Command Prompt window that gives you direct access to the operating system.
Identifying packet loss on the network
You need to know the address of the Default Gateway on your network. This applies both to wired and wireless networks.
On a wireless network, the default gateway is the wireless access point (AP); on a LAN, the default gateway is the router. In both cases, this gateway is on the boundary of the network. This is the point that all of your connections have to get to in order to pass through onto the internet. So, we are just looking at the stretch of communications on the private network.
The test that we will use checks out both directions of traffic – from your computer to the gateway and back again. As it covers both there and back, you can be sure that you have tested the conditions experienced by outgoing and inbound packets.
Enter ipconfig in the Command Prompt window to get information on your local network.
You need to look for a value for Default Gateway. In the example shown above, that address is 192.168.0.1. This is a typical IP address for the default gateway on a private network.
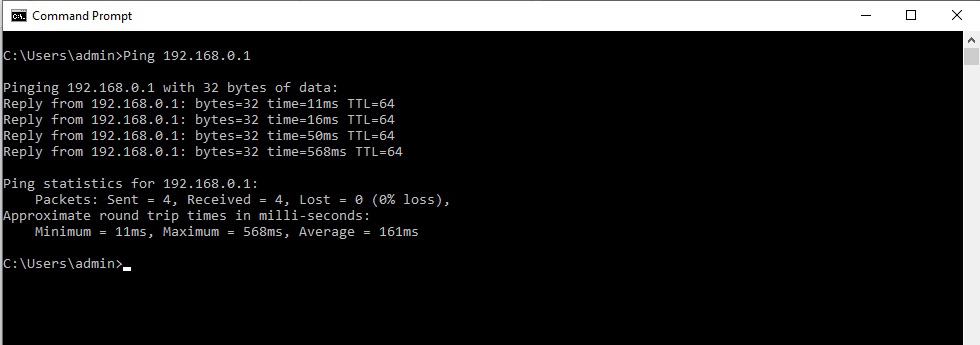
Now you can launch a test for a connection to and from the Default Network. Type Ping <default gateway address> substituting the actual IP address you got from the ipconfig output for <default gateway address>. In the example, that address was 192.168.0.1. So, the Ping command should be Ping 192.168.0.1 and that is shown below.
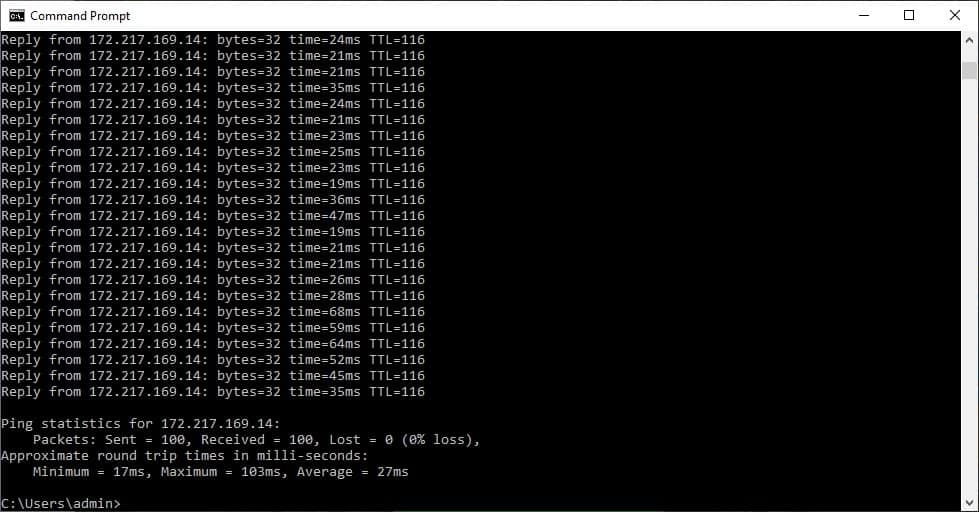
Ping makes several tests and summarizes the results. In the example above, you can see that there was no packet loss. On Windows, Ping executes four test runs. That doesn’t give much opportunity to spot a problem because usually, packet loss is a lot less than 25 percent. Make Ping run 100 tests by adding -n 100 at the end of the command, such as Ping 192.168.0.1 -n 100.
The example run of 100 tests above shows that there was still no packet loss encountered on the network. This is good because it shows that the network is able to cope with its current throughput demand. However, this situation could change once the new application goes live and lots of users generate a lot more pressure on the network’s capacity.
One of the main causes of packet loss in a network is the overloading of switches and routers. If packets arrive at a switch at a faster rate than that device can handle, the switch initially buffers the incoming packets. Once that queue is full, new packets arriving cannot go anywhere else and so packets will be lost until the switch empties out some room in the buffer.
Identifying packet loss on the internet
Even if your network is working just fine, your users still might experience problems with interactive applications and video streaming services. This could be because of problems with the internet connection.
The command to check on the connection packet loss rate is exactly the same: Ping. However, this time, you need to put in the address of an expected source of data. You don’t need to know the IP address because Ping will implement DNS resolution if it is given a URL. So, here is an example of 100 tests sent to the server for Google, launched with the command Ping google.com -n 100.
In this case, there was no packet loss.
Dealing with packet loss
If you experience packet loss on the network, the most likely cause is an overwhelmed switch or router. Try a Ping to different endpoints on your network that will pass through different network devices so that you can see exactly which device is in trouble.
Once you identify the device that is overloaded, you can help the situation without needing to replace either the device or the cables that connect to it. This is by a method called traffic shaping.
Traffic shaping algorithms involve identifying the packets that relate to different applications and then slowing some application traffic to give priority to other traffic at each switch. This is a queuing strategy that will always hold up the traffic of some applications, placing them in a queue, to enable the prioritized traffic direct access to the switch.
It might seem that there is nothing you can do about packet loss on the internet because you have no control over that domain. However, your traffic might be throttled by your Internet service provider (ISP). In this scenario, the ISP slows down or drops packets for certain applications and video streaming is a particularly big target for some ISPs.
Throttling is very difficult to detect or prove. As it targets video traffic, the tests you run with Ping won’t show up the type of treatment that your video traffic receives.
Another reason could be that your network gateway router doesn’t have the capacity for all of the traffic that it is expected to process. In this case, you could implement queuing on the router, or upgrade to a device with greater capacity.
Jitter
Ping shows more than just packet loss data. In the examples shown above, you can see that the Ping summary shows the minimum, maximum, and average roundtrip time for all of the packets in the test run batch.
The variation in packet delivery time is called jitter and it is a bad condition for interactive applications. As VoIP and video conferencing don’t use any session control or buffering, they need packets to arrive in order and at a regular speed. They don’t have time to re-sequence arriving packets, so if the following packet travels faster and arrives before the packet that was sent in front of it, the VoIP application won’t check but will play those data segments in the order they arrived – resulting in quirky sounds.
As with packet loss, a small amount of jitter shouldn’t create detectable problems with the sound or video quality because each tiny slice of the stream is hardly noticeable. A brief period of jitter or just a small range of transmission times won’t have much impact on service quality.
Packet loss testing FAQs
How do I test for packet loss?
The most commonly-used utility to test for packet loss is Ping. this tool will send packets to a specific destination and report if a response failed to arrive. A missing packet could mean that the request that was sent got lost or that the reply was lost. Ping can also be used to check on the availability of a particular device. However, it is better to get a network monitoring tool that will issue repeated tests for you and only notify you when a test fails – which indicates packet loss or that a device has gone offline.
What is packet loss in CMD?
Without a constant traffic monitor in place, it is difficult to identify packet loss – it would just seem that a networked application is slow to respond. Therefore, for the purposes of root cause analysis when your user-facing systems run slow, it is a good idea to have a network monitoring tool. If you want to check on packet loss for yourself at the command line (CMD) in Windows, the best option is to issue a Ping command to a remote point on your network. A low level of packet loss should be expected – about 2 to 5 percent of all traffic. However, if packet loss escalates, this would indicate that one of your network devices is overloaded and dropping packets.
How do I fix packet loss on Windows?
Packet loss almost never occurs on your Windows PC. Instead, it will be a problem with your network. Usually, packets get dropped when a device on the network, such as a switch or a router, is presented with a higher packet throughput than it can handle. On these occasions, the device just can’t take the next packet in and that data just can’t travel any further – packets can’t park on a wire, they just cease to exist. So, you would need to check your switches and routers for problems and reboot them. Another cause could be badly ordered Access Control Lists (ACLs) on your router. If the problem persists, you will need to institute queuing on your routers or upgrade the device that is forming a bottleneck to provide more capacity.


