Subnets play a crucial role in network management by helping to optimize and reduce network congestion. Subnetting is a widely adopted practice that involves dividing a large network into smaller, more manageable sections. Instead of treating a network as a monolithic block of connected devices, subnetting breaks it into multiple interconnected networks, each known as a sub-network or subnet. This segmentation improves network performance and efficiency, allowing for better traffic management and reducing the likelihood of network bottlenecks.
A subnet is essential for allocating IP addresses to the devices within a segmented network. Rather than assigning each device a unique global address, subnetting allocates subnet-specific IP ranges to each segment, which helps streamline network communication. However, the process of allocating address scopes for each subnet can be complex, especially as the network grows. As the number of devices increases, managing IP addresses manually becomes increasingly impractical and prone to error.
Subnetting also brings its own set of challenges, such as ensuring proper address distribution, preventing conflicts, and maintaining a logical structure as the network expands. Despite these complexities, planning remains the most effective tool for managing subnets. Careful consideration of the network’s current and future needs, as well as an understanding of the overall architecture, can help alleviate many of the difficulties associated with subnetting.
This guide will walk you through the key address considerations and best practices for splitting up your network effectively. It will also cover essential tools and techniques to manage the new address space configuration, ensuring that your network remains organized, scalable, and efficient. Proper planning and understanding of subnetting can make managing large and complex networks a much smoother process.
Why subnet?
A typical LAN is made up of wires connecting devices together that enable several endpoints to communicate, such as desktop PCs, printers, servers, and even telephones. At some point in the network, traffic destined for several endpoints is going to travel down the same cable. Data travels over the network as an electronic pulse applied to the wire.
When electricity is applied to a wire, it takes possession of the entire length of that cable instantaneously. Only one source of signal can operate on the wire at one time.
If several endpoints send data at the same time, the charges that represent the data mingle. This is called a “collision” and makes the transported data meaningless. So, collision has to be avoided. This collision avoidance is managed by the network card of each connected device. It will test the line to make sure there is no current charge on it and then put its signal onto the cable.
Congestion occurs when there are too many endpoints connected to the same wire. In this instance, the amount of time that each device has to wait to get a clear shot at the wire makes the network “slow.” In order to avoid one user hogging the network and locking everyone else out, data transfers are split up into chunks. The application receiving the data will check the sequence of arriving packets and reassemble their data payload into a stream.
The network card has to check network availability for each packet that it sends. When many endpoints use the same wire, the silence on the line that gives a transmitting network card an opportunity to send the next packet becomes rare. So, the receiving application has to wait longer for the transfer to complete.
You may have very efficient equipment on your network, but if you have too many endpoints sharing a wire, users will complain that the network is slow and it is preventing them from doing their work effectively. In this situation, breaking up the network into subnets is your best option.
— Implementation point
Once you have split up your network into sections, you need to count the number of devices that you have in each sub-network and allocate IP addresses to each. The addresses in each sub-network should be contiguous. This means that you need to reserve a range of IP addresses for each sub-network. The calculation of that range is the subject of IP subnetting. So, now you are learning about subnetting a network.
What is subnetting?
The term “subnetting” specifically applies to the addressing considerations for a system that includes subnets. On an IP network, you use an IP address. This is an identifier made up of four 8-bit numbers, which are separated by a dot (“.”). Each eight-bit binary number is known as an octet.
The sequence of numbers works on base 256. Each number in an address represents an underlying binary number of eight bits. The highest eight-digit binary number is 11111111, which is 255 in our regular decimal counting system.
So, addresses run in order from 0.0.0.1 up to 0.0.0.255, and then the next address up is 0.0.1.0. The maximum number allowed in any address space is 255.255.255.255. As that is just a representation of binary numbers, the actual maximum binary address is really 11111111.11111111.11111111.11111111. There are 32 numbers in the binary version of the IP address and each can only be a zero or a one.
Each device on your network must have a unique IP address. This uniqueness only applies to your network, so it doesn’t matter if some other network somewhere else is using the same addresses as you. However, you can’t have the same IP address allocated to a device in one subnet and also to a device in another subnet. In networking terminology, each device that needs a unique IP address in order to communicate over the network is called a “host.”
Broadcast address and network address
Your subnetting address allocation will divide up the available range of addresses into a range reserved for each subnet. The valid address range for a subnet always starts with an even number and ends with an odd number. The first number of the range is designated as the Network ID. The last number in the range becomes a “Broadcast ID,” which means that any messages sent to that IP address get picked up by all of the devices in the subnet.
— Implementation point
When you plan the address scope for each of your subnets you need to add a count of two more addresses — the Network ID and the Broadcast ID — to the range.
The subnetting system has one more address element, which is the “subnet mask.” This divides the IP address for the subnet into a network element and a host element. There is no fixed point for the division between the network and host sections of the address. The length of each portion is indicated by the subnet mask.
— Implementation point
You do not have to make the address space for each sub-network the same size. So, you should calculate the address requirements of each sub-network individually.
The next section of this guide will explain this issue in more detail.
The subnet mask
The IP subnet mask will give you the Network ID for any given subnet. If you take the IP address of a device within the subnet and apply the subnet mask to it with Boolean algebra, you end up with the Network ID. Remember that the Network ID is also the first address in the range allocated to the subnet.
This system of mathematical deduction allows network equipment to work out which network segment the message goes to, using the subnet mask. Understanding the subnetting system enables you to properly set up the subnets and allocate the right pool of addresses to each sub-network.
The subnet mask values will all be for a certain number of bits from the left, with the remaining positions filled in with zeros. The number of ones in the mask gives the mask length. The number of zeros in the mask gives the subnet length, which enables you to allocate unique IP addresses to the devices connected to the subnet. This second part of the address is sometimes referred to as “the host bits.” The longer the subnet length, the more address you get in the pool for that subnet. There is no correct length to mask, it is just a matter of how many host addresses you need in each subnet.
There are only a limited number of formats for a subnet mask because of the subnet requirement that all the ones in the IP address should be contiguous and start in the first position to the left. The location of the last “1” in the subnet mask identifies the mask octet. The mask can appear in any of the four octets in the subnet mask. The final number in the decimal version of the mask is always 255, 254, 252, 248, 240, 224, 192, or 128. That is because those numbers correspond to the binary octets 11111111, 11111110, 11111100, 11111000, 11110000, 11100000, 11000000, 10000000.
Here is a list of valid subnet masks:
| Subnet mask | Mask length | Mask octet | Subnet length | Number of addresses |
|---|---|---|---|---|
| 255.255.255.254 | 31 | 4 | 1 | 2 |
| 255.255.255.252 | 30 | 4 | 2 | 4 |
| 255.255.255.248 | 29 | 4 | 3 | 8 |
| 255.255.255.240 | 28 | 4 | 4 | 16 |
| 255.255.255.224 | 27 | 4 | 5 | 32 |
| 255.255.255.192 | 26 | 4 | 6 | 64 |
| 255.255.255.128 | 25 | 4 | 7 | 128 |
| 255.255.255.0 | 24 | 3 | 8 | 256 |
| 255.255.254.0 | 23 | 3 | 9 | 512 |
| 255.255.252.0 | 22 | 3 | 10 | 1024 |
| 255.255.248.0 | 21 | 3 | 11 | 2048 |
| 255.255.240.0 | 20 | 3 | 12 | 4096 |
| 255.255.224.0 | 19 | 3 | 13 | 8192 |
| 255.255.192.0 | 18 | 3 | 14 | 16384 |
| 255.255.128.0 | 17 | 3 | 15 | 32768 |
| 255.255.0.0 | 16 | 2 | 16 | 65536 |
| 255.254.0.0 | 15 | 2 | 17 | 131072 |
| 255.252.0.0 | 14 | 2 | 18 | 262144 |
| 255.248.0.0 | 13 | 2 | 19 | 524288 |
| 255.240.0.0 | 12 | 2 | 20 | 1048576 |
| 255.224.0.0 | 11 | 2 | 21 | 2097152 |
| 255.192.0.0 | 10 | 2 | 22 | 4194304 |
| 255.128.0.0 | 9 | 2 | 23 | 8388608 |
| 255.0.0.0 | 8 | 1 | 24 | 16777216 |
In each case shown in the table above, the number of host addresses available in the pool is two less than the total number of network addresses created by the subnet mask. This is because the first and last addresses in the range are reserved as the network address (Network ID) and the broadcast address (Broadcast ID).
Those mask values are the decimal representation of the actual binary mask. So, in reality, the mask 255.255.255.240 is 11111111.11111111.11111111.11110000.
Applying the mask to an IP address requires you to use Boolean algebra and work with the binary versions of the address and the mask, not the decimal version.
With the Boolean AND, each bit in the same position of the two numbers needs to be set in order for that bit to be set in the results. If either of those two bits is a zero, the result for that position in the number will be zero.
Given the network IP address 60.15.20.200 and the subnet mask of 255.255.255.240, you would AND the binary numbers for those addresses together with the following results:
      00111100.00001111.00010100.11001000

AND   11111111.11111111.11111111.11110000

=     00111100.00001111.00010100.11000000

=     60.15.20.192
In this example, the mask length is 28 and the subnet length is 4. When you AND this subnet mask to any binary address, the first 28 bits in the address will turn up in the results unaltered. The last four bits of the address will be rubbed out and replaced with zeros.
Once you have the Network ID for an address, it is easy to discover the Broadcast ID. As the subnet length is 4, this range of addresses has 16 members. So, you just need to add 16 to the IP address of the Network ID. This gives you 60.15.20.208. However, the Broadcast ID always has to be an odd number, and the Network ID is one of the set of 16 addresses, so deduct 1 and you know that the Broadcast ID for this subnet is 60.15.20.207. The devices within that subnet can be allocated addresses from 60.15.20.193 thru 60.15.20.206.
Subnet notation: CIDR
Another point you need to know about is the notation standard used for subnetting. The mask length can be appended to the Network ID to give you a quicker idea of the size of the subnet. This follows on from the ID after a slash. So, in our example, that subnet scope could be written as 60.15.20.192/28. Given that the whole length of any subnet mask is 32, the information that the mask length is 28 tells you that the subnet portion has 4 digits.
This notation system is part of a routing methodology called Classless Internet Domain Routing, which is abbreviated to CIDR and pronounced “cider.” The table below shows the number of IP addresses within each scope expressed by CIDR.
IPv4/CIDR Reference Chart
CIDR Notation | Subnet Mask | # of IP Addresses |
|---|---|---|
/0 | 0.0.0.0 | 4,294,967,296 |
/1 | 128.0.0.0 | 2,147,483,648 |
/2 | 192.0.0.0 | 1,073,741,824 |
/3 | 224.0.0.0 | 536,870,912 |
/4 | 240.0.0.0 | 268,435,456 |
/5 | 248.0.0.0 | 134,217,728 |
/6 | 252.0.0.0 | 67,108,864 |
/7 | 254.0.0.0 | 33,554,432 |
/8 | 255.0.0.016 | 777,216 |
/9 | 255.128.0.0 | 8,388,608 |
/10 | 255.192.0.0 | 4,194,304 |
/11 | 255.244.0.0 | 2,097,152 |
/12 | 255.240.0.0 | 1,048,576 |
/13 | 255.248.0.0 | 524,288 |
/14 | 255.252.0.0 | 262,144 |
/15 | 255.254.0.0 | 131,072 |
/16 | 255.255.0.0 | 65,536 |
/17 | 255.255.128.0 | 32,768 |
/18 | 255.255.192.0 | 16,384 |
/19 | 255.255.224.0 | 8,192 |
/20 | 255.255.240.0 | 4,096 |
/21 | 255.255.248.0 | 2,048 |
/22 | 255.255.252.0 | 1,024 |
/23 | 255.255.254.0 | 512 |
/24 | 255.255.255.0 | 256 |
/25 | 255.255.255.128 | 128 |
/26 | 255.255.255.192 | 64 |
/27 | 255.255.255.224 | 32 |
/28 | 255.255.255.240 | 16 |
/29 | 255.255.255.248 | 8 |
/30 | 255.255.255.252 | 4 |
/31 | 255.255.255.254 | 2 |
/32 | 255.255.255.255 | 1 |
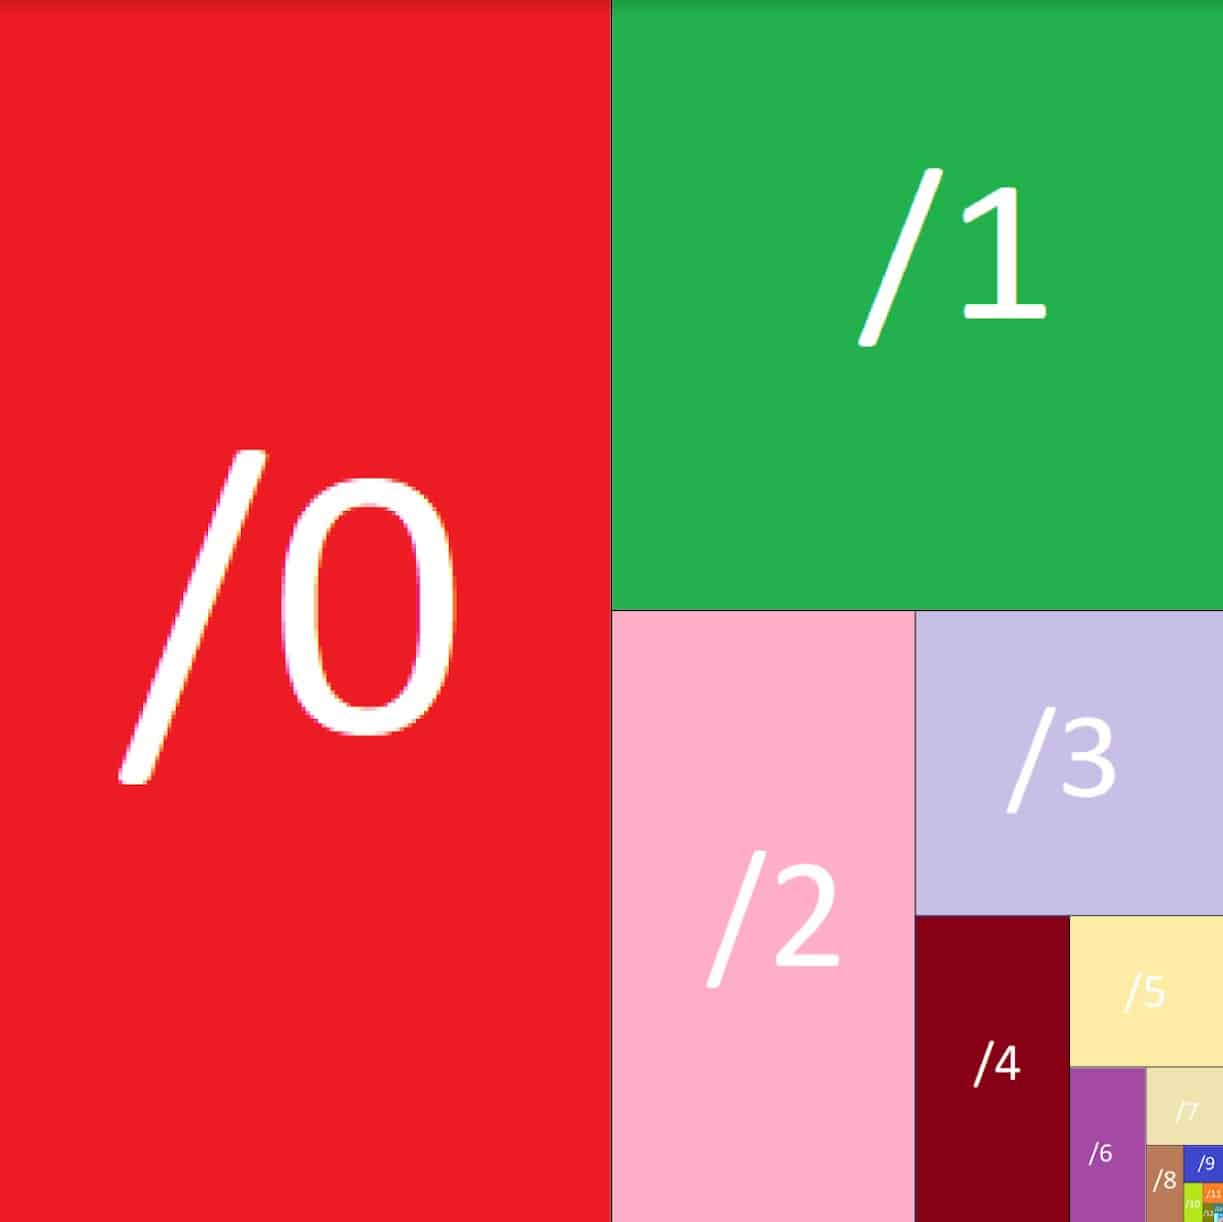
The graphic below shows the relative address space created by each CIDR value.
Subnetting shortcuts
You only really need to perform calculations on the segments including and after the change from ones to zeros in the subnet mask. In the above example, you would know, given that the first three segments of the address have a value of 255, that the Network ID is going to have the same first three segments of the given IP address. Continuing our example, you just need to copy down 60.15.20 and focus on the last segment of the address.
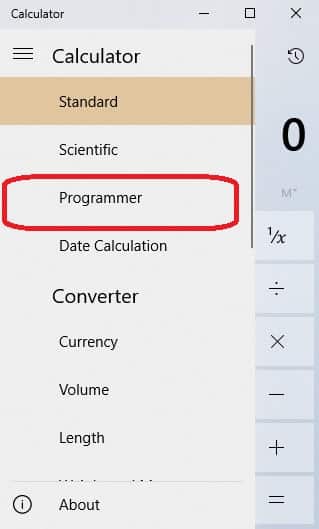
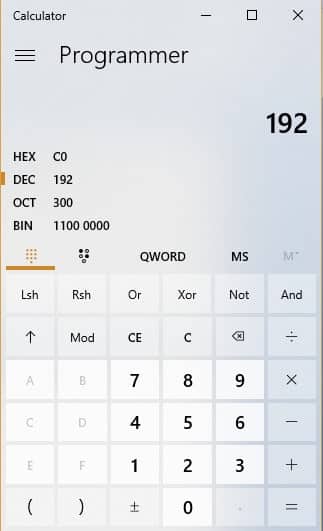
A programmer’s calculator can help you work out binary numbers and it can also provide you with an AND function, so you don’t have to write out the calculation on paper. The regular calculator in Windows can provide this facility. You just need to click on the Hamburger menu at the top left and select Programmer from the settings options.
In this mode, you can choose to perform AND operations on either binary or decimal numbers. The results of the calculations are shown in both formats.
Variable-length subnet masking
The tutorial on subnetting in this guide is based on CIDR, which enables a great deal of flexibility in the size of the address pools you assign to each subnet. In fact, you don’t have to limit your system to the use of just one subnet mask. You can assign different sized address pools to each subnet. This is known as “variable-length subnet masking” (VLSM). Class-based subnetting reserves sections of the entire address space for separate classes, with each class having a default subnet mask. There are no such fixed points with VLSM.
Remember that subnet addressing is a function of routing. Therefore, if you want to use variable-length subnet masking, you need to be sure that your network equipment can cope with the methodology. Most network devices are equipped to manage a range of routing protocols. Fortunately, most of those routing networking systems can cope with VLSM.
Related post: Variable Length Subnet Mark Calculator
Specifically, you can use VLSM with the Routing Information Protocol v2 (RIPv2), Integrated Intermediate System to Integrated System protocol (IS-IS), the Enhanced Interior Gateway Routing Protocol (EIGRP) and Open Shortest Path First (OSPF), and the Border Gateway Protocol(BGP) can all cope with VLSM. Just about all routers are compatible with the RIPv1 system, and may actually use that protocol as the default setting. You need to make sure to change that preference because RIPv1 can’t cope with VLSM.
— Implementation point
When you calculate the address ranges for each of your sub-networks, you need to pick the subnet mask that gives you enough hosts in that sub-network. So, you need to round up the allocation of network addresses to the next possible block size. For example, if you have sub-networks that contain 67, 18, and 45 devices, first of all you have to add two addresses to each section for the Network ID and the Broadcast ID. So you need address ranges that contain 69, 20, and 47 addresses.
Looking at the table of available subnet starting points above, you can see that although you can have address spaces of different sizes, there are fixed points at which an address range can start. You can’t have an address range of 69, so you have to round up and allocate that sub-network 128 addresses. The sub-network that needs 20 IP addresses will get an allocation of 32 and the sub-network that needs 47 addresses will get 64.
Therefore, you need to work with a subnet allocation of 128+32+64, which works out at 224. Although this strategy creates gaps in the address space, it is more efficient than the fixed-length method of subnetting which would have required each sub-networks to have the same size of address space. VLSM allows a much larger number of subnets.
When calculating your address starting point, you will have to round up again because there is no subnetting address range that gives you 224 IP addresses. The next point up will give you 256 addresses. This is a starting address of 255.255.255.0.
Your first sub-network will have an address of 255.255.255.0. The remaining space in the address range is needed for that first sub-network and the other two sub-networks as well. So, you will be dividing up the address range twice more. This is why variable-length subnet masking is sometimes referred to as “subnetting a subnet.”
Refer to the table above again. The next possible subnet starting point is 255.255.255.128. So, the address range for your largest sub-network will fit into the range between 255.255.255.0 and 255.255.255.127. The Network ID for that sub-network will be 255.255.255.0 and the Broadcast ID will be 255.255.255.127. There are 126 IP addresses available within that range. You need 67 addresses, so there will be 59 addresses spare in that scope. That gives you a lot of room to add new devices into that sub-network.
The address 255.255.255.128 will be the Network ID for your next sub-network. You need 45 addresses for this network, but you have to allocate a range of 64. The Network ID and the Broadcast ID takes up two of that allocation, so you will address 45 devices and then have 17 spare IP addresses. The Broadcast ID for that sub-network will be 255.255.255.191.
The Network ID for your last sub-network will be 255.255.255.192. This sub-network contains 18 devices and you also need a Network ID and a Broadcast ID, so this address space will contain 32 addresses, leaving 12 spare IP addresses. The Broadcast ID for this sub-network will be 255.255.255.223. This leaves address spaces for new sub-networks between 255.255.255.224 and 255.255.255.253.
See also: VLSM Tutorial
The Best Subnet Calculators
As pointed out above, the standard Windows calculator can help you work out subnet address pool membership. Some handy calculators specifically designed for subnetting are also worth a try. Many of these subnet calculators are available online and so work no matter which operating system you have.
Our methodology for selecting a subnet calculator
We reviewed the market for subnet calculators and analyzed the options based on the following criteria:
- A quick command-line utility or an easy-to-use graphical interface
- Straightforward procedures to get results
- An option to save results to file
- A way to convert between CIDR notation and a full binary address
- Options for Windows, macOS, and Linux
- A free tool that is easy to download and install
- A small program that doesn’t use much processing power
Here is our list of the best free subnet calculators:
- Tech-FAQ Subnet Calculator – a free utility that runs on Windows
- Subnet Ninja – a free online calculator
- Spiceworks Subnet Calculator – a free online tool
- The IP Subnet Calculator – another free online tool
- Subnet Calc – free and written for Macs
- VLSM (CIDR) Subnet Calculator – a free online calculator specializing in variable-length subnets
- Ipcalc – online or can be installed on Linux
- Sipcalc – command-line utility for Linux
- IP Subnet Calculator – a tool for Windows and Linux
Master IP Subnetting
Subnetting is not so difficult as long as you use a specialized calculator and implement CIDR instead of class-based IP routing.
If the complexities of allocating ranges for each sub-network and subnetting a network put you off splitting up your network, you should now have the confidence to give the strategy deeper consideration.
The ability to calculate subnet scopes is an essential part of any network engineering certification. If you hope to become a Cisco Certified Entry Networking Technician or a Cisco Certified Network Associate, you will need subnetting skills under your belt. You won’t be able to pass your CCENT 100-101 or CCNA 200-120 exams without mastering these techniques.
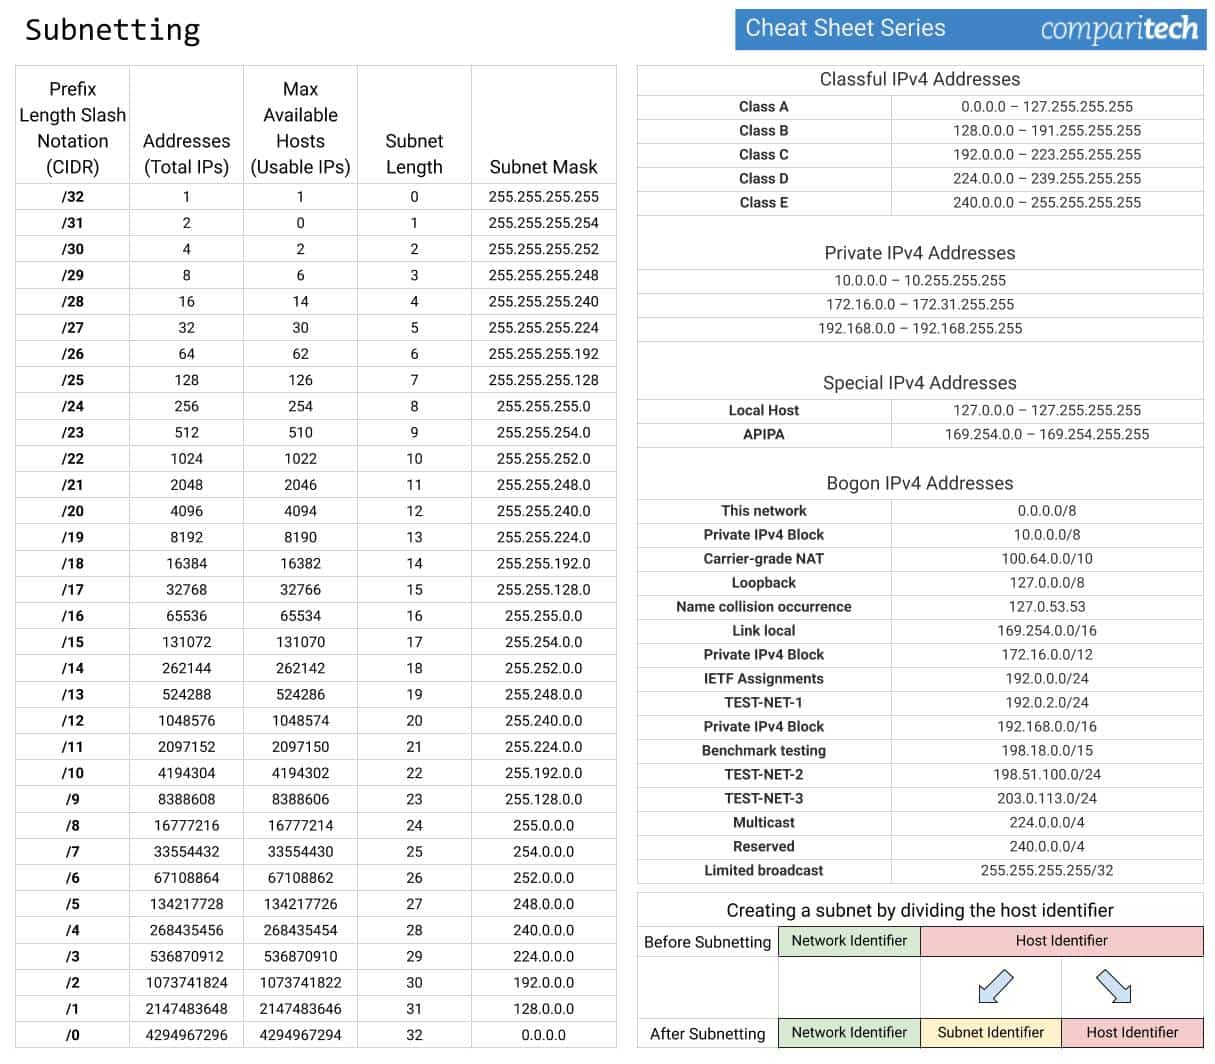
Subnetting Cheat Sheet
View or Download the Cheat Sheet JPG image
Right-click on the image below to save the JPG file (1215 width x 1064 height in pixels), or click here to open it in a new browser tab. Once the image opens in a new window, you may need to click on the image to zoom in and view the full-sized JPG image.
View or Download the cheat sheet PDF file
Download the cheat sheet PDF file here. When it opens in a new browser tab, simply right click on the PDF and navigate to the download menu.
Subnetting FAQs
What kind of networks are prime candidates for subnetting?
Subnetting is suitable for large LANs. The grouping of devices for the purpose of making address allocation more manageable would be a waste of time on a small network.
How do you determine whether two addresses are in the same subnet?
Get the subnet mask for the first IP addresses, convert both to binary and then perform an AND on the pair. Do the same for the second IP address and its subnet mask. If the result of both calculations results in the same number, the two addresses are in the same subnet.
What is an IP class?
The IP classes are labeled A, B, C, D, and E. These are used for “classful” addressing. This system is no longer used, since the introduction of the “classless inter-domain routing.” The class is determined by the value of the first octet in an address. Classes A, B, and C can be used for host addresses, class D is for multicasting, and class E is reserved for experimental purposes.
How do you convert binary notation to dotted decimal notation?
An IP address represented in binary should have 32 digits. Break the long number up into 4 sections of 8 digits each. The easiest way to convert each chunk into a decimal figure is to use a programmer’s calculator, such as the one that is available in Windows 10. Otherwise, it is necessary to multiply each digit in the 8-digit chunk by 2 to the power of its position in the number. In this method the left-most digit is in position 7 and the right-most is in position 0. Add together the results of each positional calculation to get the digital number for the 8-bit section. This will create four decimal digits. Write them down in a row, separated by dots to get the address into dotted decimal notation.




try Flex Subnetting (Google Chrome extension), it should be in the list.
1. work in any platforms that support Chrome extension
2. no installation
3. intuitive ui for splitting and merging subnets (vlsm)
secondly, not all tools in your list are still available.