CPU usage refers to the amount of processing power a computer’s central processing unit (CPU) is currently using
Your computer constantly runs numerous background processes, which can significantly impact its performance. These processes, while essential for various system functions, often consume substantial processing power, leading to high CPU usage. When this occurs, it typically means that the computer is handling multiple tasks simultaneously or that a specific application or process is demanding an excessive amount of resources.
This can result in noticeable performance issues, such as slower response times, lag, or even system crashes. To maintain optimal performance, it’s essential to ensure that your CPU operates efficiently. Monitoring CPU usage is a key step in identifying and resolving performance bottlenecks. By keeping track of how much of the CPU’s capacity is being utilized, you can pinpoint whether hardware or software issues are affecting system performance.
CPU usage is expressed as a percentage of the total processing power available. For instance, if usage reaches 100%, the CPU is operating at its maximum limit, attempting to process more tasks than it can handle. This can lead to performance slowdowns, system instability, and even physical problems like overheating, which may shorten the lifespan of your hardware. Consistently monitoring and promptly resolving high CPU usage can help avoid these problems and keep your computer operating efficiently and dependably.
There are several ways to check the current CPU usage in your Windows computer:
- Task Manager: Press the “Ctrl + Shift + Esc” keys on your keyboard to open the Task Manager. The CPU usage can be found in the “Performance” tab, under the “CPU” section.
- System Tray: Right-click on the taskbar and select “Task Manager.” The CPU usage can be found in the “Performance” tab, under the “CPU” section.
- Command Prompt: Open the Command Prompt (press the “Windows + R” keys and type “cmd”). Type “wmic cpu get loadpercentage” and press Enter. This will show the current CPU usage as a percentage.
- PowerShell: Open the PowerShell (press the “Windows + X” keys and select “Windows PowerShell”). Type “Get-Counter -Counter “\Processor(_Total)% Processor Time” -SampleInterval 1 -MaxSamples 5″ and press Enter. This will show the current CPU usage as a percentage.
- Third-Party Software: There are also many third-party software applications available that can monitor CPU usage and provide additional information such as usage history and alerts when usage exceeds a certain threshold
Fortunately, it is quite easy to fix CPU usage issues, especially on your Windows computer. Lowering CPU usage is the process of reducing the amount of computer processing power that a system or application is using. In this article, we will show you various possible ways and methods that you can use to lower the CPU usage of your computer.
Restart your computer
Computer restart solves many underlying problems. A restart does to a computer what taking a nap does to the human body. Computer restart or reboot remains one of the easiest ways to lower CPU usage in Windows. When there’s a noticeable slow down, a background task or process is not functioning properly, CPU load or memory consumption is high, or something else entirely, this is generally the first step you should take. You can simply get rid of it by rebooting your computer.
Rebooting clears various caches, stops running processes and allows certain background updates/patches to fully install. You can restart your computer directly from the Start Menu, similar to how you would do it normally. Once restarted, any background process which was hogging up the processor of your computer will be terminated and the CPU usage graph will fall drastically. However, if the problem persists, or your computer is always running at a high CPU load, then there may be an underlying issue that needs further investigation.
Manually terminate/restart background processes
It may be that background processes are eating up processing power, and closing them could help the issue. Windows allows you to manually end as well as restart background processes quite easily. This can be quite great for completely getting rid of a certain background process, as well as for restarting any important background processes which you think are not performing as they should. Here are some of the steps you can take:
- Close unnecessary programs and browser tabs: Running too many programs or tabs at the same time can cause your CPU to work harder than necessary. Closing the ones you are not currently using can help lower CPU usage.
- Disable background programs: Some programs run in the background and consume CPU resources even when you are not using them. You can disable these programs from starting automatically to lower CPU usage.
In Windows, you can end or restart background processes using the Task Manager by following the steps below:
- Press the “Ctrl,” “Shift” and “Esc” keys on your keyboard to open the Task Manager.
- In the Task Manager, click on the “Details” tab to view a list of all running processes.
- To end a process, right-click on the process you want to end and select “End task.”
- To restart a process, you’ll need to end the process first and then open it again. Right-click on the process you want to restart, select “End task,” and then open the application or program associated with that process again.
Alternatively, you can also use the command prompt to end or restart background processes. To end a process, you can use the “taskkill” command followed by the process ID or process name. For example: “taskkill /pid 1234” or “taskkill /im notepad.exe”. To restart a process, you can use the “start” command followed by the process name. For example: “start notepad.exe” Please be cautious when using the Task Manager or Command Prompt to end or restart background processes, as this can cause unexpected problems with your system. It’s best to make sure you know what you are doing before proceeding.
Schedule regular maintenance
Regularly running maintenance tasks such as disk cleanup, disk defragmentation, and error checking can help improve the performance of a computer and lower CPU usage. This is done by removing unnecessary files and other data that may be used by malware and organizing data on the hard drive. Follow the steps below to run Disk Cleanup on Windows:
- Click the Start button and type “Disk Cleanup” in the search bar.
- Click on the Disk Cleanup program that appears in the search results.
- Select the drive you want to clean up and click OK.
- Select the types of files you want to delete and click OK.
Follow the steps below to run Disk Defragmentation on Windows:
- Click the Start button and type “Defragment” in the search bar.
- Click on the “Defragment and Optimize Drives” program that appears in the search results.
- Select the drive you want to defragment and click the “Optimize” button.
Follow the steps below to run Error Checking on Windows:
- Right-click on the drive you want to check for errors and select “Properties”.
- Click on the “Tools” tab.
- Under “Error Checking”, click the “Check” button.
- Follow the prompts to complete the error check
Scan for malware
Sometimes, high CPU usage may be a sign of malware infection. Running a virus scan can help identify and remove any malicious software that may be causing the problem. In case of high CPU usage, scanning your computer for potential malware infection is highly important if you want to lower CPU usage. You can use the Windows Defender to do a full scan of your computer which will scan all files and programs for any potential malware or infected files which will be automatically removed for potentially lowering your computer’s CPU usage.
You can run a virus scan with Windows Defender in Windows 10 by following these steps:
- Click the Windows icon in the bottom-left corner of the screen, and then click the “Settings” (gear) icon.
- In the Settings window, click “Update & Security.”
- In the Update & Security window, click “Windows Security” on the left sidebar.
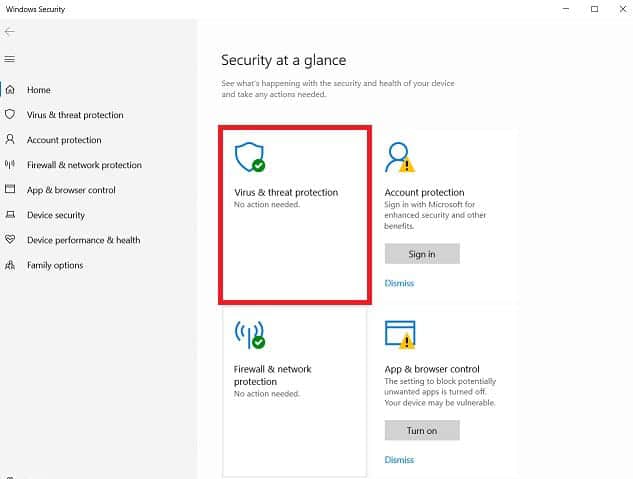
- In the Windows Security window, click “Virus & threat protection.”
- To run a quick scan, click the “Scan now” button.
- To run a full scan, click the “Advanced scan” link, then select “Full scan” and click “Scan now.”
- Wait for the scan to complete. Windows Defender will display the results of the scan, including any threats that were detected and removed.
Use Third-Party Programs
Apart from using in-built Windows tools for lowering CPU usage, there are third-party applications that provide much more detailed information regarding all the background processes running on your computer and the CPU usage regarding them. Two such great third-party programs that you may wish to consider include CPU-Z and Process Monitor. Apart from being great hardware monitoring tools, these programs also offer a few CPU performance optimization options which can further lower your CPU usage.
Check Windows power settings
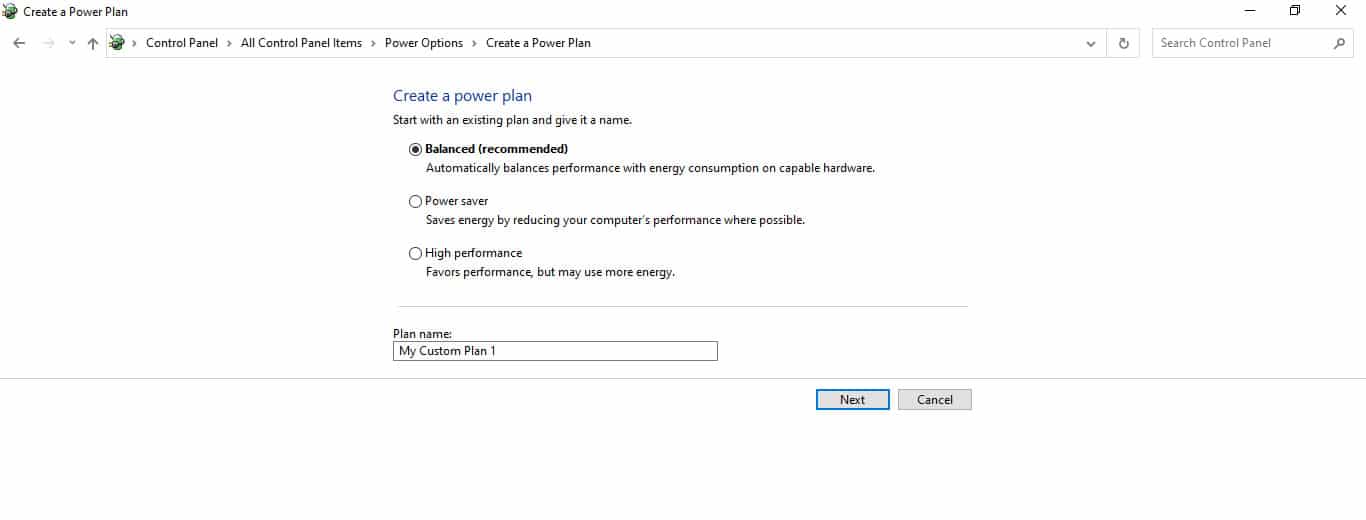
Windows power settings can have an impact on CPU usage. Different power plans, such as “High Performance” and “Power Saver,” can affect how much power is allocated to the CPU and other components of a computer.
The following are common powers settings and their impact on CPU usage:
- High Performance: Setting the power plan to “High Performance” will allocate more power to the CPU and other components, which can lead to higher CPU usage. This is useful when running demanding tasks that require a lot of processing power.
- Power saver: Setting the power plan to “Power Saver” will allocate less power to the CPU and other components, which can lead to lower CPU usage. This can help to conserve battery life on laptops or reduce power consumption on desktops. However, it can also cause performance issues if the tasks are CPU intensive.
- Balanced: This setting is a balance between performance and power conservation. It’s a good setting for general usage.
- Custom settings: The user can customize the power plan by choosing which components get more power and which get less.
It’s good to adjust the power settings according to the task you are performing. You may want to use the High-Performance setting while gaming or working on a video project, and switch to Power Saver or Balanced when you are just doing normal office work. For example, if you are running a resource-intensive program like a video game or video editing software, you may want to use the “High Performance” power plan to ensure that the CPU has enough power to handle the task.
Update drivers and OS
Outdated drivers and OS can have a significant impact on CPU usage. Drivers are software that allows the operating system to communicate with the hardware components of a computer, such as the graphics card, network card, and sound card. If the drivers are out of date, the operating system may struggle to communicate with the hardware, which can lead to high CPU usage. Outdated drivers may cause compatibility issues with the current version of the operating system, causing conflicts and high CPU usage as the system tries to work around the incompatibilities.
It is important to keep the drivers on your computer updated to ensure that they are compatible with the operating system and to take advantage of performance optimizations and bug fixes. This can help to reduce CPU usage and improve the overall performance of your computer.
Add more RAM
RAM plays a crucial role in determining CPU usage on a computer. RAM is used by the computer to store data that is frequently accessed by the CPU. When the CPU needs data, it first looks in the RAM before going to slower storage devices such as the hard drive. If your computer is low on memory it may use the CPU to compensate for the lack of memory, adding more RAM can help lower the CPU usage.
It’s important to have enough RAM for the tasks you are performing to reduce CPU usage. However, it’s also important to not have too much RAM, as it can cause high CPU usage as well. It’s best to check the recommended RAM for your computer’s model and operating system and purchase accordingly.
Here are some important tips on adding more RAM:
- Insufficient RAM: If the computer does not have enough RAM to store all the data that the CPU needs to access, the CPU will have to retrieve the data from the hard drive. This process is slower than retrieving data from RAM and can cause high CPU usage as the CPU waits for the data to be retrieved.
- Excessive RAM: Having too much RAM can also cause high CPU usage. The CPU may have to constantly check and manage the RAM, which can consume a significant amount of CPU resources.
- RAM and Swap file: When the RAM is full and the CPU needs more memory, it will start using the swap file (also called virtual memory) on the hard drive. This can cause a significant slowdown as the hard drive is slower than RAM.
- Compatibility issues: If the RAM is not compatible with the motherboard or the CPU, it can cause high CPU usage as the computer struggles to communicate with the RAM.
- Adequate RAM: Having enough RAM for the tasks you are performing can help the CPU to access the data quickly, and therefore, reduce the CPU usage.


