Ubiquitous encryption is a good thing if you’re shopping on Amazon, but it’s a real pain when you’re trying to administer a network. Here’s how I decrypt SSL with Wireshark.
In this post, we cover:
- What are Wireshark and SSL Encryption?
- Using a pre-master secret key to decrypt SSL and TLS
- Using an RSA key to decrypt SSL
- How Wireshark makes decrypting SSL traffic easy
- Wireshark Decrypt SSL FAQs
What is Wireshark?
Wireshark is a free and open-source network protocol analyzer, widely used for network troubleshooting, analysis, software and communications protocol development, and education. It allows users to capture and interactively browse the traffic running on a computer network.
Key Features:
- Packet Capture: Wireshark can capture live network data from a wide range of network interfaces, including Ethernet, Wi-Fi, and even Bluetooth in some cases.
- Protocol Analysis: It provides detailed inspection of network protocols, supporting over 2,000 protocols such as TCP, UDP, HTTP, DNS, and more.
- Deep Inspection: Wireshark allows users to drill down into the contents of network packets, examining headers, payloads, and metadata.
- Filters: It provides powerful filtering capabilities, both for capturing traffic and for analyzing captured traffic. Filters can be applied based on various packet attributes like IP addresses, ports, protocol types, etc.
- Visualization: It has visualization tools, such as packet graphs and flow diagrams, to help users better understand traffic patterns and communication between devices.
- Exporting Data: Users can export packet data in various formats for further analysis, such as CSV, XML, or plain text.
Wireshark is available for multiple operating systems, including Windows, macOS, and Linux. It’s a powerful tool, but using it effectively requires understanding networking concepts and being familiar with network protocols and packet structures.
You can download Wireshark for free.
What is SSL?
SSL stands for Secure Sockets Layer, a cryptographic protocol designed to provide secure communication over a computer network, primarily the Internet. SSL was the standard security technology for establishing an encrypted link between a web server and a web browser (or other client) until it was superseded by TLS (Transport Layer Security). Although SSL is considered deprecated today, the term is still widely used to refer to the modern encryption protocols that are based on the same concepts, often generically referred to as SSL/TLS.
SSL uses symmetric encryption to protect the data being transmitted between a client and a server. This means the data is encrypted before transmission, and only the intended recipient (with the correct key) can decrypt it. It also uses asymmetric encryption for securely exchanging the keys that will be used for symmetric encryption. This typically involves public and private keys.
SSL ensures the authenticity of the communication parties. When a client connects to a server using SSL, the server provides a digital certificate that verifies its identity. This prevents man-in-the-middle attacks, where a malicious actor might try to intercept or impersonate one of the parties in the communication. A certificate authority (CA) issues these certificates, and they contain the server’s public key and information about the server’s identity.
How SSL/TLS Works
- Before the connection: The client (e.g., a web browser) wants to establish a secure connection to a server. The client sends a request, and the server responds by sending its digital certificate.
- Verification: The client verifies the server’s certificate against trusted Certificate Authorities (CAs) that it already knows. If the certificate is valid, the client proceeds.
- Key Exchange: The client and server then agree on an encryption method and exchange keys. A session key is generated, which will be used for the symmetric encryption of the actual data.
- Encrypted Communication: Once the handshake is complete, the server and client can securely exchange data, encrypted with the session key.
See also: Wireshark Alternatives for packet sniffing
Download the Wireshark Guide
Using a pre-master secret key to decrypt SSL and TLS
Using a pre-master secret key to decrypt SSL in Wireshark is the recommended method.
A pre-master secret key is generated by the client and used by the server to derive a master key that encrypts the session traffic. It’s the current standard in cryptography and is usually implemented via Diffie-Hellman.
Your browser can be made to log the pre-master secret key, which Wireshark uses to decrypt SSL and TLS sessions.
Here are the steps to decrypting SSL and TLS with a pre-master secret key:
- Set a Windows environment variable
- Set a Linux or Mac environment variable
- Launch your browser and check for the log file
- Configure Wireshark to decrypt SSL
- Capture and decrypt the session keys
When you’re finished, you’ll be able to decrypt SSL and TLS sessions in Wireshark without needing access to the target server.
Set a Windows environment variable
In Windows systems, you’ll need to set an environment variable using the Advanced system settings utility. This variable, named SSLKEYLOGFILE, contains a path where the pre-master secret keys are stored.
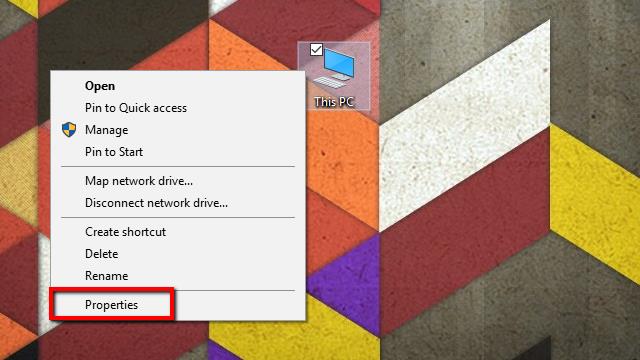
- Start by right-clicking on My Computer, and selecting Properties from the menu. The System menu will open.
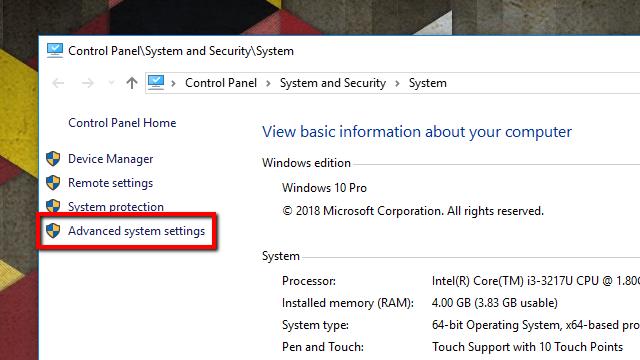
- Next, click Advanced system settings on the list to the left. The System Properties window will open.
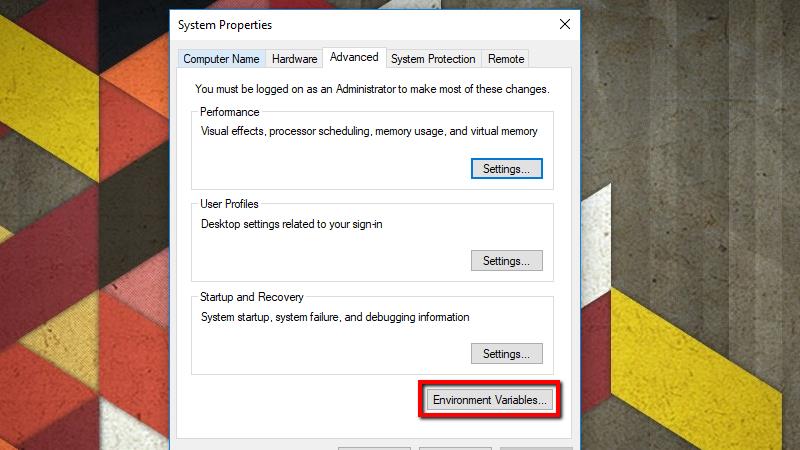
- On the Advanced tab, click the Environment Variables button.
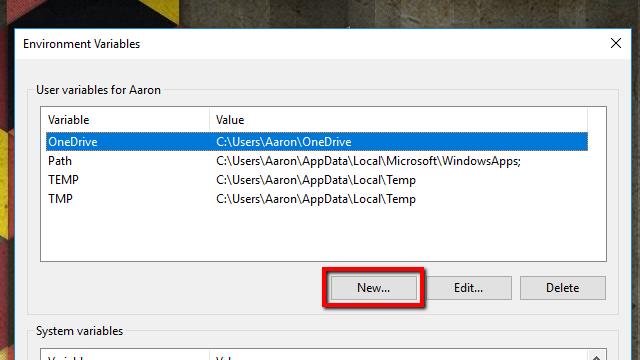
- Click the New… button under User variables. You can also create the variable under System variables if you’d like to log SSL keys for every user on the system, but I prefer to keep it confined to my profile.

- Under Variable name, type the following:
SSLKEYLOGFILE
In the Variable value field, type a path to the log file. You can also click the Browse file… button and specify the path using the file picker.
As a note, if you’re creating this as a system-wide environment variable, you’ll need to use appropriate wildcards or store the file in a place accessible by all users. For instance, you might choose %USERPROFILE%\App Data\ssl-keys.log or C:\ssl-keys.log. - Once you’ve finished, click OK and move to the next set of steps.
Set a Linux or Mac environment variable
In Linux and Mac, you’ll need to set the SSLKEYLOGFILE environment variable using nano. In Linux, the variable is stored in ~/.bashrc. On the Mac, you’ll create the variable in the file ~/.MacOSX/environment
1. Open a terminal and use this command in Linux:
nano ~/.bashrc
2. Open Launchpad, click Other, and launch a terminal to run this command in Mac OSX:
nano ~/.bash_profile
Note: The following steps are the same for both operating systems.
- At the end of the file, add this line:
export SSLKEYLOGFILE=~/.ssl-key.log
- Press Ctrl+X, Y to save your changes.
- Close the terminal window and open another to set the variable, then type the following to confirm it’s been set successfully:
echo $SSLKEYLOGFILE
After you execute the command, you should see output similar to the image above. /Users/comparitech/.ssl-key.log is the full path to my SSL pre-master key log. Note: You’ll want to make a note of yours, which will be different, to enter in Wireshark.
Now that the variable has been set, you can move on to the next set of steps.
Launch your browser and check for the log file
- Before you launch Wireshark and configure it to decrypt SSL using a pre-master key, you should start your browser and confirm that the log file is being used.
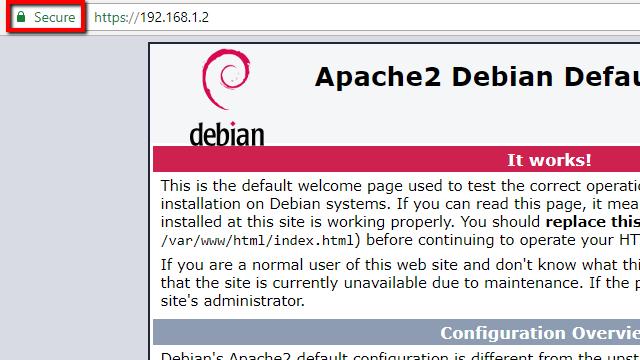
- In order to populate the log, it’s important that you visit a site that has SSL enabled. I’m using my own Apache server for testing, but any site will work. One of the biggest benefits of using a pre-master shared key is you don’t need access to the server to decrypt SSL.
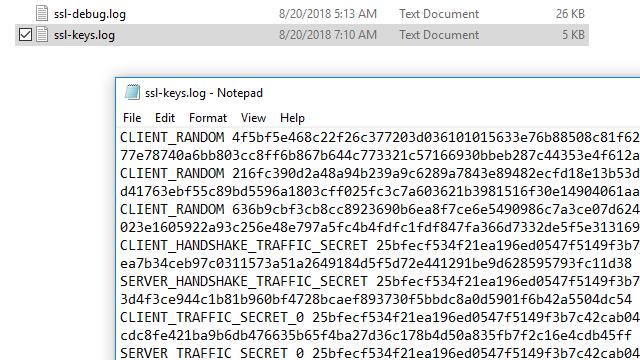
- After you’ve visited a SSL-enabled website, check the file for data. In Windows, you can use Notepad. In Linux or Mac, use the following command:
cat ~/.ssl-log.key
On any operating system, your file should look like mine does above. After you’ve confirmed that your browser is logging pre-master keys in the location you selected, you can configure Wireshark to use those keys to decrypt SSL.
Configure Wireshark to decrypt SSL
Once your browser is logging pre-master keys, it’s time to configure Wireshark to use those logs to decrypt SSL.
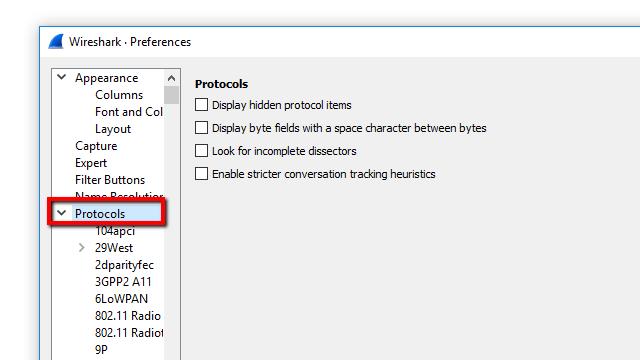
- Open Wireshark and click Edit, then Preferences. The Preferences dialog will open, and on the left, you’ll see a list of items. Expand Protocols, scroll down, then click SSL.

- In the list of options for the SSL protocol, you’ll see an entry for (Pre)-Master-Secret log filename. Browse to the log file you set up in the previous step, or just paste the path.
- When you’ve finished setting the (Pre)-Master-Secret log filename, click OK and return to Wireshark. You’re ready to move on.
Related post: How to use Wireshark
Capture the session and decrypt SSL
The final step is to capture a test session and make sure that Wireshark decrypts SSL successfully.
- Start an unfiltered capture session, minimize it, and open your browser.
- Visit a secure site in order to generate data, and optionally set a display filter of ‘ssl’ to minimize the session noise.
- Click on any frame containing encrypted data.
In my case, I’ll select one that contains HTTP traffic with text/HTML encoding, since I’d like to see the source code the web server is sending to my browser. But any encrypted transmissions that use a pre-master secret or private key will work with this method. That includes all data utilizing Perfect Forward Encryption (PFE) through Diffie-Hellman or comparable key exchanges.
Once you’ve selected an encrypted data frame, look at the Packet byte view, and specifically the tabs underneath the view. You should see an entry for Decrypted SSL data, among others.
You’ll notice that my session still looks like it’s full of garbage, and no HTML is visible. That’s because my web server (and most Apache servers) use GZIP compression by default.
When you click the Uncompressed entity body tab, which only shows up in this case with SSL decryption enabled, you can view the source code of the site. For instance, here’s the title element of the default Apache page in plaintext.
Using an RSA key to decrypt SSL
You might have noticed earlier that Wireshark has a field that allows you to upload your RSA keys and use them to decrypt SSL. In practice, RSA key decryption is deprecated.
The reason decrypting SSL with an RSA key isn’t commonly used anymore is that Perfect Forward Encryption (PFE) has made it obsolete. Sessions negotiated with Diffie-Hellman don’t use the RSA key directly; instead they generate a one-time key, stored only in RAM, that is encrypted using the key on disk.
If you were previously using an RSA key to decode traffic, and it stopped working, you can confirm that the target machine is using Diffie-Hellman exchanges by enabling SSL logging.
To turn on logging, click Edit from the toolbar menu and select Preferences. Expand the Protocols menu item on the left and scroll down to SSL. From here, you can click the Browse button and set the location of your SSL log.
Once the location is set, all SSL interactions will be logged in the specified file.
Capture a session with your SSL-enabled host, then check the logs. Specifically, you should scroll until you find the frame that the TLS handshake was negotiated on. It’s likely that you’ll see a telltale DHE entry in the cipher string.
That means Diffie-Hellman key exchanges are enabled. In my case, Apache is specifically using Diffie-Hellman with elliptic-curve keys, which is denoted by the string ECDHE.
Scroll a little further and you’re likely to see that the master secret cannot be found.
If your logs look like that, and you can’t decrypt data using an RSA key, you have no choice but to switch over to the pre-master secret method above.
Since PFE is becoming standard practice, with TLSv1.3 likely forcing the issue, simple RSA key decryption is deprecated and should not be used.
Wireshark makes decrypting SSL traffic easy
I really like the way Wireshark handles the SSL decryption process. Cryptography is complicated, and the standards are constantly changing to be more secure. But once Wireshark and your environment are set up properly, all you have to do is change tabs to view decrypted data. It doesn’t get any easier than that.
Related Posts:
- Fix Common Wireshark Startup ” no interfaces found” Issue
- Wireshark Cheat Sheet
- How to run a remote packet capture with Wireshark and tcpdump
- Identify hardware with OUI lookup in Wireshark
Wireshark Decrypt SSL FAQs
How do I read TLS packets in Wireshark?
Follow these steps to read TLS packets in Wireshark:
- Start a packet capture session in Wireshark.
- In the top menu bar, click on Edit, and then select Preferences from the drop-down menu.
- In the Preferences window, expand the Protocols node in the left-hand menu tree.
- Click on SSL. The main panel of the window will show protocol settings.
- Enter a file name and select a location for SSL debug file.
- Click in RSA keys list and then select Edit and then New.
- Fill out the information fields in the pop-up window: IP address, Port, Protocol (which will be HTTPS), Key File, and Password. Press OK.
- Click OK in the Preferences screen.
The data field at the bottom of the main Wireshark page will show the decrypted contents of the packet.
How does a 2 way SSL handshake work?
The two-way SSL handshake authenticates both the server and the client. Here are the steps that are carried out in this process:
- Client hello: sent from the client to the server and includes its supported cipher suites and TLS version compatibilities.
- Server hello: sent from the server to the client in response. It contains a link to the server’s public certificate and a request for the same back from the client.
- The browser validates the server certificate and if all is OK, sends a link to its own certificate.
- The server checks out the client’s certificate. If all is OK, session establishment continues.
Is it possible to decrypt passively sniffed SSL/TLS traffic?
Yes. However, you will always need the RSA key in order to decrypt traffic. That could be acquired through legitimate methods and with permission or could be tricked out of the source of the traffic through a “man in the middle” strategy.





strange… Edit > Preferences > Protocols does not have an SSL option. it goes from SSH to SSyncP
If you have hard time looking for SSL in wireshark check for Protocols -> TLS there it is on version 4.4.3, and keep in mind to restart windows if you add new environmental variable
It seems that creating the ssl-keys.log doesn’t work if you use brave.
When I switched to chrome, it created the file immediately.
Jon , were you able to generate he sslkeylogfile..thanks
Thank you for a great tutorial, not just in terms of content but also presentation. Very easy to follow!
Hi,
IDK why, but my file from SSLKEYLOGFILE doesn’t populate 🙁 I’m using Win7 64 and tried both: Firefox and Chrome (also 64bit) with admin privileges, even tried to restart system and nothing… Tried simply with YouTube site (maybe I should clear cookies first to ensure browser will download everything again?) I thought browsers doesn’t support this functionality anymore, but this article is so fresh that problem must be on my computer. If you have some advices – I would love to hear 🙂
cheers,
Jon
You need to go back to FireFox version 68.1.1 or earlier. You are right, that they do not support that functionality anymore.
Start Firefox or Chrome from the same terminal.
For example:
Firefox &
Note: You must start the browser from the same command terminal because the session variable is set only on the terminal.
Environment variables in windows sometimes need restart.
Fantastic write up, Aaron. Great job!