
- Using a VPN allows you to appear to be located in a different country, letting you access geo-locked content on many streaming aps.
- Not all VPNs have an app for Firestick and many popular VPNs are detected and blocked by streaming services.
- We’ve tested over 78 VPNs to find which reliably work with Firestick to reliably stream from Netflix, Hulu, iPlayer and most other srevices.
- NordVPN is our top recommendation for Firestick. It has a simple-to-use Firestick app and works with most international streaming platforms.
The Amazon Fire TV Stick, Firestick, and Fire Cube transform any HDMI-equipped TV into a connected streaming hub. While these devices are great, their content is limited by where you are in the world. To get around this restriction, you need a VPN.
Utilizing a Virtual Private Network (VPN) lets you encrypt all your internet traffic and reroute it through a server of your choice, making it appear as if you’re located in a different country or region. This nifty trick lets you access geo-locked content and watch your favorite shows on popular streaming apps such as Netflix, Hulu, Amazon Prime Video, BBC iPlayer, HBO, and more. Plus, if you like to use Kodi on your Amazon Fire TV or Fire TV Stick, a VPN ensures your internet traffic remains private, shielding it from prying eyes of nosy internet service providers.
While Amazon Fire TV apps used to be fairly rare, plenty of VPN providers now have their own. However, if your VPN doesn’t have an app specifically designed for Firestick, don’t worry. We’ve got a workaround for you. Let’s dive in!
What is the best VPN for Firestick?
If you’ve not already purchased a VPN for streaming with Firestick, you’re going to want to make sure you choose one that is up to the job. For instance, you’ll need a service that’s quick enough for uninterrupted streaming, yet secure enough to prevent ISP throttling or other intrusions on your privacy.
We recommend NordVPN. Out of the dozens of VPN services we’ve tested, it’s one of the fastest, scores highly for privacy protection, and works with all Kodi add-ons. Not only that, but it also works with virtually every streaming service we’ve tested and is included in the Amazon app store.
If you are in a rush, check out our list of the best VPNs for Firestick below:
- NordVPN: Our first choice for Amazon Fire TV Stick users. Superb Firestick app, easy to use, strong on privacy, lots of advanced features. Works with most streaming platforms. Come with a risk-free money-back guarantee.
TIP In our testing we found that the cheapest NordVPN plan (Standard) works perfectly for Amazon Fire Stick. - Surfshark: The best budget VPN for Firestick. Fast, reliable, and versatile. No connection or bandwidth limits. Perfect to share your account with friends and family.
- IPVanish: Lightweight and easy to navigate with a remote control. Good for Kodi users. Easy-to-use app for Firestick devices. Connect as many devices as you like. Strong streaming ability and a powerful set of security features.
- ExpressVPN: A solid all-rounder that is fast and secure. Works with a dozen Netflix regions. Apps for all devices, including Firestick.
- CyberGhost: Simple enough for complete beginners to use. Dedicated Firestick app and thousands of servers in 100+ countries (some of which are designed for streaming).
- ProtonVPN: A very speedy service that’s great for streaming and can even block ads automatically. Impressive set of security tools and a dedicated Firestick app.
- PureVPN: Quick and versatile VPN with its own Amazon Fire TV app. Works with most major streaming services and permits up to 10 simultaneous connections.
- PrivateVPN: Another budget-friendly option. A highly secure VPN that is great for streaming and torrenting. Works with over 20 Netflix regions and can even be used in places with extreme online censorship.
Many VPNs claim to work with Amazon Fire Stick but most (especially free VPNs) are often blocked.
We regularly test the top 70 VPNs with all major streaming sites and this list only includes VPNs which reliably unblock Amazon Fire Stick and offer a full money-back guarantee, allowing you to try them risk-free.
Best VPNs for Firestick – Our hands-on review
We’ve compared the most important features of the top VPNs here. Prefer to read the in-depth reviews? Start with NordVPN – our #1 choice for Firestick
| No value | NordVPN | Surfshark | IPVanish | ExpressVPN | CyberGhost | Proton VPN | PureVPN | PrivateVPN |
| Website | NordVPN.com | Surfshark.com | IPVanish.com | ExpressVPN.com | Cyberghost.com | ProtonVPN.com | PureVPN.com | PrivateVPN.com | Ranking for Firestick TV | 1 | 2 | 3 | 4 | 5 | 6 | 7 | 8 | Devices Supported | Windows, MacOS, iOS, Android, Linux | Windows, MacOS, iOS, Android, Linux, Amazon Fire TV, Apple TV | Windows, MacOS, iOS, Android | Windows, MacOS, iOS, Android, Linux, Smart TVs, Routers | Windows, MacOS, Linux, iOS, Android | Windows, Linux, MacOS, iOS, Android, Chromebook | Windows, MacOS, iOS, Android, Smart TVs, Chromebook, Routers | Windows, MacOS, iOS, Android, Amazon Fire TV | Popular Sites Unblocked | 95% | 88% | 85% | 86% | 85% | 87% | 80% | 85% | Simultaneous Connections | 10 | Unlimited | Unlimited | 8 | 7 | Free: 1, VPN Plus: 10 | 10 | 10 |
|---|---|---|---|---|---|---|---|---|
| Best deal (per month) | $3.09 Up to 77% off 2 year plans + 3 months free | $1.99 86% OFF + 3 months free | $6.49 Best MONTHLY deal | $4.99 SAVE: 61% + 4 months free on 2 year plans | $2.19 SAVE 83% on the 2 year plan + 2 months free! | $3.59 SAVE 64% on a 2-year plan | $1.99 85% off the 5-yr standard plan | $2.00 Save 85% on a one year plan + 24-months free |
How to install a VPN on Firestick
The NordVPN app is available on the Fire TV and Fire TV Stick’s default app store. If you can’t find it, you may be using a first-generation Firestick. These don’t support VPN connections, and unfortunately, there’s no way around it. Still, these models are around a decade old anyway, so if you have one, it’s long overdue for an upgrade.
Here’s how to install a VPN on Amazon Firestick or Fire TV:
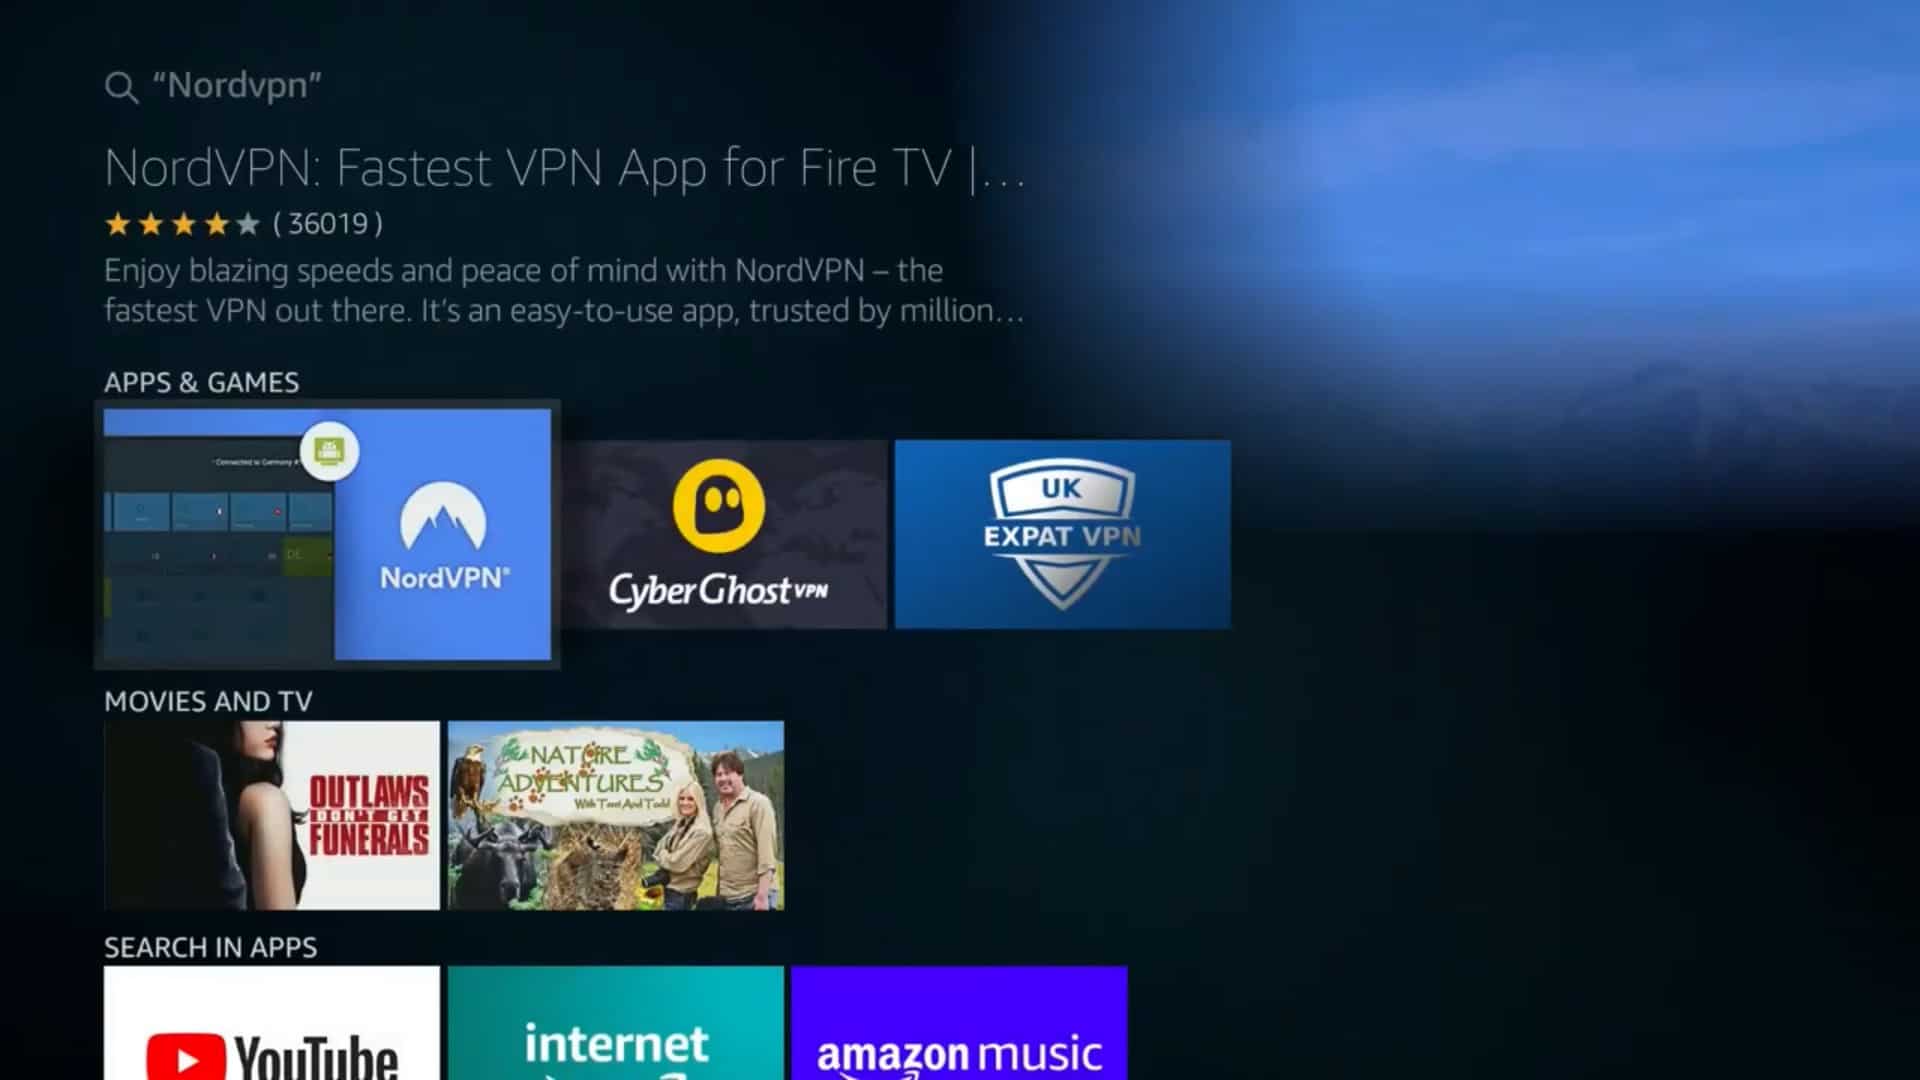
- Starting from the home screen, go to Apps > Categories > Utility or run a search for “VPN”

- Select NordVPN from the list

- Click the yellow button next to Get to download and install the app

- Once the app is installed, click the yellow button next to Open on the same page to launch NordVPN
- Enter your NordVPN account username and password and log in. This may be a bit slow with the remote control but you should only need to do it once.
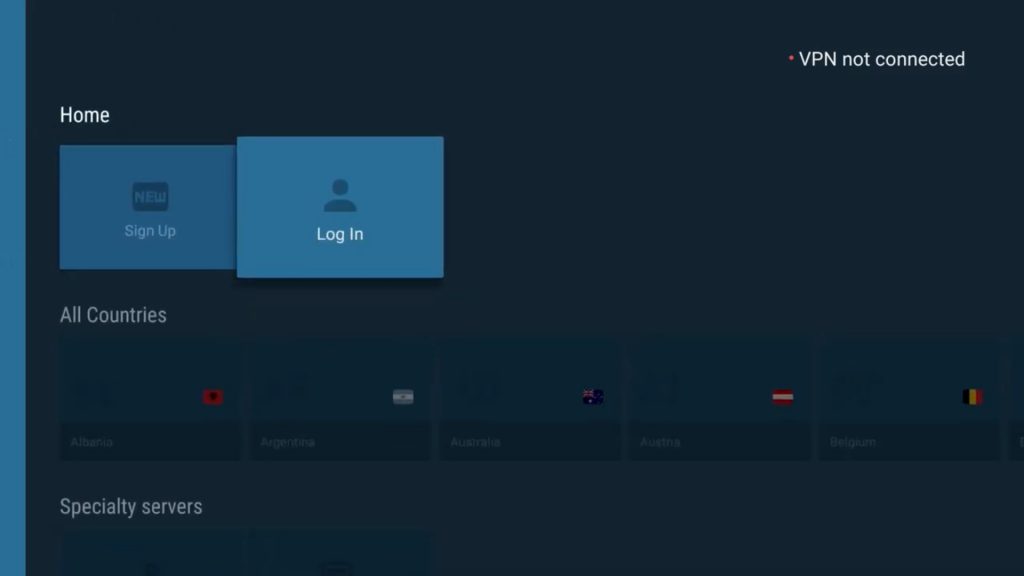
- Either click the Connect button to connect to the VPN right away, or select a specific server location to connect to.


And that’s it! Your connection will be established after a few moments. You can now leave the VPN app running in the background while you stream.
Although NordVPN is our favorite VPN for Firestick, Surfshark, IPVanish, ExpressVPN, CyberGhost, and a few other great VPNs now also have apps on the Fire TV app store. But what if the provider you want to use doesn’t have a dedicated Firestick app? Don’t worry, we’ll explain how to sideload VPNs on your Fire TV shortly.
If your VPN doesn’t have a Firestick app, use this workaround
There are several ways to protect your Amazon Fire TV with a VPN. The simplest way to install a service that’s not in the Amazon App Store is to sideload it. Here’s an example using NordVPN:
Note that NordVPN released a Fire TV app after we published this tutorial video, so users of that VPN should opt for the app available from Amazon. This video still applies to other VPN providers that don’t make Fire TV apps, though.
Important information: VPNs that you have side-loaded onto your Firestick will not automatically update. Instead, you’ll have to repeat the side-loading process every time, manually downloading and installing the latest version of the app. This is why we recommend side-loading only as a last resort — getting your VPN straight from the app store is easier, safer, and quicker.
Preparing your Amazon Fire TV or Fire TV Stick for sideloading
If you’re using a VPN app that isn’t listed on the Firestick’s default app store, we’ll show you a couple of other ways to get your favorite VPN on Firestick.
Before we begin, we need to allow the Fire TV to install apps from unknown sources.
1. Boot up your Fire TV and go to Settings > Device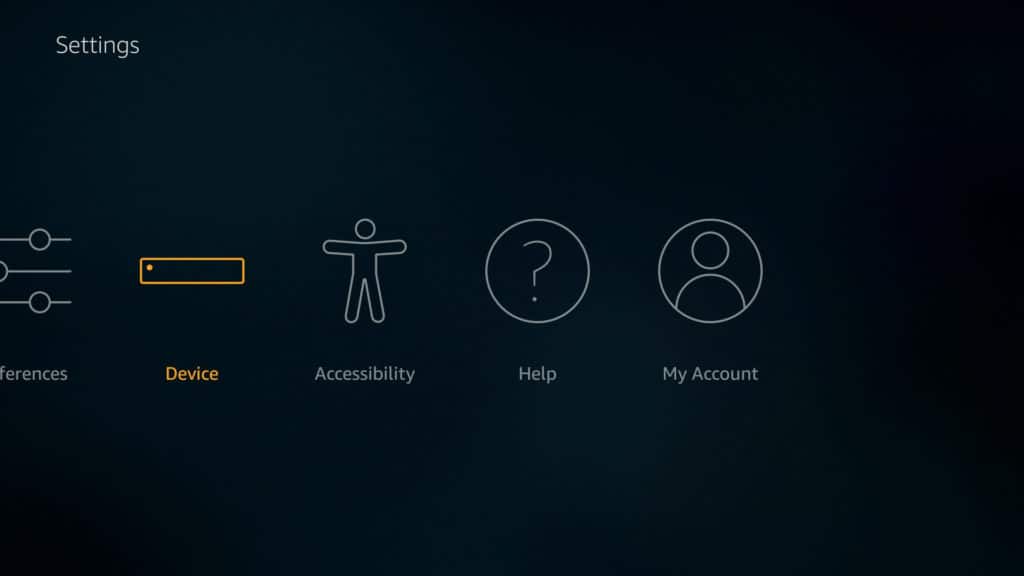
2. Scroll down to Developer Options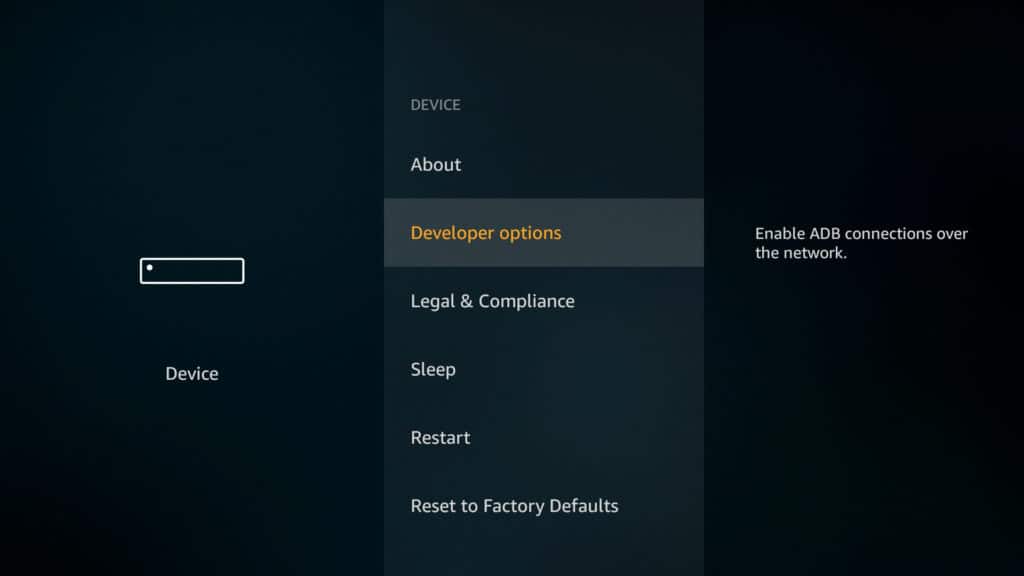
3. Toggle on Apps from unknown sources and ADB debugging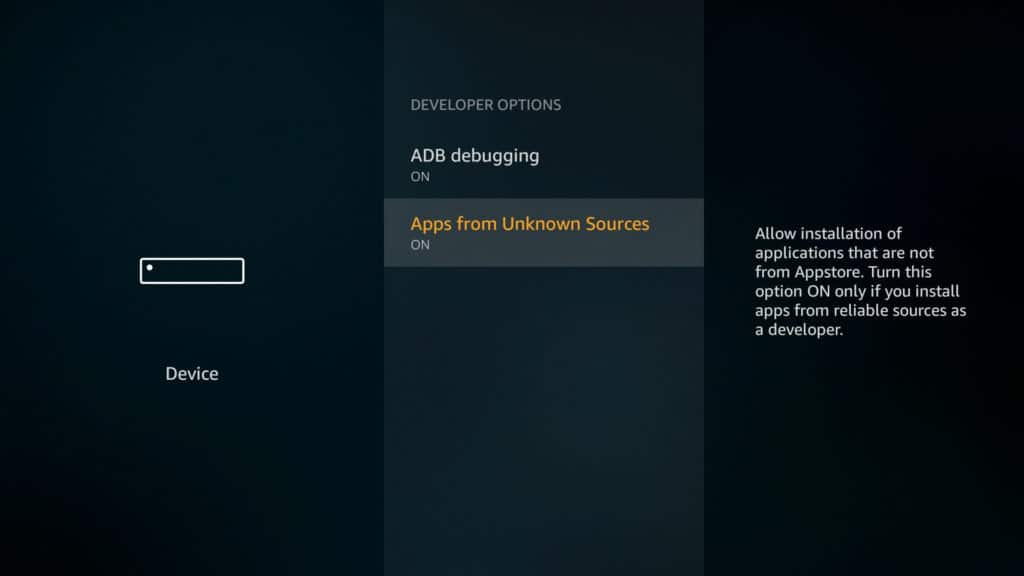
4. Back out to the System menu again and go to About
5. Select Network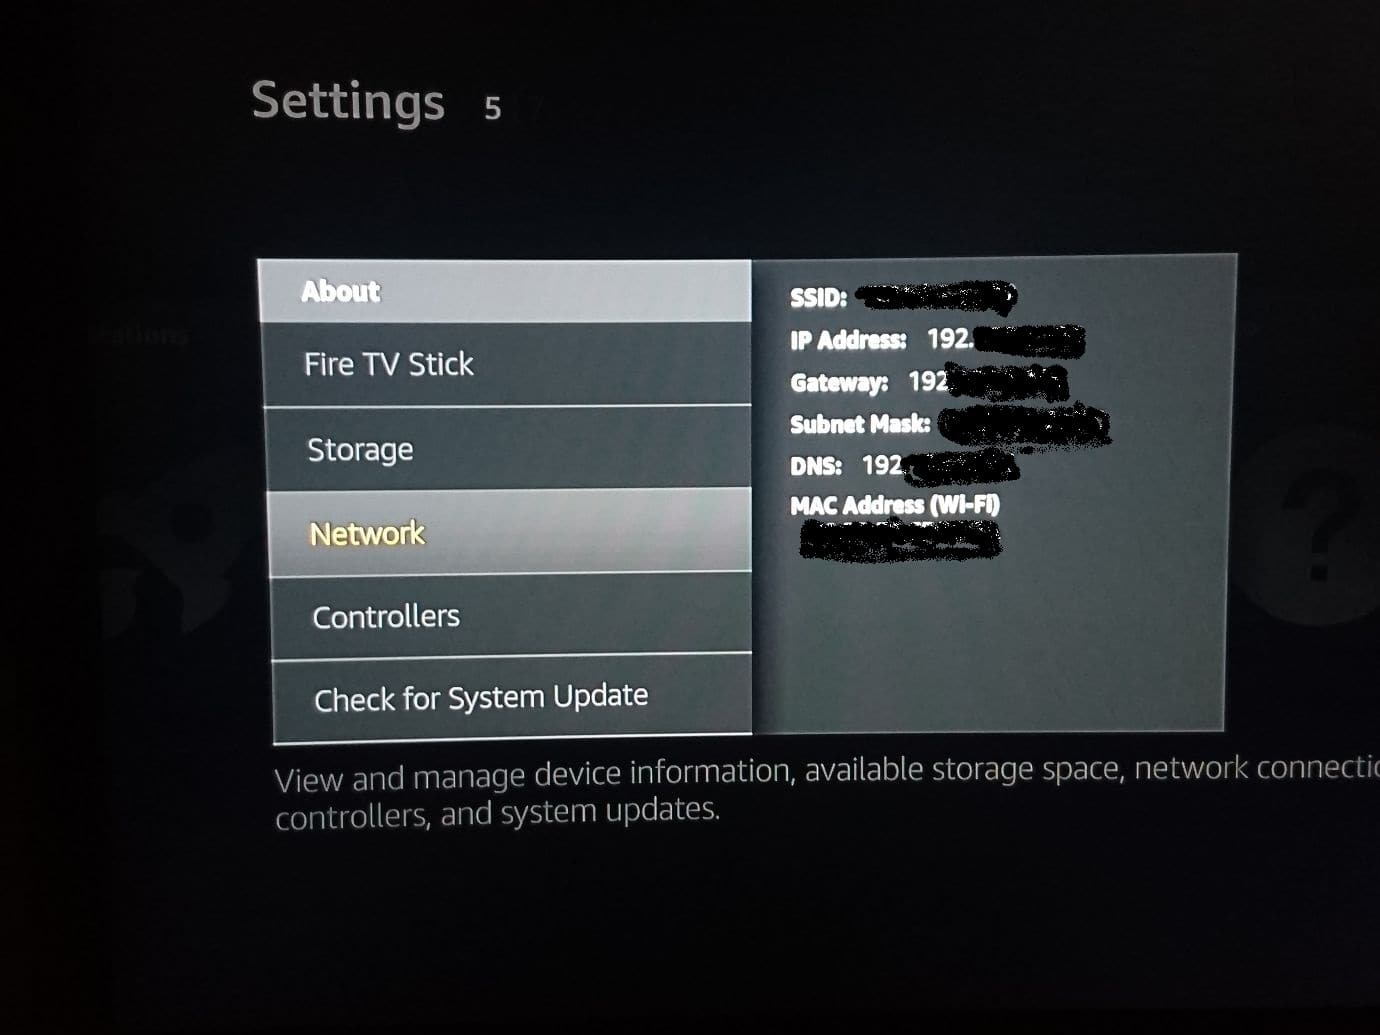
Jot down the IP address of your Fire TV and keep it handy for method #2.
You can now use apps from outside Amazon’s app ecosystem. The most difficult part of this process is actually getting the VPN on Firestick because Amazon didn’t make it very easy to download APK files or use Google Play. You can choose any of the methods below based on what best suits you.
Alternate Method #1: Install VPN app APK on 2nd-gen Fire TV stick and newer via direct download (recommended method)
This method is easy if your VPN provider makes its Android APK file available via direct download instead of through an app store like Google Play.
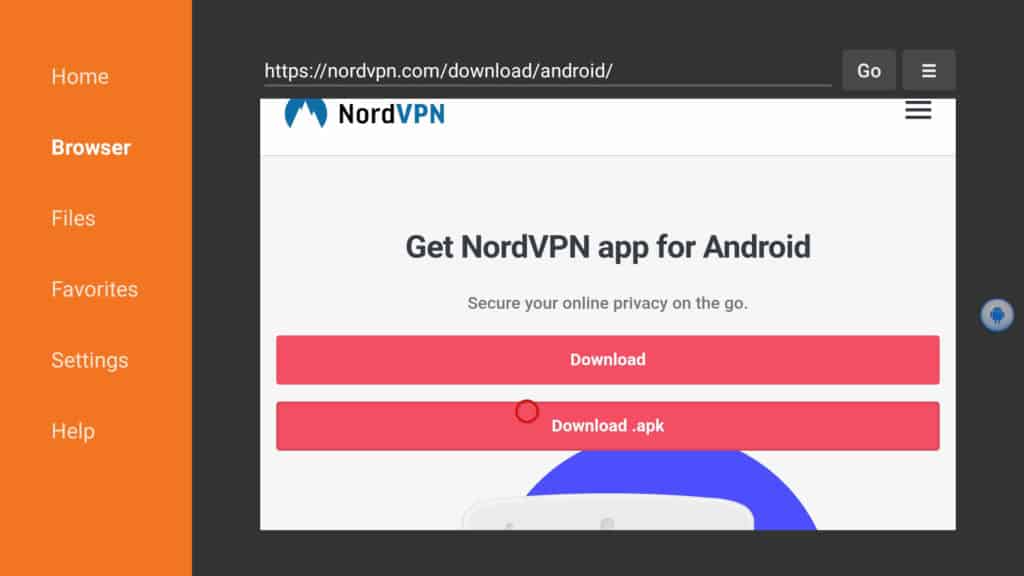
We advise you to only download APKs from the VPN provider’s website. NordVPN, for example, allows customers to download the APK directly from its website. APK files from third parties could be infected with adware or malware.
To use this method, you’ll need a Firestick that’s second-gen or later (anything released later than 2016) and a download URL for your VPN’s APK file. While we’re using NordVPN as an example in the screenshots below, this is just for demonstration, and we want to remind you that it’s available in the Amazon app store.
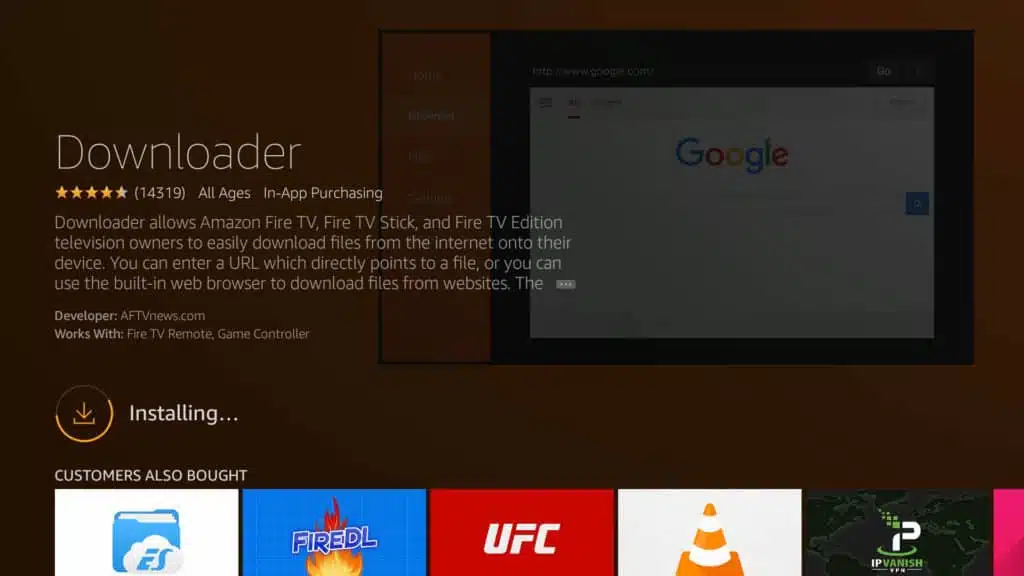
- Boot up your Fire TV and enter “Downloader” into the search bar
- Install the Downloader App, which, as of writin,g has an orange logo
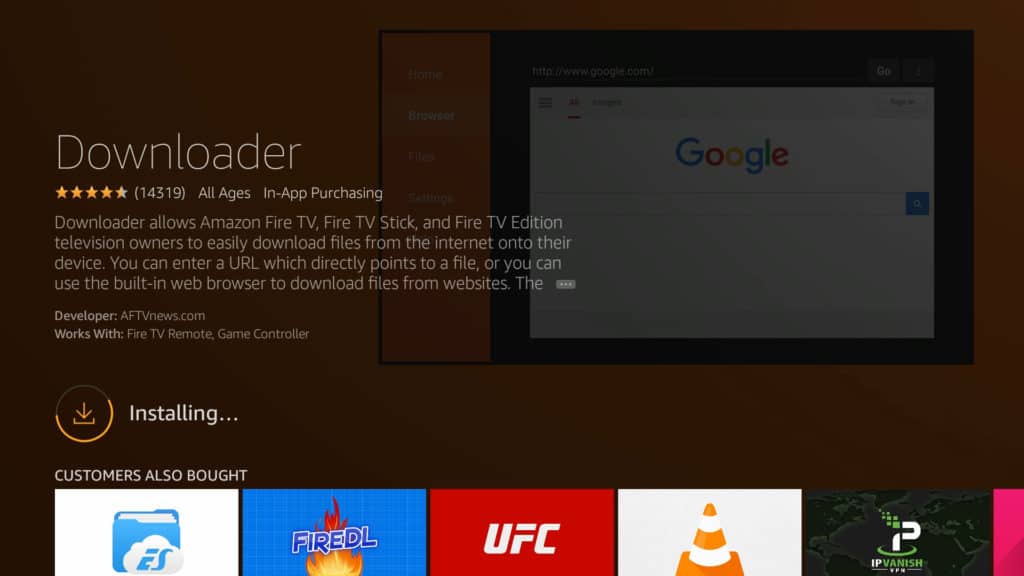
- Open Downloader and enter the direct download URL for the VPN app’s APK file. If the URL is too long, you can type in the URL for a page that contains the download link, which will open up a rudimentary browser from which you can download the APK.
- When the download finishes, you’ll be prompted to install the app. If not, open your downloads in the Downloader app and click the APK file
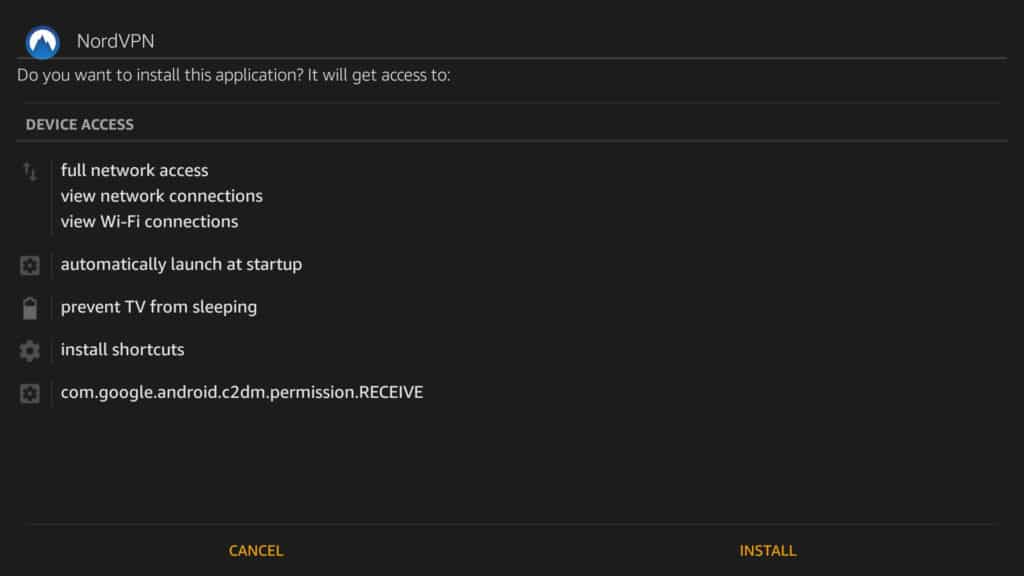
- The app should be installed and ready to go. Learn where to find it and how to enable it further down

Sometimes direct download APK files are not openly advertised by the VPN provider. If you can’t find one by searching around the provider’s website, try contacting customer service to see if they can either send you a link or the APK file itself. You can upload the file to cloud storage such as Dropbox and download the file using Downloader from there, or you can sideload the APK onto your device by plugging the Fire TV into your computer’s USB port and dropping the APK file into an accessible location.
Alternative Method #2: Sideload VPN app on 2nd-gen Fire TV Stick and newer with another Android device
This method requires the second generation of the Fire TV Stick or newer plus a second Android device with internet access to Google Play, such as a smart TV, smartphone or tablet. We’ll download the apps to the second device first, then transfer them to the Fire TV using Apps2Fire.
If you’re not sure what generation Firestick you’re using, look for the model name on the outside. 2nd-gen Firesticks have the model name “LY73PR”.
- On your second Android device, download and install Apps2Fire from Google Play
- On the same Android device, download and install the VPN app of your choice from the Google Play Store
- Launch the app and tap the menu icon (three dots) in the top right corner
- Tap Setup
- Under IP address of your Fire TV, enter the IP address you wrote down in step 6 of the previous section
- Tap Save
- Tap the menu icon (three dots) again and select “Upload Apps”
- Tap the VPN app you want to use on your Fire TV to upload it to your Fire TV
- The app should automatically install on your Fire TV. We’ll show you how to find it and enable the VPN in the next section
Note that if you have an APK file for the VPN app on your phone rather than an installed app, you can also use Apps2Fire, but the previous method is probably easier and doesn’t require a second Android device.
Find the VPN app and connect (following alternative methods #1 and #2)
Now that the VPN app is installed on your Fire TV, we just need to log in and connect. These steps will vary a bit depending on your VPN provider, but the process is generally the same.
- Head back to the starting menu on the Fire TV
- Go to Settings > Applications
- Select Manage installed applications
- Find and select the VPN app you pushed onto the Fire TV
- A sub-menu will appear. Select Launch application
- Enter your VPN provider’s login credentials.
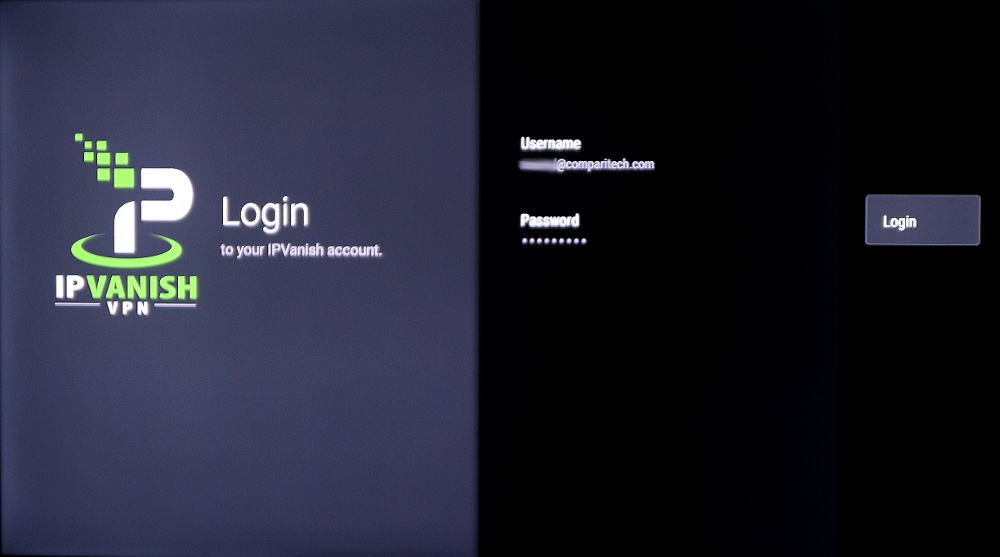
- In the VPN app, select a location and hit the connect button. Once the connection is established, you’re good to go!
The VPN service should remain connected until the device powers off or you manually disconnect it. If given the option, you can set the app to automatically reconnect should the connection drop at any point.
Updating your Firestick VPN app
One hassle you might encounter with sideloaded Google Play apps and direct download APKs is that they don’t automatically receive updates. If you have a working, stable version and it’s secure, then this isn’t so much of a problem. But if your VPN stops working overnight, it’s likely an important update has been released, meaning you’ll have to upgrade.
The process is more or less the same as the steps you took in either method #1 or #2. However, before you begin, it’s important to force stop the existing VPN app.
- From the Fire TV home screen, go to Settings > Applications > Manage installed applications
- Find your VPN app, click it, and choose Force stop
- Use method #1 or #2 to push the app onto your Fire TV and install it
- This time, a page will appear that asks if you want to install an update to the existing application along with any new permissions. Select Yes
- After the update, you will have to log back into the app using the steps in the previous section.
No APK or Google Play? Try setting up the VPN on a wi-fi router
If you can’t find a reliable APK file and don’t have access to Google Play on another Android device, or if you’re using the first-generation Fire TV Stick, your options are limited. There are ways to download APKs using forged device IDs from Google Play using Chrome extensions, then sideloading them with ADB, but that’s more technical than we’re going to get in this article, not to mention you could be violating Google’s terms of service using those methods.
Instead, we recommend setting up the VPN on a wi-fi router instead of the Fire TV. There are two main ways to do this: setting up a virtual router on a laptop or configuring your home wi-fi router to use a VPN. Virtual routers are easier to set up but require a laptop to route your online traffic through, so it’s not exactly convenient. Setting up a VPN on a physical router only works on certain router firmware and can be tricky, but it is much more convenient once properly configured. Both methods work with all versions of Amazon Fire TV and Fire TV stick.
Method #3: Connect Fire TV to a VPN-enabled virtual wi-fi router
Most newer laptops come with the ability to create their own wi-fi hotspots that other devices can connect to. If the laptop is connected to a VPN, then all of the internet traffic from the devices connected to that hotspot is also tunneled through the secure VPN server. We’ll show you how to set up a virtual wi-fi router on Windows and Mac, which you can then connect your Fire TV to. This method works even with the 1st-generation Fire TV and Fire TV Stick.
Download and install the desktop VPN app for your operating system from your VPN provider’s website if you haven’t already.
How to set up a VPN-enabled virtual router hotspot on Windows
If you’re using Windows 10, check out the video below. For older versions of Windows, refer to the text instructions:
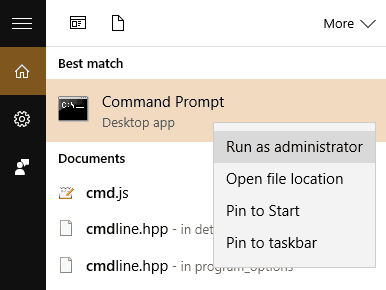
- First, we need to check to make sure your computer supports virtual routers. In the Windows search bar, type cmd and right click Command Prompt > Run as Administrator
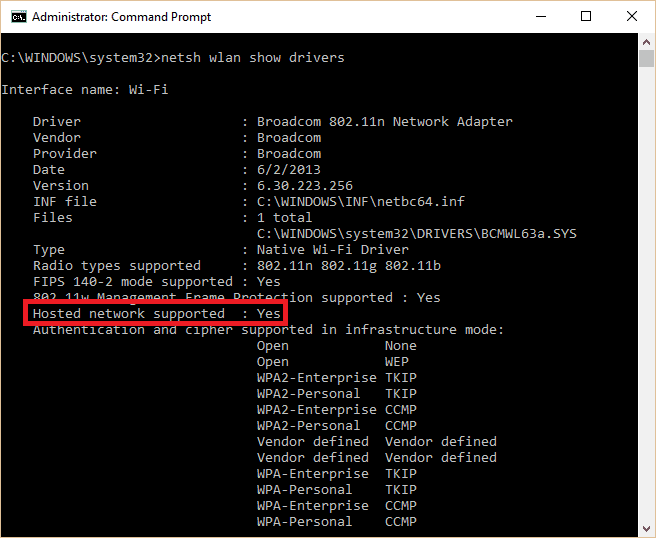
- In the terminal windows that appears, type
netsh wlan show driversand hit /Enter - Look for the line that says Hosted network supported. If it says Yes then you are good to go. If not, you’ll have to set up the VPN on the physical router. Help with that further down.
- In the terminal window, type
netsh wlan set hostednetwork mode=allow ssid=<MY-NETWORK> key=<MY-PASSWORD>, replacing <MY-NETWORK> and <MY-PASSWORD> with the network name and password of your choice, and hit Enter.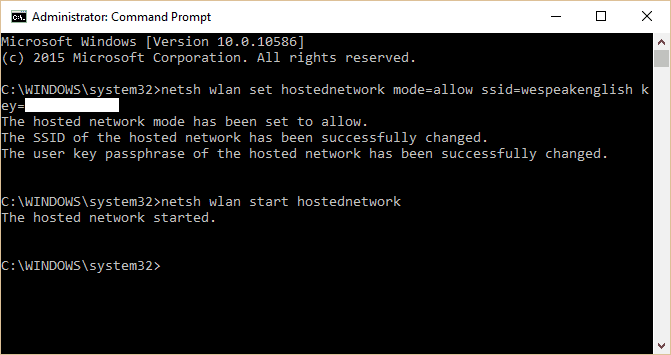
- You should see some text indicating you successfully created the virtual router. To turn it on, type
netsh wlan start hostednetworkand hit Enter - You should get a message that says the hosted network started. If not, you need to update your network adapter drivers and try again.
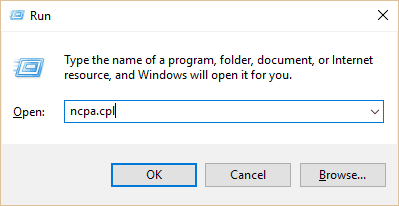
- Next we need to share the virtual router with other devices. Press Windows Key+R, type ncpa.cpl into the Run prompt, and hit Enter
- In the list of connections that appears, look for the one you just created. It will have the network name you put in earlier. Remember or jot down the name of this connection
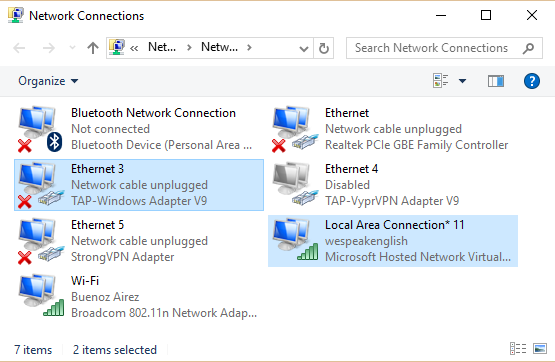
- On the same list of connections, look for the one that says TAP-Windows Adapter. Right click it and select Properties
- Click the Sharing tab at the top and check the box to Allow other network users to connect through this computer’s Internet connection
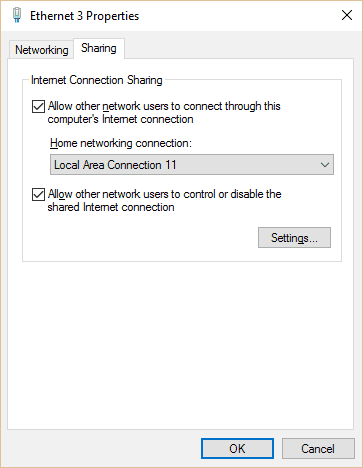
- Under Home network connection, click the dropdown and select the name of the network you created earlier. Press OK
- Open your VPN app, select OpenVPN as the protocol in the settings if needed, and connect to a server in the United States. OpenVPN activates the TAP Windows Adapter
- Your PC is now a VPN-enabled wi-fi router!
How to set up a VPN-enabled virtual router hotspot on macOS
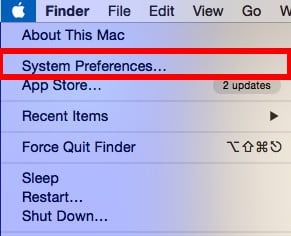
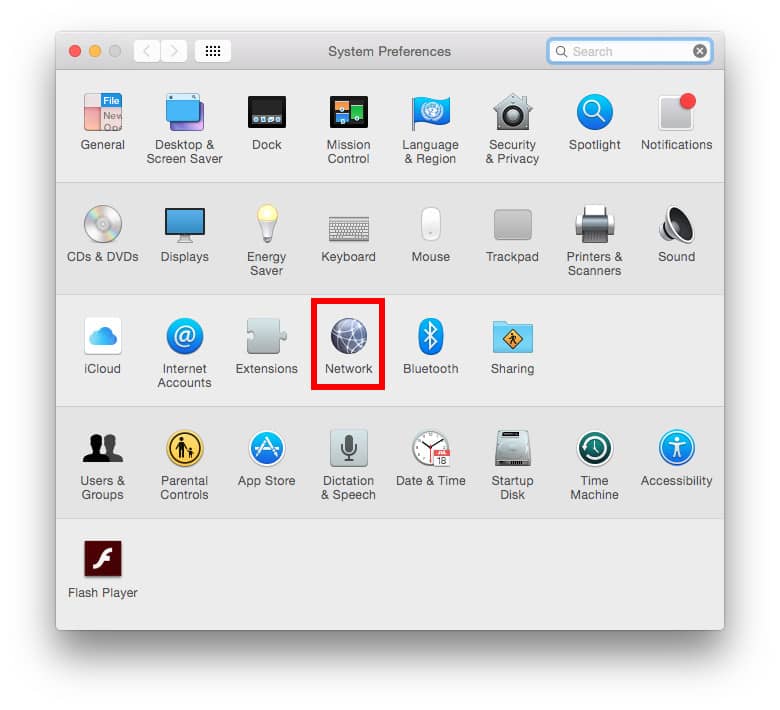
- Click the Apple icon to get a system menu, then select System Preferences.
- In System Preferences, click the Network icon.
- In the Network window, click on the plus (+) sign at the bottom of the left panel to add a new service. In the pop-up window, select the following options: Interface: VPN, VPN Type: L2TP over IPSec, Service Name: [choose a name for your VPN connection]*
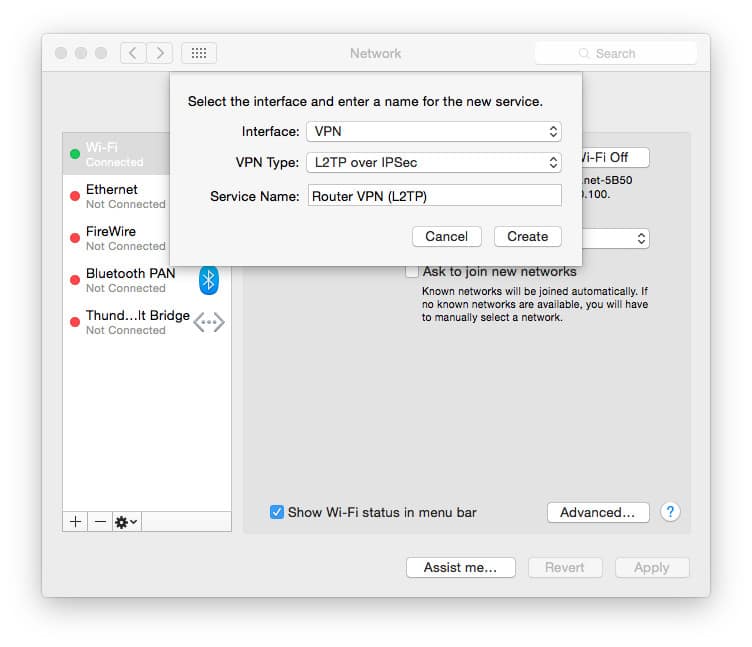
- Click Create. For these next steps, you will need your VPN username, password, and a server address. You will probably also need an IPSec key, depending on your VPN provider’s settings, this can also be referred to as a Shared Key or Shared Secret. You can find these under the Manual Configuration section of the VPN provider’s support website. Most providers will also have a list of VPN servers that you can choose from.
- Enter the following details: Configuration: Default, Server Address:[server address as specified by VPN provider], Account Name: [username], Encryption: Automatic (128 bit or 40 bit)
- Check the box next to Show VPN status in menu bar to see your VPN connection status in the menu bar.
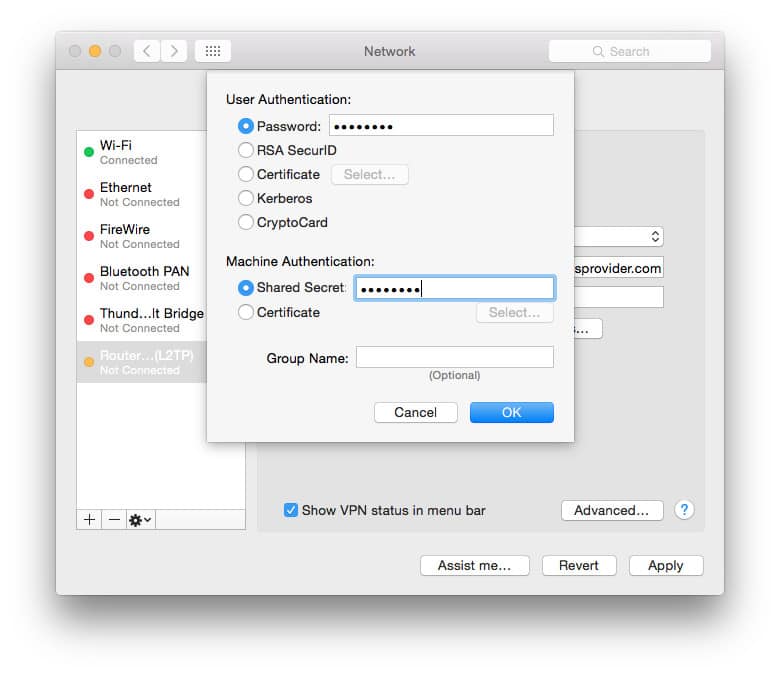
- Click on Authentication Settings…. On the User Authentication screen, enter your password in the box and the IPSec key in the Shared Secret box under Machine Authentication, then click OK.
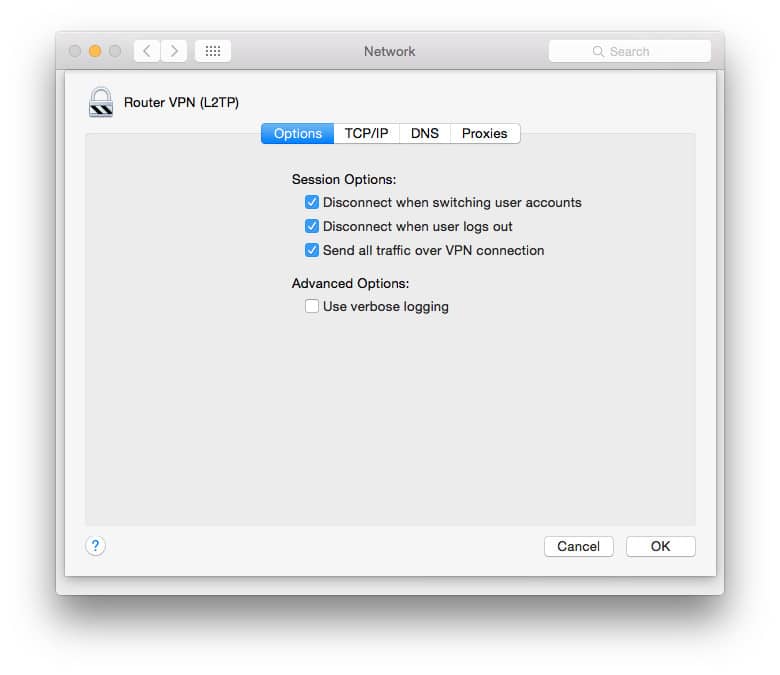
Authentication settings - Next, click on Advanced… Check the box for Send all traffic over VPN connection, then click OK.
- Click Apply to save all of your settings, and then connect to your VPN with the Connect button. You are now connected to a VPN server. Now you just need to set up your VPN for sharing.
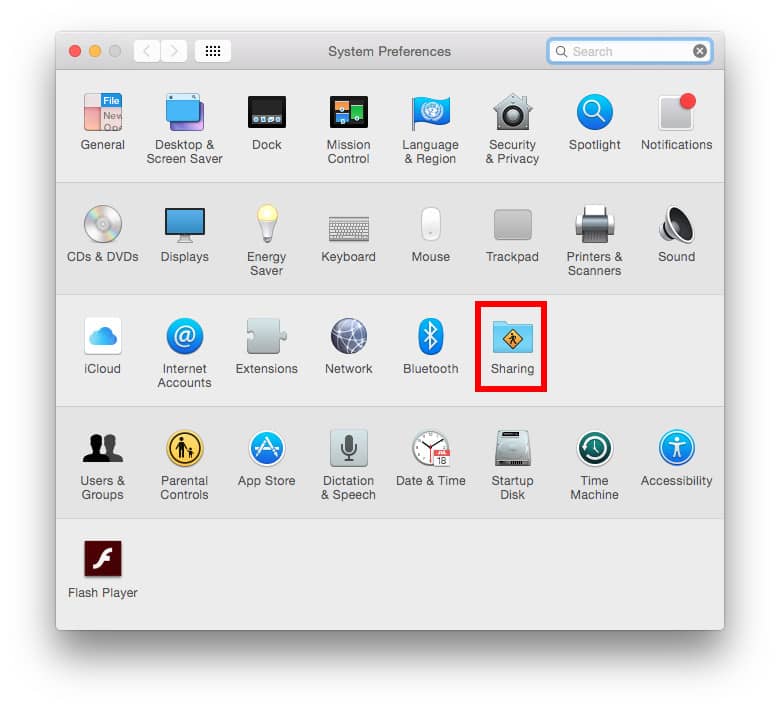
- Return to the System Preferences menu, then click on Sharing.
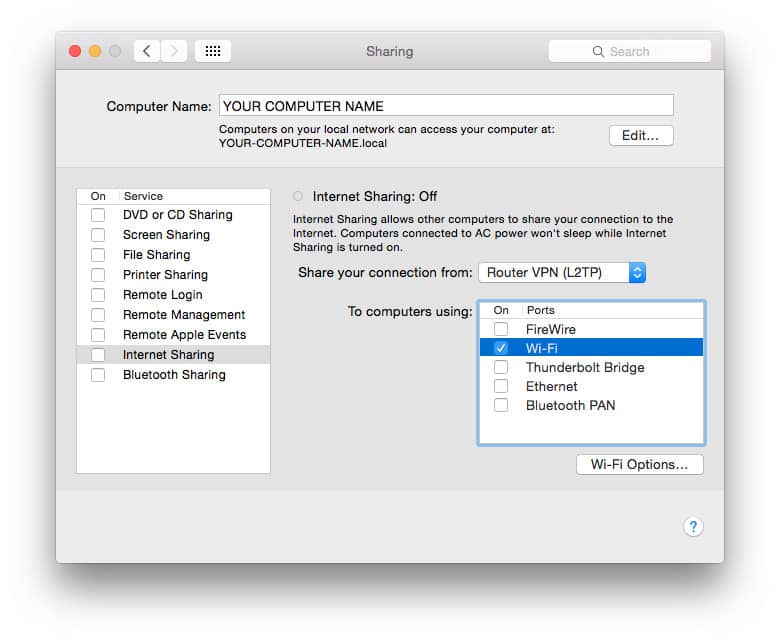
- Select Internet Sharing from the left panel. The Internet Sharing options will appear on the right side of the screen. Set the following settings: Share your connection from: [the VPN L2TP connection you just created] To computers using: Wi-Fi
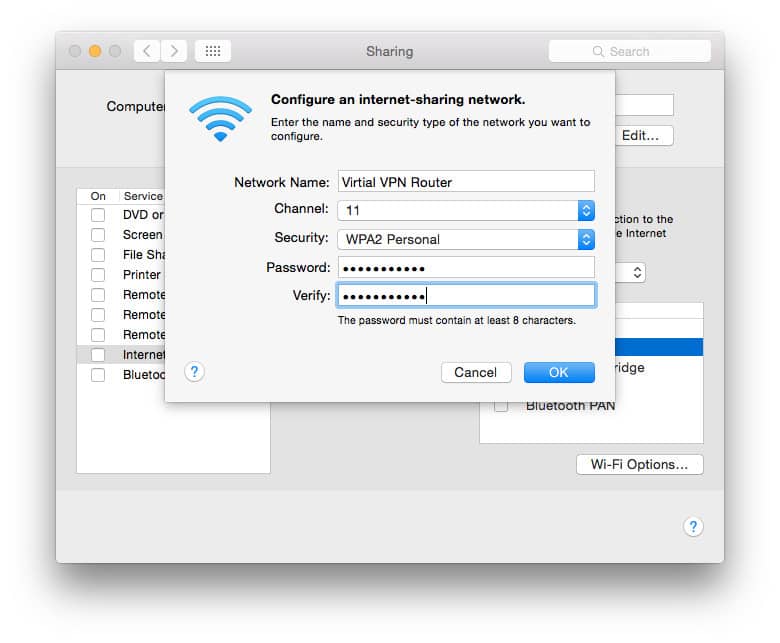
- Select Wi-Fi Options…, and enter the following details: Network Name: [choose a network name also known as an SSID], Channel: [leave as default], Security: WPA2 Personal, Password: [choose a password], Verify: [re-enter your password]
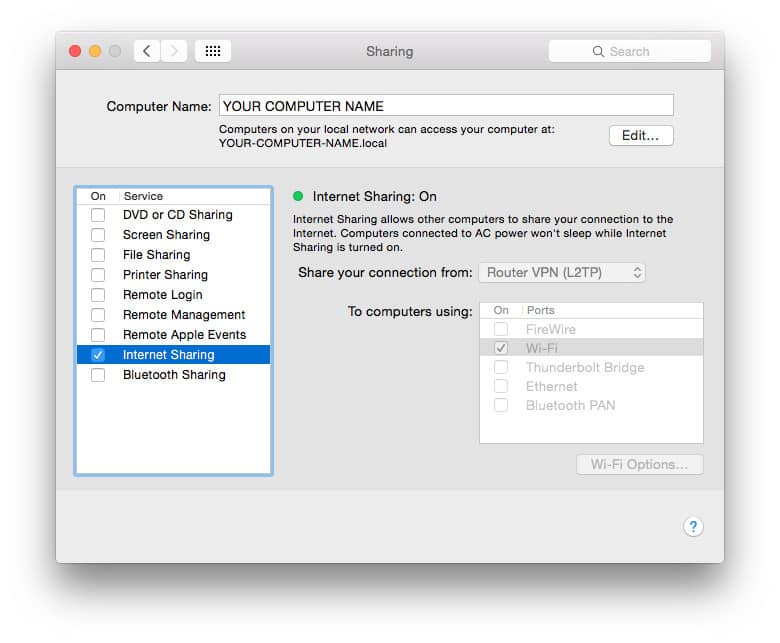
- Click OK. On the Sharing menu, check the box next to Internet Sharing. You will see a prompt asking you to turn on Internet sharing. Click Start. When Internet Sharing has been activated, a green light will appear next to the text: Internet Sharing: On
- In your menu bar, you will now see two new icons. The first icon shows your VPN connection status. The other new icon shows your Internet Sharing status.

- Open the VPN app and connect!
If you select the wi-fi icon by clicking on it, you will see that it is no longer searching for available wi-fi signals. Instead, it tells you that wi-fi internet sharing is on, the name of the wi-fi signal that the Mac is broadcasting, in this example “Virtual VPN Router” is our SSID and the wi-fi channel that the signal is utilizing. You connect your multiple devices to this wi-fi router the same way as you would to any other wi-fi, using the SSID and password that you put into the wi-fi settings screen above.
Method #4: Connect Fire TV to a VPN-enabled physical wi-fi router
Finally, you can install a VPN directly onto your router itself. This is a more complicated and involved process, but it will ensure that every device on the network is protected. Unfortunately, the exact installation process is different for every brand of router and the firmware it’s running. If you’re interested in this approach, we’d recommend checking the support section of your VPN’s website — in our years of experience, we’ve found that virtually every provider has manual setup instructions for at least some routers.
Recent VPN Product Updates
Our team has been reviewing VPNs since before they were common knowledge, so we’ve seen how much providers can change over time. That’s why we keep a close eye on any new additions, optimizations, or tweaks in the services we recommend. Some of the latest updates include revolutionary features you might not be aware of, so we’d suggest checking out our summary below:
NordVPN
- Introduced Threat Protection Pro, a tool that stops malicious sites, online trackers, and ads before they become a problem for you (September 2024)
- Improved the existing Meshnet feature with helpful UI changes and the ability to continue functioning when devices are offline (September 2024)
- Enhanced the speed and security of the NordVPN browser extension (December 2024)
- Began alerting users to upcoming maintenance ahead of time (September 2024)
Surfshark
- Started allowing users to get their own dedicated IP address as an add-on to their existing subscription (September 2024)
- Launched a free-to-use tool that checks whether your email address has been found in any major data breaches (October 2024)
- Gave iOS users the ability to let certain apps pass through the VPN unencrypted, a feature called split tunneling. (October 2024)
IPVanish
- Almost doubled the number of countries its network covered, bringing its total to more than 100 (October 2024)
- Began offering online storage and a cloud-based secure browser for users on the Advanced plan (October 2024)
- Introduced a tool that allows mobile users to check if a link is safe without actually opening it (December 2024)
ExpressVPN
- Began offering credit and identity theft protection services for users in the United States (November 2024)
- Released updates to optimize ExpressVPN for the next generation of Copilot+ systems (September 2024)
Methodology: How do we choose the best VPNs for Firestick?
We followed our in-house testing methodology to determine which VPNs worked best with a Firestick. This involved scoring providers on a series of metrics.
We used:
- Nine metrics to measure streaming ability — including each provider’s compatibility with platforms such as Amazon Prime Video and Netflix, and whether apps exist for platforms such as Firestick.
- Ten metrics to measure each service’s ease of use — such as the existence of streaming servers and router support.
- Sixteen metrics to measure security and privacy — including the level of encryption and leak protection.
- Eight metrics to gauge whether a service represents good value for money — including the monthly cost and the existence of any discounts or offers.
We also measured which VPNs were fastest. This involved testing their speeds in the morning, at noon, and in the afternoon. To get an idea of global — rather than just local — speeds, we connected to servers in the US, UK, South Korea, and Australia.
To try and replicate the average user’s experience, we carried out the tests using virtual machines that had been rate limited to 250 Mbps. This is the median average of fixed broadband speeds in the US as of Sept 2024.
Once we’d collected the results, we converted each provider’s average speed to a score out of ten. This makes it easy to compare providers.
As you can see from the above, ProtonVPN was the fastest VPN on average, followed by Surfshark and NordVPN.
To generate an overall score, we combined the scores for each provider’s streaming ability, ease of use, security and privacy, value for money, and speed. We used this score to compare and, ultimately, rank providers.
The chart above shows us that NordVPN is the best VPN to use with a Firestick/ Fire TV, closely followed by Surfshark and IPvanish.
Why your privacy is at risk if you don’t use a VPN
If you connect to a public Wi-Fi network (e.g., coffee shops, airports, etc.), any other user could access your browsing information. If you’re not using an encrypted connection, a malicious user with easily available tools can find out the websites you visit, your username and passwords, personal details including your name and address, and videos you download and stream.
Anyone connecting to public wi-fi should use a VPN which will encrypt and hide all your browsing activity.
A VPN will also mask your online activity if you connect via your home or work internet provider. This is particularly important in countries such as the US where ISPs can legally sell and share your data with other organizations. This data includes sites you visit and the content you stream. We’ve tested the best VPNs for security and privacy and NordVPN is our #1 choice for Firestick users.
How to change your region on the Fire TV Stick
Changing your Fire TV Stick region will allow you to access geo-restricted content from other parts of the world. Once you have subscribed to a region, you will need to log in to your Amazon account and select “Your Account” > “Change Your Country or Region”.
From there, you can select the country or region that you would like your Fire TV Stick to originate from. You can also choose whether you want your current Fire TV Stick content to continue working or be removed (note: some content may not be available in certain countries/regions). After making your selection, click “Save Changes”.
Firestick VPN troubleshooting
If you encounter any issues connecting to or staying connected to the VPN through an app, try the following:
- Check to ensure you have a 2nd-gen or later Fire TV device. 1st-gen Firesticks, which don’t support VPNs, will have an FCC ID on the housing: 2ABDU-0509
- Uninstall and reinstall the VPN app. Go to Settings > Applications > Manage Applications. Reinstall using the steps above. Ensure you’re using the latest version of your VPN provider’s app.
- Restart your Fire TV device by unplugging it, waiting one minute, and plugging it back in.
- Try a different VPN server location
- Check that your internet connection works normally without the VPN.
See also:
- How to install Kodi on Firestick
- Does Firestick keep buffering? Try these fixes
- How to install NordVPN on Firestick
- How to install ExpressVPN on Firestick
- How to install Hotspot Shield on Firestick
- How to install PIA on Firestick
- How to install Ivacy on Firestick
- How to install CyberGhost on Firestick
How to uninstall a VPN on your Firestick
Whether you’re having trouble with a VPN app on your Firestick or you simply don’t need it anymore (perhaps you’re looking to switch to one of the best VPNs for Firestick listed in this post), you may wish to uninstall it. The good news is that this is very quick and easy to do.
Here’s how to uninstall a VPN app on your Amazon Firestick device:
- Select Settings from the top menu of your Firestick.
- Head to Applications.
- Click Manage Installed Applications.
- Select the VPN app you wish to uninstall.
- Click on Uninstall and then click it again to confirm the action.
VPN for Amazon Fire Stick / Fire TV: FAQs
Is every VPN compatible with a Firestick?
Not every VPN is compatible with Amazon Firestick. Many don’t offer apps for Amazon Firestick or Fire TV which makes it that much more difficult (but not impossible) to get set up. That’s why it’s worth sticking with those recommended in this post, all of which provide the relevant apps to make the process quicker and easier. If you already have a VPN and find it doesn’t have an app for Firestick, there are ways around this such as installing the VPN on your wifi router.
Can Firesticks get viruses?
Firesticks are less likely to catch viruses than computers or smartphones, but they’re not entirely invulnerable to malware or viruses. In addition, firesticks operate on a version of the Android OS, which leaves them open to potential cybersecurity threats.
Your Firestick’s risk of being infected with viruses or malware increases if you download and install apps from third-party sources instead of sticking to the official Amazon Appstore. To safeguard your Firestick from such threats, it’s a good idea to:
- Download apps exclusively from the official Amazon Appstore
- Steer clear of installing apps from unknown sources or third-party app stores
- Regularly update your Firestick with the latest software updates from Amazon
- Employ a trustworthy VPN service to defend your data and privacy
Adhering to these safety measures can lower the chances of viruses or malware compromising your Firestick and ensure your device remains secure.


I use FireTV 4K Max on each TV. For me it was a no brainer as to the VPN I was going to use. I use Surfshark, actually on everything. I’ve never had any issues using it. I can’t explain how simple it is to install and then I have (depending upon the device) certain settings I prefer to configure differently from the standard recommendations. When streaming, never had any problems with any streaming app. I’ve heard from friends and colleagues who use a VPN, complain about not being able to stream certain subscriptions. For example, the two I hear a great deal about more than any other – YouTube TV & Netflix. They stream perfectly for me. Good luck to everyone and simply my opinion, I understand everyone has their reasons for choosing not to use a VPN. I look at it from the perspective as an investment. I’m investing in keeping my WiFi network safe which in turn means keeping my personal information safe and protected. That said, if you’re not using a VPN and find yourself with some extra time, maybe think about looking into the various options that exist for a VPN as well as reading reputable websites which have verified reviews regarding the different VPN services as well as comparing each. Safe surfing!
I tried this method for installing vpn on my FireTV. Works great! I used Windscribe VPN on the FireTV. Works great with Windscribe VPN. The trick to using VPN on the Firetv is to change your zip code from your home zip code and try different vpn servers within you VPN service provider. I’ve also used IVACY VPN. It is not as good as WINDSCRIBE VPN.
Hi
IPVanish was working fine in Amazon fire-stick for a few days and after a while i am NOT able to see the Country i was frequently connecting to… its been removed or deleted.. i can connect to other countries/server but not the one specific country i wanted to ? hows is this possible? whos tracking it? any idea ?
Very impressive guide, I am unfortunately in the pool of people trying to bypass Geo-Location blocking for Amazon Prime Instant Video and tried ExpressVPN, Unlocator, and UnBlock US and have had no luck.
Is there any service that can bypass this?
IP Vanish does not work with Amazon Fire Stick second generation. I purchased the VPN and worked with their technical team. They confirmed Amazon has blocked most of the VPN softwares. Refund is on its way.
Please let me know if anyone has been successful in using VPN or Proxy to make Fire stick work.
IPVanish doesn’t unblock Amazon Prime Video from outside the US/UK/Canada, but it does work on Amazon Fire TV Stick, 2nd gen or later.
Hi, I’m not sure how to start a new conversation so am replying. I have fire tv and live in Canada. I bought vpnvanish as I thought it would work. I don’t really care about prime tv, just want all the other apps that come with it ie. espn, hbo go, food network etc. I have vanish turned on on my computer and tv and I am still being told I can’t get these apps as I am not in the US. Any ideas? Should I cancel subscription and get express? Funny, that was the vpn I was going to get until I read your article for Fire TV. Thanks in advance,
This is a tutorial for installing the VPN on Fire TV/Fire TV Stick, but you’re saying you have it installed on your computer and TV? I’m not sure I follow.
I’ve just installed IPVanish on my US bought Alexa Fire Stick. I am in Canada and am trying to get around the GEO_IP error messages.
After a successful install and registration and a reboot I am still getting error messages on Amazon content and I cannot download any US only apps.
IPVanish doesn’t unblock Prime Video. Try ExpressVPN or PrivateVPN’s Fire TV apps for that.
I am in the uk but wanting to watch american tv shows that are blocked here. I’ve downloaded a vpn but the firestick now does not seem to be compatible with my uk account. Do I need to open an american amazon account to make this compatible?
What VPN are you using?
Trying to download my vpn providers configuration file for openvpn for android and it won’t download
Are you using Downloader?
Hmm first article I read from you where you are recommending VPN providers other then Express Vpn!!
Hi John, I plan on using VPN on two different sticks. Would I have to pay twice the amount with IPvanish? Thanks
I’m a newbie. So i bought the firestick. How do I know if its a first gen or 2nd? And after i buy the IPVanish and install the App on my stick, do i have to go to the every single time I use my kodi?
Check the FCC ID number on the housing…
1st gen: 2ABDU-0509
2nd gen: 2AE6S-0948
Not certain but I believe IPVanish stays connected until you either power down the Fire TV Stick or disconnect from the internet altogether. If you have a 1st gen stick, however, it won’t stay connected and you’ll need to configure the VPN on a virtual or physical router instead.
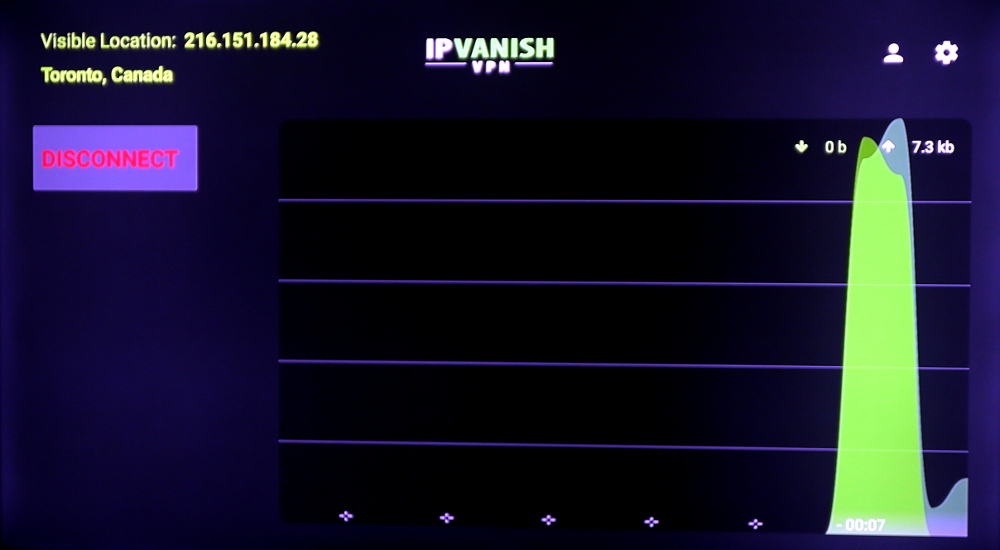
Does ipvanish still work for the fire stick? Followed instructions, can connect and see traffic moving in the graph – but still get the message about wrong location whenever I try to start Amazon prime movies that are only available in certain countries.
Any ideas?
Did you get this sorted? I’m at the same point as this right now!
I have installed expressvpn and set location to be usa but still when tried to install hulu or sling it says unavailable. Is my vpn working?
What generation Fire Stick?
Thanks for the tutorial. I have loaded the IPVanish onto my second generation firestick. It says connecting when I press CONNECT (country United Kingdom, city best available and server best available) but it doesn’t connect ?
Hi. i downloaded ipvanish from my amazon firestick app. section. when I connect the vpn, it kicks me off my wifi network and says that I don’t have a connectVPN, it kicks me out of everything and I don’t have access too anything. when I restart my Firestick and disconnect my vpn… the network connection works perfectly fine… what did i do wrong?
Usually that means you’re using a 1st-gen Fire Stick, which isn’t compatible with VPNs.
SMH! Why VPN’s not compatible with first Generation Fire TV Sticks? Bummer!
Hi,
I set up the connection on the firestick as you suggested.
This screen shows up with a green CONNECT word. I clicked it but it never said connected. How do I know I am connected?
Below connect it says
country United states
City best available
server best available
but nothing else, the rest of the screen is empty.
How do i know I am connected?
thanks
Click CONNECT
Great walkthrough – thanks for creating. All worked perfectly for me with NordVPN, Firestick 2 and the URL to Nord’s apk. One question – once I’ve connected the VPN how do I know if the connection to Nord drops? On my Mac I can have the NordVPN app kill any specified apps should the connection drop. I feel a bit vulnerable just connecting then hoping the connection is still there…
you should be able to turn on a kill switch in the app settings that halts traffic when the connection drops. otherwise I’m not sure there’s a way to make notifications appear on top of Kodi.
If a VPN is installed on Fire TV stick, does it work strictly for the stick?
I ask because I’ve tried a couple of router based VPNs and did not like the result, as I was locked out of my local banking website as well as having Apple Mail on my desktop unable to retrieve mail from Yahoo and Gmail.
Any assistance is appreciated.
Yep, if you install it on the Fire TV Stick it will not affect any other devices. If you have the VPN installed on your router, however, you might be able to set up split tunneling so only specified devices go through the VPN. Depends on your firmware, though.
I tried to install ipVanish direct from their website on to my 2nd generation Firestick but it wouldn’t connect. Someone suggested it was because my router was not suitable (BT Home Hub 5) although I wasn’t attempting to load it on to the router. Please help, thanks.
Not sure what the problem could be without trying it for myself. Your router shouldn’t affect it, though, unless it’s somehow blocking the port that the VPN connects on.
Great work and overview/tutorial!
Would like to know to avoid local MLB blackouts using IPVanish if the client loaded on Firestick 2nd Generation completely takes care of that, or if this Android device can allow MLB app acquire Geolocation from some Android locations services, essentially bypassing the IP Address to determine location from Android’s own geolocation capability?
Hi John,
I’m not sure about Fire Stick, but for Android phones you need root to properly spoof your location in order to bypass the MLB.tv blackouts. See more here https://www.comparitech.com/blog/vpn-privacy/mlb-tv-workaround-with-dns-vpn/ and here https://www.comparitech.com/blog/vpn-privacy/watch-mlb-on-kodi-and-the-best-add-ons-for-2017/
Hi my VPN connects and 10 seconds later says “No process running” whats this please?
thank you
I installed IPvanish then took IPTV subscription but channels on the subscription package dont open and other builds do.Ithen have to disconnect the vpn and suffer inherent problems for not having it connected.