If you’re keen on setting up your own VPN for free, there’s no easier way to do it than with SoftEther. SoftEther is a VPN solution with free software to connect a server to a client. It’s relatively easy to use compared to the standard OpenVPN setup, and it supports more protocols. They include OpenVPN, L2TP/IPSec, PPTP, SSTP, and EtherIP.
In this tutorial, we’ll show you how to set up SoftEther using the L2TP/IPSec protocol on an Amazon Web Services EC2 Instance. You can use Amazon’s micro tier free of charge for one year, provided you stay under the time, space, and bandwidth limits.
Once set up, you should be able to use your homemade VPN just like any other commercial VPN: bypass censorship, unblock geo-locked content, secure open wifi connections, and encrypt P2P file transfers. We’ve even tested this with Netflix and were able to bypass the VPN and proxy firewall to watch US Netflix from Germany, something many paid VPN providers struggle with (we’ve got a list here of paid services that beat the Netflix VPN ban).
What you need to make your own VPN using SoftEther:
Before we get started, make sure you have all the following ingredients:
- Amazon Web Services account. This requires a credit card, but you’ll only be charged for what you use, which will likely be nothing if you’re prudent about what you’re doing.
- PuTTy and PuTTygen for Windows users. Download both here.
- SoftEther client application for your operating system
- A basic working knowledge of Unix commands and how servers work with clients will be massively helpful in troubleshooting should something not go exactly as planned.
Launch an EC2 instance
First, we need to create an EC2 instance in Amazon. An “instance” is lingo for a virtual server. EC stands for “Elastic Cloud,” meaning the server can increase and decrease in size as needed. Only the smallest instance size is available under the free trial, so make sure to pick that one.
- Once you’ve registered an AWS account, open the dashboard and click on EC2.
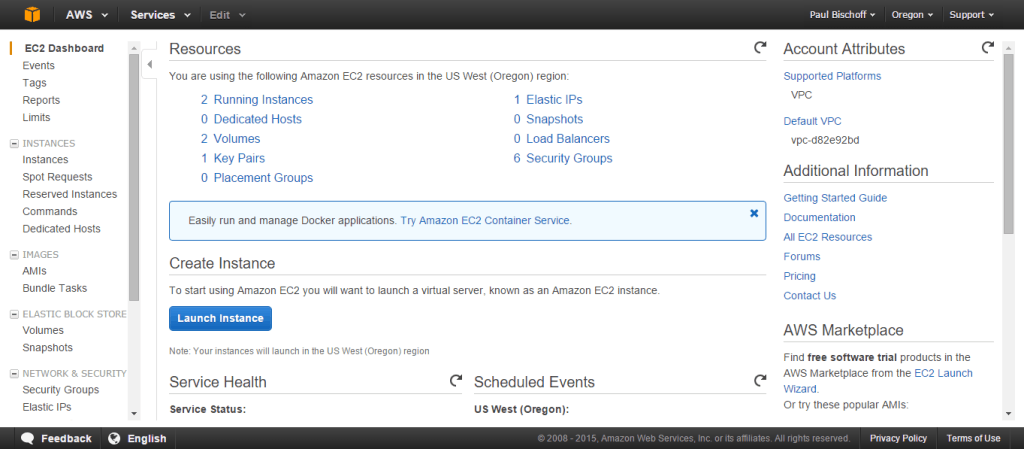
- Click the button that says “Launch instance”.
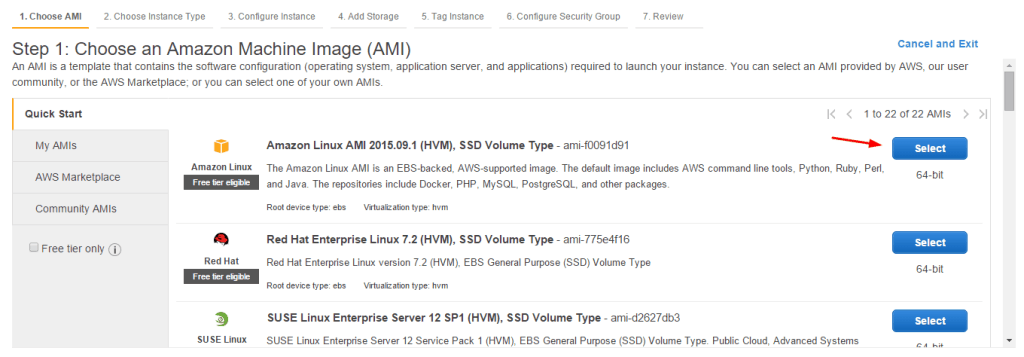
- For this tutorial we’re going to use Amazon Linux AMI, which is free tier eligible as of time of writing. The Ubuntu Server 14.04 LTS should also work, but some details will be different. Click the Select button.
- Make sure the “free tier eligible” t2.micro tier is selected and click Next (not Review and Launch) until you get to Step 6: Configure Security Group.
- For simplicity’s sake we’re just going to change Type to “All Traffic” and Source to “My IP”. If you prefer more security or a wider range of clients than just your computer, you can open ports 22, 443, 500, 992, 1194, 4500, and 5555. Name the security group something you’ll recognize such as “softether”.

- Click Review and Launch, then Launch.
- Next you’ll be asked to create a key pair (or use an existing one if you’ve done this before). Name the key pair something you’ll recognize, such as “softether”, and download it. Keep this somewhere secure and do not lose it, or else you won’t be able to access your server.
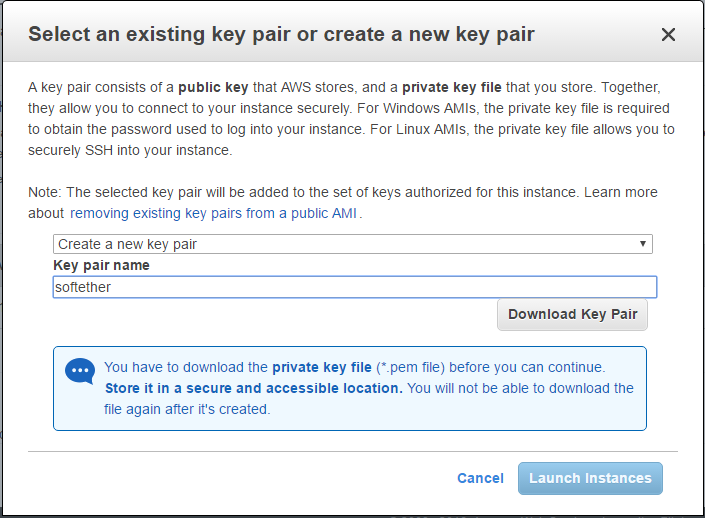
- Click Launch Instances. Scroll to the bottom of this page and click View Instances.
- You should see your new instance initializing. Click on it to display information below including the Public DNS address. We’ll need that in the next step, so copy it to your clipboard.
Congratulations, you have a server. Now we need to access it.
Accessing your EC2 instance
For this tutorial, we’ll be using PuTTy and PuTTygen on Windows. Mac and Linux users can just use their terminal. First, we need to generate a key file so we can access our server through SSH.
- Open PuTTygen
- Click Load
- Navigate to wherever you downloaded your .pem key pair. Click the dropdown menu in your file navigator to show “All files”, or else the .pem key wont appear. Select the .pem file and click Open.
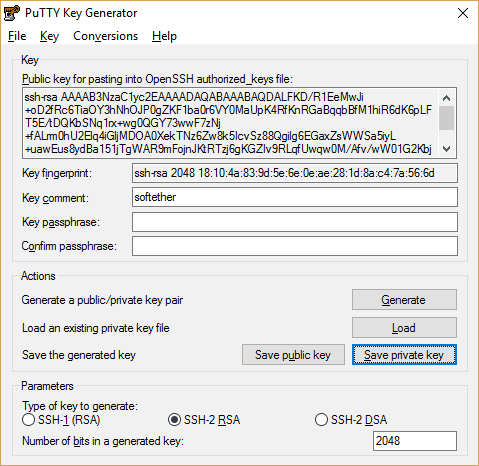
- Click “Save private key” and confirm to save without a passphrase. You must give it a file name identical to that of the .pem file. In this case, “softether”.
With the .ppk private key file in hand, we can now connect to the server.
- Open PuTTy
- Under Host Name, paste the public DNS address of your instance (starts with “ec2” and ends with “amazonaws.com”) from the EC2 instances dashboard.
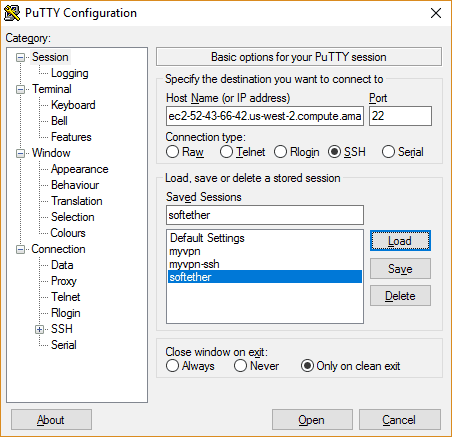
- In the left sidebar, click the ‘+’ icon next to SSH to expand it, then click “Auth”
- Next to the bottom field, click the Browse button. Navigate to the private key (.ppk) file you just created. Click Open.
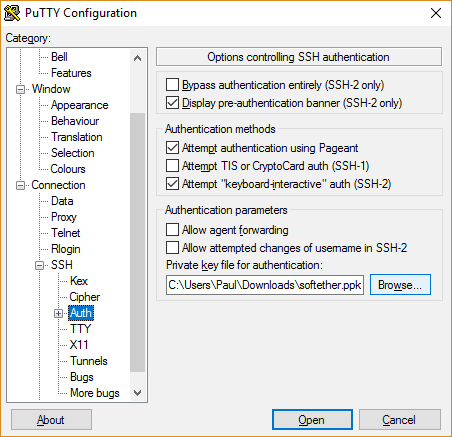
- Go back to the Session page in the left sidebar. Name the session something you’ll remember and hit Save. Now you can connect instantly from PuTTy in the future without having to go through all these steps again.
- Click Open at the bottom of PuTTy
- Click Yes to confirm you trust the server
- In the black terminal window that appears, you’ll be prompted for a username. Assuming you chose the Amazon Linux AMI, type in “ec2-user” and hit enter.
You are now SSH’ed into your server. Anything you type into the PuTTy terminal is a command for the server, not for your local computer.
Install SoftEther on your EC2 instance
Now that you can give commands to your server, we can install the SoftEther server application. Unfortunately, SoftEther is not available in any package managers, so we’ll have to download it from the website. But before we do that, let’s make sure everything is up to date.
- In the PuTTy terminal, type
sudo yum upgrade(note other versions of Linux may use “apt-get” instead of “yum”. - Type
wget http://www.softether-download.com/files/softether/v4.21-9613-beta-2016.04.24-tree/Linux/SoftEtherVPNServer/64bit-Intelx64or_AMD64/softether-vpnserver-v4.21-9613-beta-2016.04.24-linux-x64-64bit.tar.gzand hit Enter. - If the above download fails, you can find the latest version of the SoftEther VPN Server software here. Replace the URL in the above command with the download link on SoftEther’s website.
- Copy the name of the file you just downloaded as it’s displayed in the terminal.
- Type
tar xzvf softether-vpnserver-v4.21-9613-beta-2016.04.24-linux-x64-64bit.tar.gzand hit Enter to unpack the file into a new directory called “vpnserver”. - In order to compile those files, type
sudo yum groupinstall "Development Tools" - Some users have reported the gcc package won’t install via the above command, in which case you can type and enter
sudo yum install gcc - Type and enter
cd vpnserver - Type and enter
make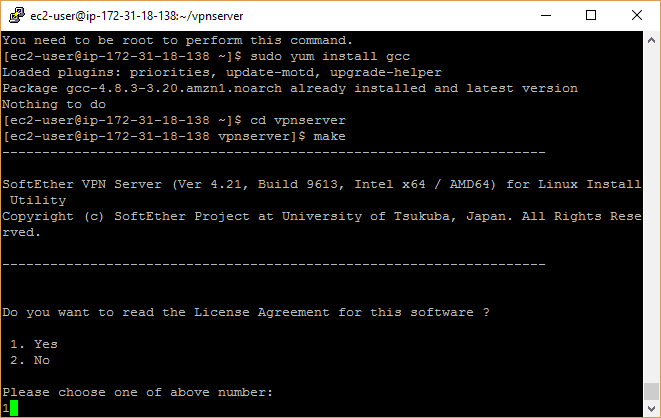
- Type “1” and hit Enter three times to get through the licensing agreement.
SoftEther is now compiled and can be executed on your server. One step closer!
Start SoftEther as a service
Next we’re going to make a file in the init.d folder that will automatically start SoftEther as a service whenever the server boots up. This will save us the trouble of turning it on manually each time we stop and start the server. You can skip this step if you please, but it can save you a lot of time in the long run. First, let’s move the SoftEther directory somewhere else.
- Type the following commands, hitting Enter after each line:
cd ..sudo mv vpnserver /usr/localcd /usr/local/vpn/server/
- Now change the file permissions to protect your files using the following commands:
chmod 600 *chmod 700 vpnserverchmod 700 vpncmd
- Create a file by typing
sudo nano /etc/init.d/vpn/server - In the empty text file, paste the following (you can paste by right clicking in Windows):
#!/bin/sh
# chkconfig: 2345 99 01
# description: SoftEther VPN Server
DAEMON=/usr/local/vpn/server/vpn/server
LOCK=/var/lock/subsys/vpn/server
test -x $DAEMON || exit 0
case “$1” in
start)
$DAEMON start
touch $LOCK
;;
stop)
$DAEMON stop
rm $LOCK
;;
restart)
$DAEMON stop
sleep 3
$DAEMON start
;;
*)
echo “Usage: $0 {start|stop|restart}”
exit 1
esac
exit 0
- Press CTRL+O (‘o’ not zero) and hit Enter to save the file. Then hit CTRL+X to exit Nano.
- Type the following commandsto make Softether run on startup:
mkdir /var/lock/subsys(this might already exist)- sudo su
chmod 755 /etc/init.d/vpn/server && /etc/init.d/vpn/server startchkconfig --add vpnserver
SoftEther will now run automatically at server startup.
Check to make sure SoftEther is working
Here we will run a quick check to make sure everything is working as desired.
- Type
cd /usr/local/vpn/serverand hit Enter - Type
./vpn/cmdand hit Enter - Type ‘3’ to choose the third option and hit Enter
- Type
checkand hit Enter to run the test
You should receive a message that all the checks passed. If not, something went wrong.
Type “exit” to quit vpntools.
Configuring SoftEther
Next we need to configure SoftEther so we can connect to it from our PC client.
- While you’re still in the vpnserver directory, type
./vpn/cmd - Choose option 1 and hit Enter
- For the hostname IP, input the IP address of the EC2 server instance followed by a colon and port 5555. You can find the IP of your server instance on the EC2 dashboard. The input should look like this:
123.123.123.123:5555 - In the next step, leave the input blank and hit Enter to connect from the Server Admin node
- The prompt should now read “VPN Server>”. Enter
ServerPasswordSetand hit Enter - Enter a password of your choice and type it again to confirm
- Next, type
HubCreate VPNand enter a new password that you will use to log in when you are not in Server Admin mode - Type
Hub VPNand hit Enter - Type
SecureNatEnable - Type
UserCreate paul, replacing “paul” with a username of your choice. - You will be asked to enter a Group Name, Full Name, and Description for the new user. Leave the Group Name blank, and use whatever you want for the other two.
- Type
UserPasswordSet paul, replacing paul with the username you just created. Enter and confirm a password for that user. - Repeat steps 10-12 for as many users as you wish.
A couple notes here. In step 9, we use Secure NAT as the means to connect hubs to the server network. Another option is Local Bridge connection, but it’s more complicated and requires you set up a DHCP server. Secure NAT takes care of the DHCP server for you.
In step 12, we use the UserPasswordSet command to enable password authentication on a particular user. SoftEther supports several other types of authentication, which can vary between users. They include NT domain, anonymous, RADIUS, individual certificate, and signed certificate authentication.
Set up L2TP/IPSec on the VPN server
We decided to use L2TP/IPSec as the VPN protocol in this tutorial for three main reason: a) it’s more secure than PPTP, b) it’s easier to set up than OpenVPN, and c) it works across multiple operating systems, unlike the Windows-only SSTP.
- While still in vpncmd’s “VPN Server>” prompt, enter
IPsecEnable - Next you are given a series of configuration prompts. Below we’ll give our recommended answers:
- Enable L2TP over IPsec Server Function – yes, enable the VPN for use on multiple devices including Windows PC, Mac OSX, iOS, and Android
- Enable Raw L2TP Server Function – no, do not allow connections without encryption
- Enable EtherIP / L2TPv3 over IPsec Server Function – yes, allow routers with this built-in function to connect
- Next comes the pre-shared key. This is a password with a maximum of nine characters. Enter whatever you like.
- For “Default Virtual HUB in a case of omitting the HUB on the Username:”, simply enter
VPN
That’s it! make sure you write down all the passwords you’ve created above and what each one is for.
Connecting to your homemade SoftEther VPN
You can connect to your VPN using any L2TP-compatible VPN client you want, but we’ll show you how to do it with SoftEther’s own app. Start by downloading the and installing the client for your operating system here.
- Open the SoftEther VPN Client Manager app and click “Add a VPN connection”
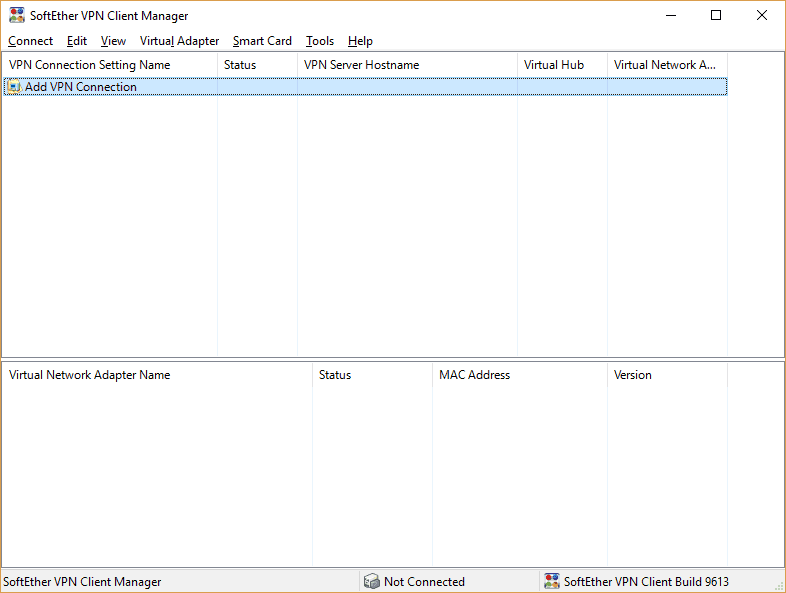
- You’ll be prompted to create a virtual adapter if you haven’t already. Confirm and press OK to accept the default name.
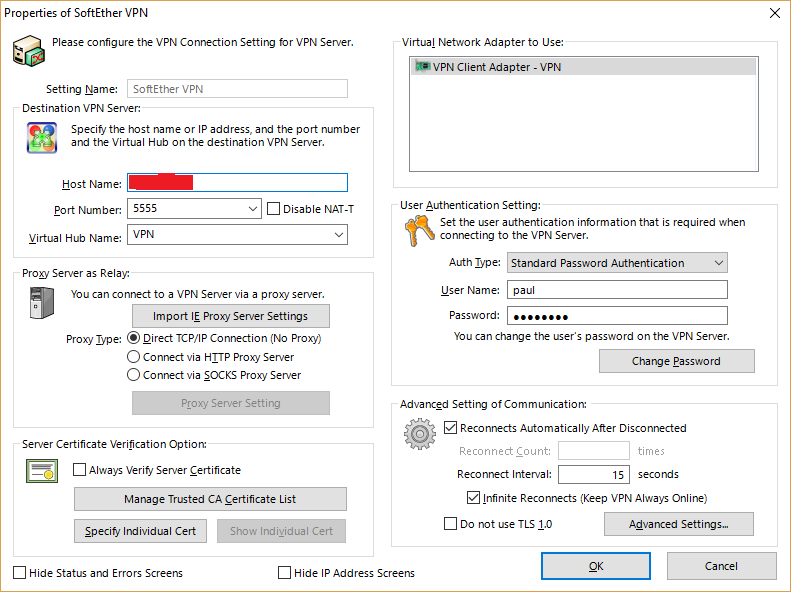
- In the Properties window that appears, enter the following:
- A Setting Name of your choice
- Host Name is your server’s IP address
- Port Number is 5555 as specified above
- Virtual Hub Name is “VPN” as specified above
- User Name is the username you set on the server above, in this case “paul”
- Password is what you set for that user with the UserPasswordSet function above
Leave everything else to the default settings and press OK. Now, back on the main window, double click the connection you just set up to connect.
A message will appear saying your VPN connection was established. Congratulations! You are now connected to your homemade VPN!
Remember to keep your bandwidth within Amazon’s free tier limits. The easiest way to do this is to right click on your instance in the AWS Console and click on the “Add/Edit Alarms” link. You can set your server to stop or even terminate after a few hours of inactivity. The free tier allows for 750 hours per month (which covers the whole month), so you shouldn’t need to do this. Those users past their initial free year of service or doing more with their AWS account, however, can prevent unnecessary charges for unused server time.
Somewhere in this tutorial, something will probably go wrong for you. If you really want a VPN but aren’t willing to do your fair share of troubleshooting, it’s probably best to opt for a paid VPN service. There are a fair number of off-the-shelf free VPN services, but they have their limitations. Linux users can find a list of our favorite VPNs for Debian and Fedora distros here. Paid subscription VPNs also allow you to channel your internet traffic through dozens of geographic locations, whereas an EC2 instance is limited to just one. Check out our VPN reviews here!


Hi! Can you please help me. When i enter Hostname of IP Address of Destination as said and coonnect by server admin mod. its show error no:1 “Add resss or port number of destination are wrong
I have checked over many time and nothing wrong about this
So what can i do ?
Are you entering the IP address of your EC2 instance and not just the example IP I used in the article (123.123.123.123)? You can find the correct IP address in your AWS EC2 console.
Chapter Configuring SoftEther,
i can’t progress in 3 to 5
When i typed my EC2 public ip (xx.xxx.xxx.xxx:5555),
Error message appeard like this -> [ Error occurred. (Error code: 1)
Connection to the server failed. Check network connection and make sure that address and port number of destination server are correct. ]
What can i do?
Connection to the server failed. Check network connection and make sure that address and port number of destination server are correct. this message comes after i did everything on Configuring SoftEther part .? please help
Please help me, I followed all the steps but I am stuck on cd vpnserver no such file or directory prompt.
Type
lsto see a list of files and folders in your current directory. Maybe they changed the name of that folder in an update, but it should still be there.Amazing tutorial. Works like a charm. There is now a pre-build Amazon Image that can be used that to create your own VPN. Although some of the paths are different the instructions in this block proved to be extremely valuable … thanks a lot for sharing. Go to EC2 and select AMI , search for Softether and launch. Then ssh into the instance as described in this blog and adapt
Amazing!!! Followed step by step in ubuntu – only had to change: chkconfig –add vpnserver for sudo update-rc.d vpnserver defaults. Love it when someone takes the time to be explicit in their documentation. Thanks Much!
Paul, thank you for tutorial! May you please explain how to connect to this vpnserver via standard windows 7 vpn client.
Hi Andrey,
The built-in Windows 7 VPN connections don’t support OpenVPN, so you need to use the OpenVPN app as described in the tutorial.
Best,
Paul
Quick question. What is the MyIP CIDR in the Security Group, if I am trying to isolate to a specific network space?
I’m not familiar with how CIDR works but I think that would be a question for your network admin.
Is there a specific reason for using EC2 and not just any VPS? I mean, you can get a cheap 128Mb VPS for a few $ a year. MS Azure has free trials too.
In any case, great tutorial!
Any VPS is fine. EC2 has a free tier, which is why we used it here. I also like how EC2 handles security groups so I don’t have to learn IPtables 😛
well I got a litell further. after downloading the file.I type “tar xzvf softether-vpnserver-v4.21-9613-beta-2016.04.24-linux-x64-64bit.tar.gz” and it says :
tar (child): soft… cant open no such file or directory
tar (child): Error is not recoverabule: exiting now
tar: Child returned status 2
tar: Error is not recoverabul: exiting now
Is it becaus I can’t log in as “su” only “pi@raspberrypi:/ $” ?
You may not have downloaded the same version as in this tutorial. Check to make sure the filenames match up exactly.
well I had to download the arm 32 bit vershion for my rasperrry PI.
I did do the section of tutorial on windows puty than went to my linux to install softether. Is this corect steps to do ? or am I suposta install softether with puty/windows pc ?
any ways I redid the step again. “chkconfig –add vpnserver”
got this: bash: chkconfig: command not found
sorry about all the out dated reply’s.
But Right now I got stuck at “Start SoftEther as a service” step 6.
ween I try to typ “chconfig –add vpnserver”
bash:chconfig: command not found
And I got stuck ate Config Softether step 3 . Ween I tryed to put what I thaink is the ip I get error code 1 conection to the server failed.Check network conection
ok so I checked to se if I typed the cmd rong on rasbin pi but its just on this post I did. So im geting the same error. But on config softether step 1.2 sudo mv vpnserver /usr/local “mv: cannot start ‘vpnserver’: No such file or directory”
I keep going and ween I try to start it says its already started(that ok)
than I get the origenal error wen I try chkconfig.
I did get the files : download instal proses from a you-tube tutorial on how to get softether on raspberry pi. Becuas the one on this tutorial culd not be found or ewhatever it sayed wen I tryed to download the link you provided.(shuld not mater)
I believe the command is “chkconfig” not “chconfig”
ok so I checked to se if I typed the cmd rong on rasbin pi but its just on this post I did. So im geting the same error. But on config softether step 1.2 sudo mv vpnserver /usr/local “mv: cannot start ‘vpnserver’: No such file or directory”
I keep going and ween I try to start it says its already started(that ok)
than I get the origenal error wen I try chkconfig.
I did get the files : download instal proses from a you-tube tutorial on how to get softether on raspberry pi. Becuas the one on this tutorial culd not be found or ewhatever it sayed wen I tryed to download the link you provided.(shuld not mater)
nvm I got a litel further
what softether file do I need for raspbery pi ?
This is an amazing tutorial. Followed it verbatim and it works great. Took ~45 mins.
Hi Paul,
Thank you so much for this very clear step by step tutorial !!
I feel very happy, because i never thought i would be able to make my own vpn, but now I know i can make as many as I want. Do you think I can use this vpn with Paypal ? I travel a lot these days, and I had hard time with their security team because of IP change.
Thank you again !