
The Tor network provides a way to connect to the internet without your location being known. It also provides its own safe space where people can create private sites and services, and where others can access them. For example, whistleblowers can contact journalists securely by uploading data to the relevant SecureDrop onion site. In this article, we’ll explore how it’s possible to set up a hidden Tor service or .onion website.
Tor background
The Onion Router (Tor) is one of the best known Internet privacy tools. Developed by various branches of the U.S. Department of Defence in the mid-1990s. The term ‘onion router’ is used to help visualize the way it works. Network traffic is routed into the Tor network, then bounced through other Tor nodes inside the network before it exits back into the clear net (meaning, the regular internet).
The initial packets are redundantly encrypted and each Tor node along the way only decrypts the layer it needs to know what to do with the packet. Due to this layered encryption, no single Tor node knows both the source and destination of any network packet.
There’s another way to use Tor. Instead of using it in a VPN-like manner to enter, scramble, and then exit Tor, it’s possible to run services such as websites inside the Tor network itself. In this case, network traffic enters the Tor network, but never exits. This article will cover the basic steps involved with building a Tor service.
There are two main reasons to run a Tor hidden service:
- To run a service that you want to hide and remain hidden and not tied to you in any way. This is the Silk Road Model. The Silk Road was an illegal marketplace run as a hidden service on the Tor networks. Because it sold illegal goods, the operators had a vested interest in remaining hidden. However, there are plenty of legal sites run by people who wish to remain hidden for political or other reason.
- To provide a secure and anonymous way for your visitors to reach you, even if you don’t care about the site being attributed to you. This is the Facebook Model. Facebook runs a Tor service at https://www.facebookcorewwwi.onion. Obviously, there’s no attempt to hide that is a Tor Facebook service as its owners and operators are well known.
While the intent of this article is the latter case, both have many operational security (OpSec) concerns you’ll need to address. Simply setting up a web server and installing Tor probably won’t be enough to keep your site and your identity separate for long. How important that is to you is commensurate with your level of paranoia.
Installing the Tor client
Tor hidden services can only be accessed through Tor connected systems. Much like you would need to launch a VPN to gain access to some geo-blocked content, you will need to launch Tor to access hidden services. Thankfully, installing and running the Tor client has become extremely easy due to the hard work of the Tor Project over the years.
See also: Best VPNs for Tor
This article is not about an end-to-end secure Tor client setup. We just need to get a Tor client running in order to move on to the creation of a hidden Tor service. Therefore, once you have followed the basic Tor client setup instructions in this article, you may wish to review the Tor Project’s recommendations for using your Tor client properly to maintain anonymity.
There are many Tor clients for a wide variety of platforms. Dave Albaugh penned The ultimate guide to using Tor for anonymous browsing that contains a fairly exhaustive list. In this article, we’re just going to look at installing the Tor client on the big three
operating systems; Windows, macOS/OSX, and Linux.
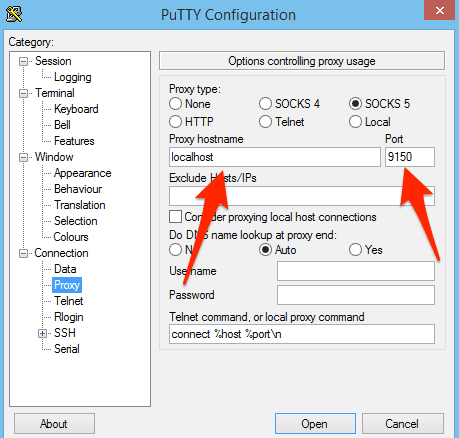
The easiest way to get the Tor client running on any system is to install the Tor Browser Bundle. It contains a hardened version of Firefox and creates a SOCKS5 proxy on localhost host port 9150 that other proxy-aware applications such as SSH can use. We’ll need Tor-protected SSH to set up our hidden service.
Installing the Tor browser for Windows
To install the Tor client for Windows, visit the Tor site directly. Ensure you download from the real torproject.org website. There are many adversaries of Tor and therefore many compromised versions of the Tor client on the Internet. Downloading directly from torproject.org ensures you will get a version free of tampering. There is also a GPG signature for each download on the Tor site which you can compare with your download for even more confidence.
Click the Download button and select the Windows version:
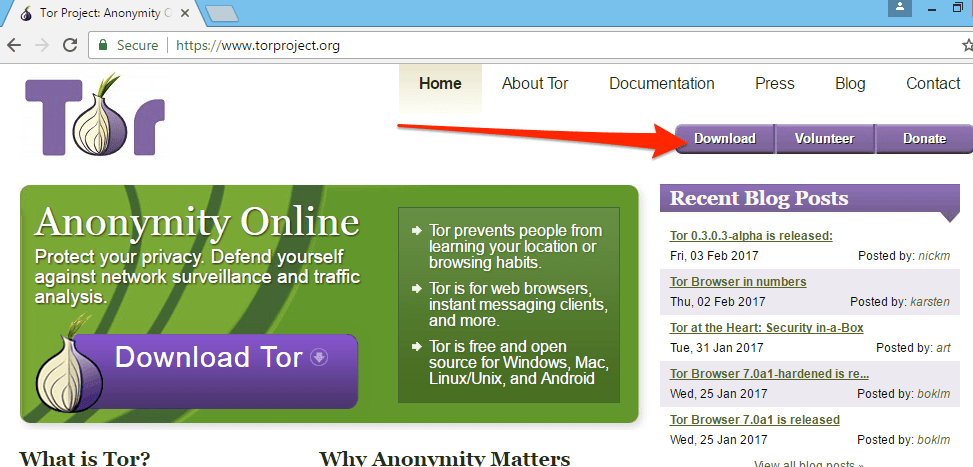
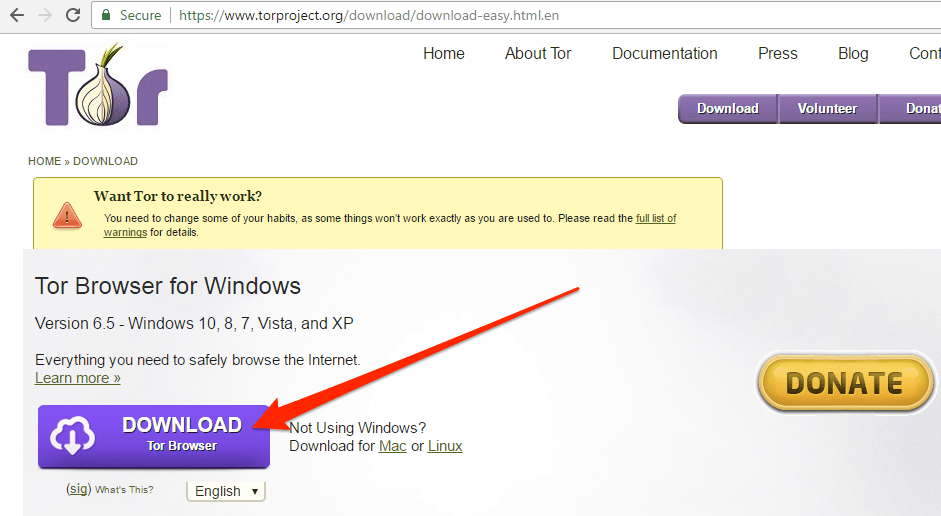
Double-click the downloaded file to start the installation process. You’ll be asked to select a language and an installation location much like any other standard Windows installation process. When the installation is complete you will see a new Tor Browser on your desktop.

The first run process will ask you what type of Tor setup you’ll need. Notice how the Direct connection option has a Connect button while the bridge or local proxy option has a Configure button.
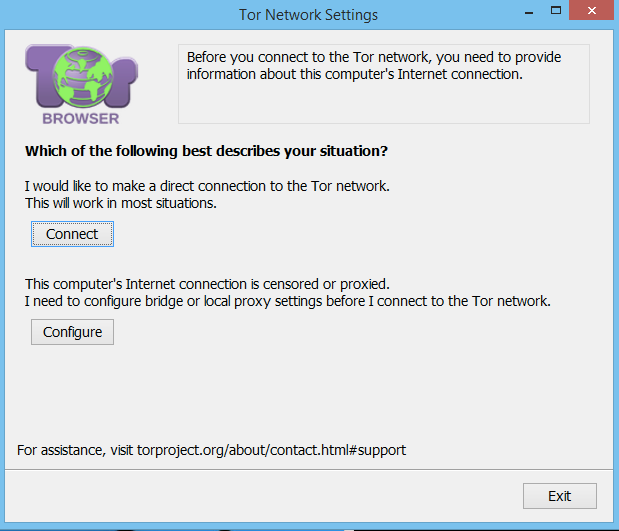
In most cases, the direct connection option will technically work, but there are two situations where you may wish to chose the second option. A direct connection will still provide anonymity, but it will be obvious to an observer that you’re using Tor which you may not want.
Also, some ISPs and networks may actively block Tor connections, or you may need to configure a proxy to access Tor. If any of those apply, you will want to select the second option to set up a bridge or configure a proxy.
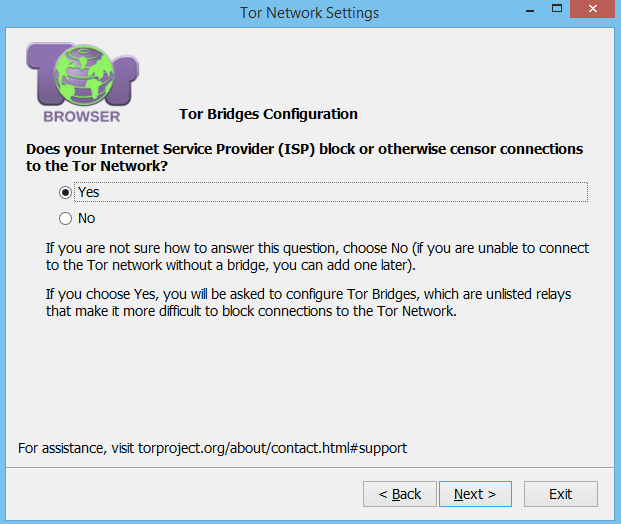
Bridge and proxy setup
Selecting yes to this question will open up a screen where you can enable bridges. Tor nodes are published so anyone wishing to block Tor access on their network simply needs to block requests destined for these known nodes.
A bridge is simply an unpublished Tor node, therefore connections to it likely will not be blocked because it’s not a known node. Unless you have some need to specify your own bridges, select the Connect to provided bridges
option.
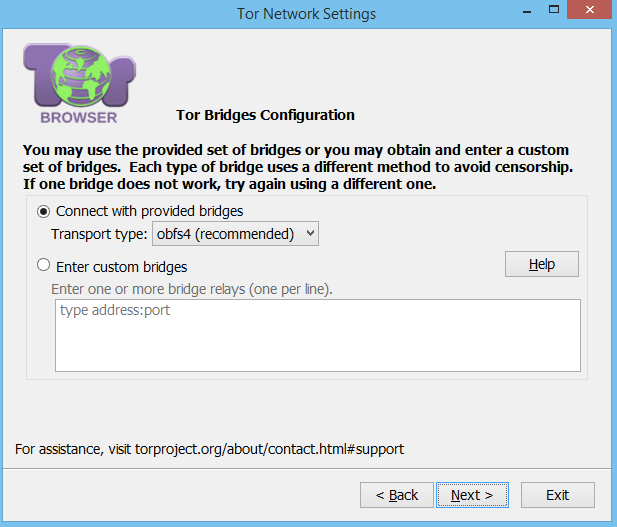
You will then be taken to the proxy configuration page.

Selecting no to this question will bypass the bridge configuration screen and take you directly to the proxy configuration screen.
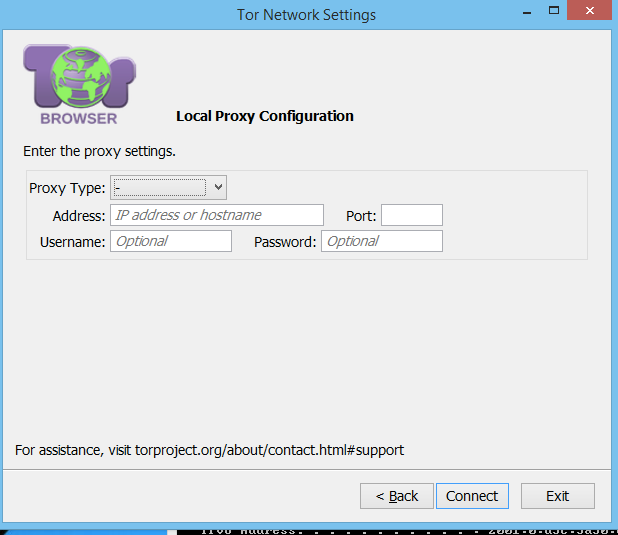
Enter your specific proxy information and click the Connect button. You will be connected to the Tor network and the Tor browser will launch.
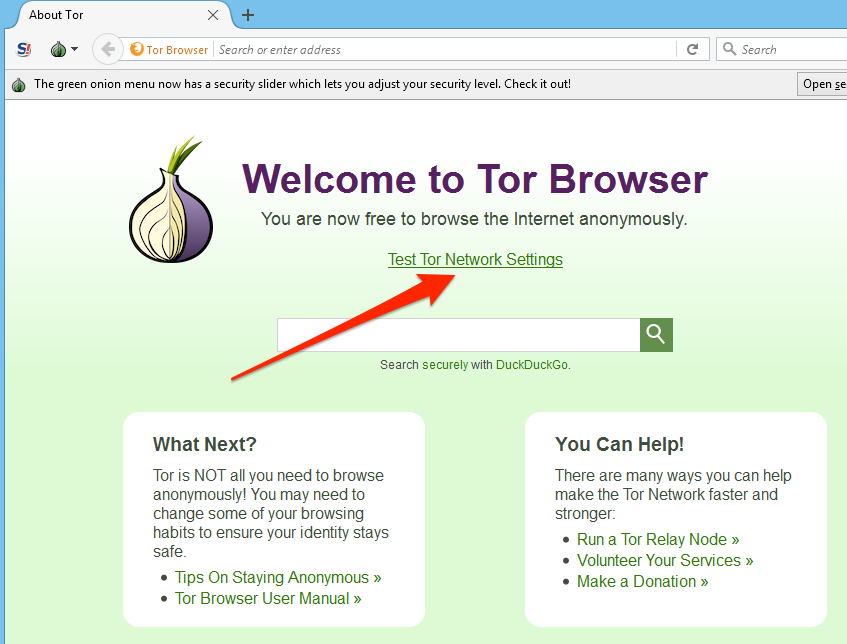
Click the Test Tor Network Settings
link to confirm that you are connected. The IP Address you see displayed should not be your own.
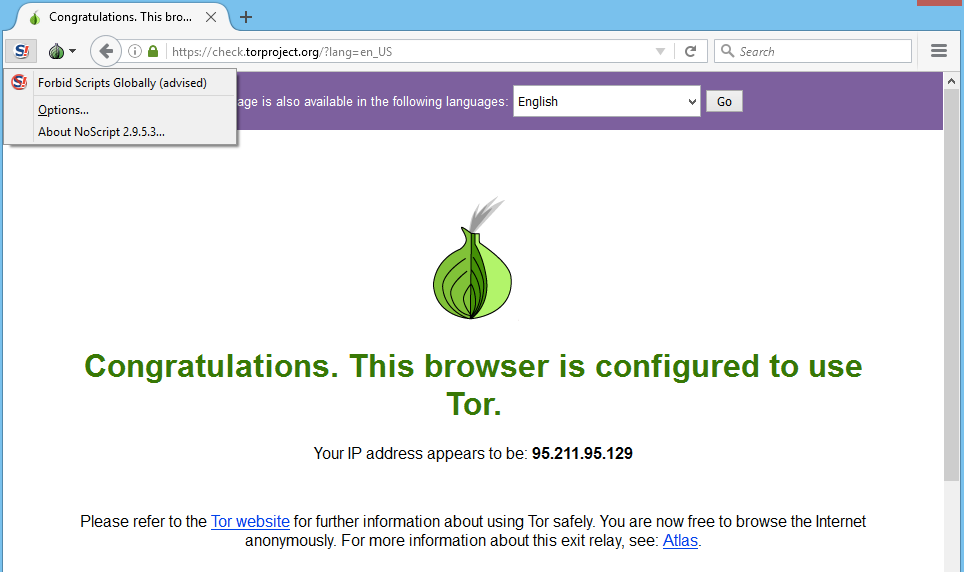
If you’re interested in the exit node you’ve been assigned, click the Atlas
link to discover more about it.
Installing the Tor browser for macOS/OSX
To install the Tor client on macOS/OSX, visit the real Tor Project download page and select the Tor Browser for Mac
option.
You will be prompted to open the image file and move it to your applications folder:
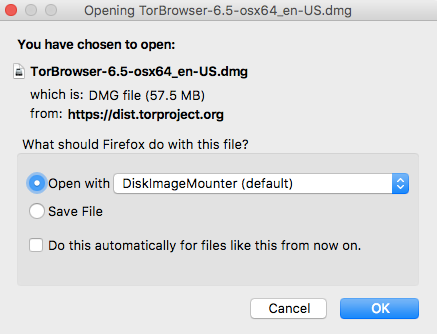
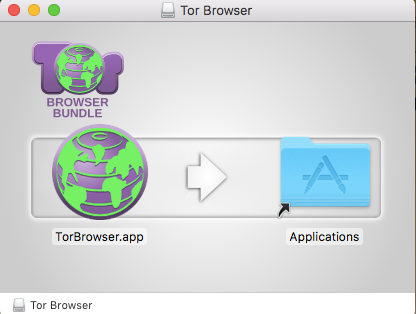
You’ll then be able to find the Tor Browser application in the Launchpad. The first run process will take you through the same bridge and proxy wizard that the Windows version did. Once you’ve completed that properly, click the Connect button. The Tor browser will launch. Click the Test Tor Network Settings
link to ensure it is working correctly and showing some other IP address.
Installing the Tor browser for Linux
The Linux Tor browser is a single binary executable that has no installation process.

Extract the zipped tar file and it will create a tor-browser en-US
directory with a file named start-tor-browser.desktop
in it. Run that file from the shell or double-click it in your file manager to launch the Tor Browser.
This will launch the now-familiar first run process that will allow you to set up any bridges or proxies you may need, and then connect to Tor. Detailed instructions on that setup are in the Installing the Tor browser for Windows section of this article.
Clicking the onion icon beside the browser address bar will disclose information about the Tor circuit that has been established for you. The circuit is the route through Tor that your request took. For example, to view the Comparitech website from Canada, I entered the Tor network in France, bounced through Germany, and exited to the clear net in The Netherlands.

Setting up a Tor service
Tor services use a specific URL structure. In the clear net we’re used to seeing Top-Level Domains (TLDs) such as .com, .net, and a myriad of others. A TLD that does not exist in the clear net is .onion and, conversely, it is the only TLD that exists in the Tor network. Meaning, if you try to connect to a Tor service such as Facebook’s Tor site at https://www.facebookcorewwwi.onion without being connected to Tor, you will not be able to. Because of this naming convention, some people refer to Tor services as onion sites
.
Security considerations during setup
We’re now going to set up a Tor service using a cheap Linux VPS. Here’s the first lesson in OpSec: because I am not interested in the Silk Road Model, I am just purchasing a VPS from a cloud provider which will forever associate me in some way to this server. You should use a server that reflects your level of concern about being associated to it.
Another consideration is that connecting to this server with your ISP IP address will associate you with this service. If that is a concern for you, there are two main ways around this.
If you have some other suitable method to connect to this system without using SSH you can set up your Tor services using that method and never have to worry about it. But, if you have no way to connect to this server other than SSH, you can use the SOCKS5 proxy provided by the Tor Browser to route your SSH traffic through. Either method should prevent your ISP IP address from becoming associated with this server.
SSH using Tor proxy
If you’re using PuTTY, you can configure that in the Proxy pane:
Using Linux or macOS, you can use SSH with the ProxyCommand argument using the correct $SERVERIP and $USERNAME for your server. Using an IP instead of any hostname you may have created should prevent DNS leaks:
$ ssh $SERVERIP -l $USERNAME -o ProxyCommand="nc -X 5 -x localhost:9150 %h %p"
I see this in the server logs:
Feb 5 16:34:34 host-172-20-0-101 sshd[11269]: Accepted password for $USERNAME from 65.19.167.131 port 22323 ssh2
And we can consult the Tor Atlas to confirm that 65.19.167.131 IP is a Tor exit node in the US, so everything looks good.
Once Tor is installed on the server, you can also decide to set up an SSH Tor service and then connect using the .onion name for your service. That command looks like this and since Tor proxies requests, the localhost IP is seen in the SSH logs.
$ ssh $YOURSERVICENAME.onion -l $USERID -o ProxyCommand="nc -X 5 -x localhost:9150 %h %p" $USERID@$YOURSERVICENAME.onion's password: Last login: Sun Feb 5 20:47:10 2017 from 127.0.0.1
Note: If you are using an alternative to PuTTY, look up their documentation for achieving the same result.
Installing Tor
Add the Tor repository to your installation sources. Tor may be available in your distributions repos, but it could fall out of date. It’s probably best to create a repo file such as /etc/yum.repos.d/tor.repo with the actual Tor project repo using following entries:
[tor] name=Tor repo enabled=1 baseurl=https://deb.torproject.org/torproject.org/rpm/el/6/$basearch/ gpgcheck=1 gpgkey=https://deb.torproject.org/torproject.org/rpm/RPM-GPG-KEY-torproject.org.asc
Then install Tor:
sudo yum install tor
You can find Debian and Ubuntu packages in the https://deb.torproject.org/torproject.org/dists/ directory; update the configuration above as necessary for your distribution.
Take a look at the /etc/tor/torrc file. The bare minimum you’ll need enabled in that file is the following:
RunAsDaemon 1 DataDirectory /var/lib/tor
You may also wish to route your DNS queries through Tor. This will force all your DNS through Tor by adding this to your torrc fle (use some value for VirtualAddrNetworkIPv4 that makes sense on your server):
VirtualAddrNetworkIPv4 10.192.0.0/10 AutomapHostsOnResolve 1 TransPort 9040 TransListenAddress 127.0.0.1 DNSPort 53
To make that work, you will also have to tell your server to resolve DNS on the localhost. That can be done by modifying the /etc/resolv.conf to tell your system to resolve using the localhost instead of whatever nameservers it is configured for now.
nameserver 127.0.0.1
Then restart your resolver:
sudo service network restart
There is more information on DNS and proxying in general on the Tor Project page here.
Prepping the actual service (web, SSH)
A Tor service can be literally any type of service that you’d see running on the clear net. I am going to use a web server as an example, utilizing the sleek Nginx (pronounced Engine X
) web server. Tor will run in front of Nginx and proxy all requests. I am using CentOS for these instructions so most of these commands will work for any Red Hat based distro. You can use apt get instead of yum on Debian-based systems such as Ubuntu, and the files I mention may be in slightly different locations.
Install Nginx using your distribution’s package manager.
sudo yum install nginx
Recall that Tor is going to proxy requests for the web server. This means that Nginx should only listen on the localhost ports. If Nginx also listens on the network interfaces attached to the Internet, then you run the risk of your hidden service being available on the clear net. To bind Nginx to the localhost only, find the default.conf file and update the default server stanza. In RPM-based distros, the default configuration file is usually here:
sudo vi /etc/nginx/conf.d/default.conf
Add localhost to the default listen directive so it looks like this:
listen localhost:80 default_server; server_name _; root /usr/share/nginx/html;
Restart Nginx:
sudo serice nginx restart
Test both the localhost port 80 and the internet accessible port 80. On the server itself:
# curl -IL localhost HTTP/1.1 200 OK Server: nginx/1.10.2 Date: Sun, 05 Feb 2017 20:13:33 GMT Content-Type: text/html Content-Length: 3698 Last-Modified: Mon, 31 Oct 2016 12:37:31 GMT Connection: keep-alive ETag: "58173b0b-e72" Accept-Ranges: bytes
Off the server:
$ curl -IL 170.75.162.213 curl: (7) Failed to connect to 170.75.162.213 port 80: Connection refused
Notwithstanding that there may be some information leakage in those headers that should be dealt with, the connection setup looks good. More on headers in the OpSec section later.
The next step is to tell Tor to listen for traffic on the external network interface on port 80 and then proxy that traffic to your local Nginx installation.
sudo vim /etc/tor/torrc
Add the following lines at the end. The format of the HiddenServicePort directive is the port you want Tor to accept connections on, and then the IP:PORT to proxy the request to. In this case, we want Tor to listen on the standard HTTP port 80 and then proxy back to our Nginx instance on port 80 on the localhost. You can infer from this that you can also proxy separate back ends and not just local services with Tor.
HiddenServiceDir /var/lib/tor/http_hs/ HiddenServicePort 80 127.0.0.1:80
Restart tor:
sudo service tor restart
To find out the name of your new HTTP Tor service, look in the hostname file of the HiddenServiceDir specified in the torrc file. This is the actual HTTP service name generated for this article, but it likely will no longer work at time of publication:
cat /var/lib/tor/http_hs/hostname
zhsluuuvqvstkzey.onion
In 10 minutes or so, that will work on Tor and you’ll be able to bring it up in the Tor browser.
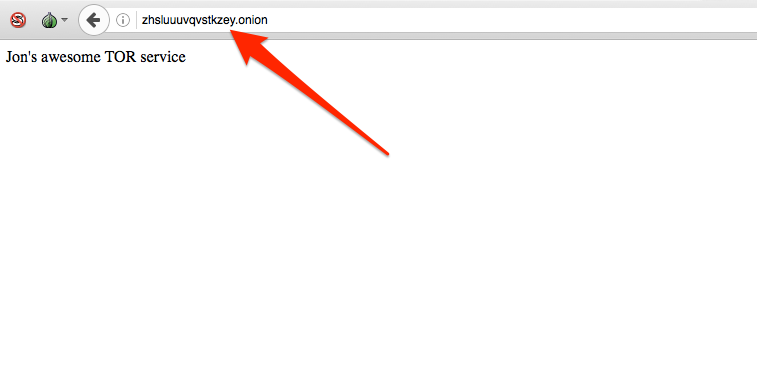
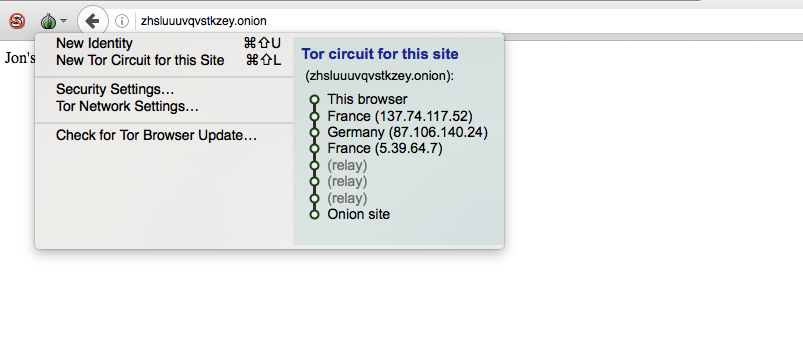
Note the different Tor circuit that an onion service uses. It doesn’t exit Tor to the Internet as the earlier example of using Tor to reach the Comparitech site did. This is because .onion sites only reside inside
Tor.
You can now add more services such as a Tor SSH service or anything else. Just install the service you want to use, and then add the two HiddenService directive to your torrc and restart Tor.
sudo vim /etc/tor/torrc
HiddenServiceDir /var/lib/tor/ssh_hs/ HiddenServicePort 22 127.0.0.1:22
Restart Tor to generate the service keys and name:
sudo service tor restart sudo cat /var/lib/tor/ssh_hs/hostname oxxcatqaha6axbcw.onion
SSH in from some other machine using your onion name:
ssh oxxcatqaha6axbcw.onion -l $USERID -o ProxyCommand="nc -X 5 -x localhost:9150 %h %p"
$USERID@oxxcatqaha6axbcw.onion's password: Last login: Sun Feb 5 20:53:20 2017 from 127.0.0.1
Once you have confirmed you can SSH using the onion name, it’s a good time to shut SSH off from the clear net. Uncomment this line in your /etc/ssh/sshd_config file:
#ListenAddress 0.0.0.0
And change it to read:
ListenAddress 127.0.0.1
And restart SSH:
sudo service ssh restart
Keep your hidden service hidden (OpSec)
Operational Security (OpSec) is the concept that collecting easily available, and seemingly unrelated, information can generate some very specific information. Tor itself is extremely good at anonymizing traffic, but humans are terrible at OpSec. Because of that, many people who have used Tor for evil have been successfully identified.
The highest profile Tor case is likely the Silk Road black market Tor site. The administrators of both generations of that site were arrested as well as some vendors. While the finer details will probably never be fully known, in most cases anonymity was being broken by sloppy OpSec rather than a weakness of Tor itself. However, there are cases where the Tor network itself may have been compromised.
There are reports that adversaries of Tor are operating Tor nodes. The idea being that if an adversary operated enough relay and exit nodes then large-scale traffic analysis could be performed to identify individual users.
The FBI Operation Onymous that took down Silk Road 2.0 as well as 400 other sites was likely running Tor nodes as part of its investigative data collection. A number of Tor relays that were modified to change headers to reveal traffic flow information appeared in the Tor network leading up to the arrests.
It’s also been noted that 129 of the 400 sites were hosted by a single web hosting provider. This may mean that hosting provider has poor OpSec, or it may mean it cooperated with law enforcement by providing internal server information not available to normal Tor users.
Whatever the case, if you want to remain disassociated from your Tor hidden service, you have a very large task ahead of you. The budget and determination of your adversary will quite likely be the determining factor of success rather than any steps you personally take. But, that’s no reason to be sloppy. Ben Tasker has written a thoughtful piece on Tor OpSec which bears reading. Here are some of the things that you should review to ensure you’re not leaking information that can be used to identify you.
Technical OpSec
Security is best performed in layers; there is no one-size-fits-all
security model. We see this in the Tor architecture in that no single node has enough information to compromise a user. Likewise, when setting up your Tor server and services, you should not trust them to be configured with your particular use case in mind.
Firewall
We configured our two sample Tor services to listen only on the localhost interface. This should be enough to prevent them from being available in the clear net. But, things can happen that are out of your control so it makes sense to add a layer of security and firewall off the entire server on all ports. This will prevent your services from suddenly becoming available on the clear net due to a errant upgrade or human error.
Application headers
There are two reasons to eliminate as many headers as possible in all your services. First, they may actually divulge information about your system that can help identify where it is. Second, even if they don’t divulge specific information like that, all data can be used in an attempt to fingerprint a server and later correlate it to some other, known, server to identify it.
You can remove the Nginx version string by using the server_tokens directive in server, location, or http section of your Nginx configuration file.
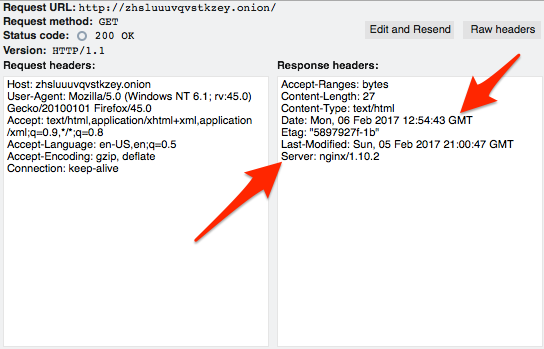
sudo vim /etc/nginx/conf.d/default/com
I put it in the server section:
server { server_tokens off; listen localhost:80 default_server; server_name _; ...
Now the version is gone:
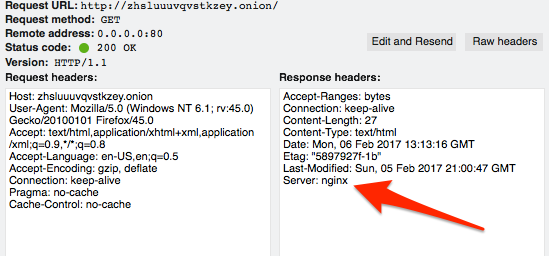
You can go farther with Nginx by using the Headers More module. With it, you can set or remove a wider variety of headers.
SSH
A special consideration with SSH is the server identification fingerprint. When you first connect to an SSH server, you are notified that your system can’t confirm the identity of the remote system, presented with the key fingerprint of the server, and asked what you want to do. Most of us accept it and then the public key of the server is stored in our known_hosts file. Subsequent attempts to connect to that service do not prompt us any more:
$ ssh oxxcatqaha6axbcw.onion -l $USERID -o ProxyCommand="nc -X 5 -x localhost:9150 %h %p" The authenticity of host 'oxxcatqaha6axbcw.onion (<no hostip for proxy command>)' can't be established. RSA key fingerprint is SHA256:FroAZ5QibIdWgYyCajY3BxMQjR5XGQFwS1alTOarmQc. Are you sure you want to continue connecting (yes/no)? yes Warning: Permanently added 'oxxcatqaha6axbcw.onion' (RSA) to the list of known hosts. $USERID@oxxcatqaha6axbcw.onion's password:
This line is added to my know_hosts file:
oxxcatqaha6axbcw.onion ssh-rsa AAAAB3NzaC1yc2EAAAABIwAAAQEArIR0Jn5fhY7kQxb37jBC1+hRFZlxjrs4YsWf4DVJjjY7dlVzhN5mEnmBZMsNSLbr9B3Fzk

8ukJp9BysAp0GbPDYT2egCggHfX79806KSMBIuUiU+g6AsxsyZPjv8t2xRc7KBfqaDL2BVqOy1bnxUva1AsPHeRG/symeTA3

Zo+Qz0YVNMN+fPCS3YA7Bc7u1YbP6KLpwyFs+CEcJdH1mHiGTx2Z0l9q7atj8tAheO7livBpLacP0SPseQqkEfJ/GWVUB7cW

KB7S2N1dy1M9im883Lpgp9Xe2doy2vScNwb70tES4zZg08AjSsybLXzSdYTEUqSP6IS0YWBE1dqdlfw==
So, the next time I log in that step is not performed:
$ ssh oxxcatqaha6axbcw.onion -l $USERID -o ProxyCommand="nc -X 5 -x localhost:9150 %h %p" $USERID@oxxcatqaha6axbcw.onion's password: Last login: Mon Feb 6 13:25:50 2017 from 127.0.0.1
The problem with this lies in my known_hosts file. Since I connected to my server earlier using the public IP and my Tor proxy, I already have an entry for that onion fingerprint under a different IP address:
170.75.162.213 ssh-rsa AAAAB3NzaC1yc2EAAAABIwAAAQEArIR0Jn5fhY7kQxb37jBC1+hRFZlxjrs4YsWf4DVJjjY7dlVzhN5mEnmBZMsNSLbr9B3Fzk

8ukJp9BysAp0GbPDYT2egCggHfX79806KSMBIuUiU+g6AsxsyZPjv8t2xRc7KBfqaDL2BVqOy1bnxUva1AsPHeRG/symeTA3

Zo+Qz0YVNMN+fPCS3YA7Bc7u1YbP6KLpwyFs+CEcJdH1mHiGTx2Z0l9q7atj8tAheO7livBpLacP0SPseQqkEfJ/GWVUB7cWK

B7S2N1dy1M9im883Lpgp9Xe2doy2vScNwb70tES4zZg08AjSsybLXzSdYTEUqSP6IS0YWBE1dqdlfw==
This is a pretty powerful correlator. It’s almost certain that the IP address 170.75.162.213 is hosting my Tor service at oxxcatqaha6axbcw.onion based on this information.
These are just two examples of ways in which your service can be fingerprinted for later identification. There’s probably no way to enumerate every possible way your service can be identified but application headers and behaviour are good umbrella topics to review.
Behavioural OpSec
There are non-technical ways that your service may be tied to you as well.
Uptime
Your service can be monitored for uptime. Many Tor services are not hosted in traditional data centers and my only be available sporadically. Correlating uptime cycles may give clues to the operator’s time zone or work schedule.
Account data
There’s little sense in using Tor for anonymity if you access a site and then log in with identifiable information. Ross Ulbricht, convicted as the Dread Pirate Roberts of Silk Road (v 1.0), was momentarily distracted by FBI agents in a library and another FBI agent grabbed his laptop and ran. Ulbricht was logged in to his Silk Road DRP account. Obviously, Ulbricht had already been identified and was set up, but that tiny bit of social engineering allowed the FBI to catch him logged in to the account of the person they were looking for.
Username correlation
Many people use handles or pseudonyms on the internet to hide their real identities. In some cases, they select a handle early on and just tend to stick with it, or at least re-use it from time to time. This is bad OpSec.
While this has nothing to do with Tor specifically, it serves as a good example of how historical account data can be used to identify people. Hillary Clinton’s email administrator Paul Combetta was targeted by Reddit users as the user ‘stonetear’ who was soliciting information about how to modify email recipients around the time the news of Clinton’s private email server surfaced. There is a long and easily traced history of Combetta using that handle so it provided almost no anonymity at all.
As with the technology OpSec concerns, there is probably no limit to the type of behaviour that can be collected and correlated to identify the operator of a Tor service. Your adversary will simply have to run out of ideas and money before you do.


Thank you for sharing. What’s problematic is all the demonstrations I can find shift in to command mode. (the old DOS system of administrator commands) but nobody tells you how to get out of the in the Android graphical interface. It’s like there is a missing page. Onionshare offers a solution but at present doesn’t allow any further downloads, though I suspect something was downloaded from the site!