
In this tutorial, we will guide you through how to set up Obfsproxy with a homemade OpenVPN server and a Windows PC. This prevents censors and firewalls from using deep packet inspection to determine whether you are encrypting traffic, which you are by using OpenVPN.
This tutorial assumes you have a functioning OpenVPN server and Windows client already set up on an Amazon Web Services EC2 instance. Check out our previous OpenVPN server tutorial on how to do that.
Obfsproxy should prevent your VPN from being blocked by censors in countries like China. We have confirmed it also bypasses the VPN ban on Netflix.
Before we begin
Obfsproxy, short for obfuscation proxy, was adopted by the Tor community. In their words:
“Obfsproxy is a tool that attempts to circumvent censorship, by transforming the Tor traffic between the client and the bridge. This way, censors, who usually monitor traffic between the client and the bridge, will see innocent-looking transformed traffic instead of the actual Tor traffic.”
Obfsproxy, however, is actually independent of Tor, so it can also be used to obfuscate OpenVPN traffic.
For Obfsproxy to work with OpenVPN, we’ll need to configure it on both the client and server side. Some VPN providers, including NordVPN and AirVPN, offer pre-configured servers, so you only need to configure the client side. This tutorial will explain both.
Here’s a list of what you’ll need:
- A functional OpenVPN server on an Amazon Linux EC2 instance similar to the one in our previous tutorial
- The OpenVPN Connect GUI (client-side app)
- PuTTy
- Python 2.7
- Microsoft C++ Compiler for Python 2.7
- OpenSSL Light for Windows
- ProxySwitchy Sharp or an equivalent proxy software
Client-side Obfsproxy configuration on Windows
We’ll start with the client-side configuration, because some people won’t need to do the server-side setup if their VPN provider already offers pre-configured servers.
Preliminary setup
Thankfully, NordVPN has already done you the courtesy of bundling most of the required dependencies together in a single .zip file. Download it here.
Start by installing Python 2.7 in the default directory with the default settings. Obfsproxy is a Python program, so you’ll need it to install. If you have a more recent version of Python, such as 3.3 or 3.4, we recommend you install 2.7 anyway. You can find the installation file in the Step 3 folder of NordVPN’s zip file (we’re skipping the step 1 and 2 folders).
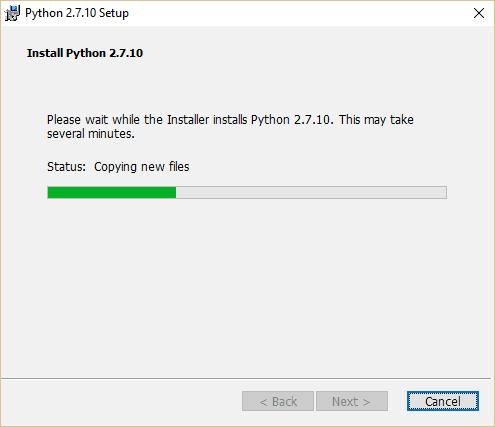
Next we need to install the Microsoft C++ Compiler for Python 2.7 from the step 4 folder. There is no such compiler for later versions of Python. You might be able to find a workaround using MS Visual Studio or the Numby package, but we found it much less of a pain just to install Python 2.7.
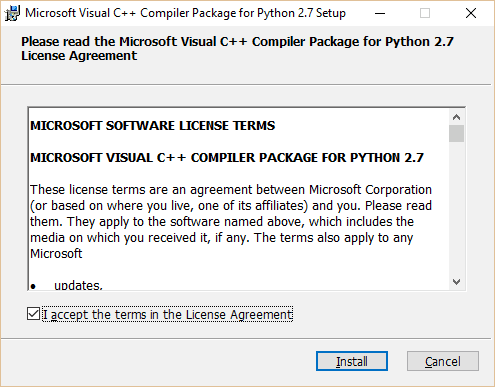
Once you have installed the C++ compiler using the default settings and directory, move on to the step 5 folder. Install OpenSSL Light, again, using all the default settings. You might be prompted for a donation after installing. Hit Finish, then close the pop up window if you don’t wish to donate.
Bookmark this page, restart your computer, and open this page again.
Obfsproxy and OpenVPN setup
You now have everything you need to run Obfsproxy, but we still need to configure it so it can be used with OpenVPN. We’ll start by modifying our existing .ovpn files in the OpenVPN directory. If you haven’t set up OpenVPN yet, please refer to our previous tutorial. If you installed OpenVPN in the default directory, you’ll find the config files in C:/Program Files/OpenVPN/config.
Find Notepad or another text editor, right click it, and choose “Run as Administrator.” Open the config file you use to connect to your OpenVPN server normally. Click File > Save As and name it something else so we have a copy to work with without worrying about screwing up the original.
We’ll modify the config file to look like the following:
 proto tcp-client

remote <your-server-IP> 8080

port 1194

dev tun1

secret ovpn.key

redirect-gateway def1

ifconfig 10.4.0.2 10.4.0.1

socks-proxy-retry

socks-proxy 127.0.0.1 10194
Notice the addition of two lines at the bottom, plus a port number on the end of the remote line. Replace <your-server-IP> with the IP address of your Amazon EC2 instance. Unless you’ve set up an elastic IP on Amazon, this address will change every time you stop and start your instance, so remember to change it if needed. On the remote line, the port number can be anything outside of the reserved range of ports. We use 8080 because it’s pretty compatible with almost all web servers, but 21194 is suggested on the OpenVPN wiki. Just remember that whatever you put here must match what we configure on the server side later on.
If you’re connecting to a pre-configured server owned by your VPN provider, the config files should be provided for you (the step 2 folder for NordVPN users).
Save your new config file, making sure not to overwrite the old one. Also make sure your text editor doesn’t automatically append the file name with .txt. It should be a .ovpn file.
Now that OpenVPN is configured, we need to install and run Obfsproxy. This is where your new Python installation comes in. In your Windows search bar, type “Command Prompt.” Right click the Command Prompt application and hit “Run as administrator.” In the terminal, type the following commands one line at a time, hitting Enter after each.
cd C:\Python27\Scripts
pip install –-upgrade pip
pip install obfsproxy
obfsproxy –log-min-severity=info obfs2 –shared-secret=<some-random-key> socks 127.0.0.1:10194
After the second command, you may see some errors or warnings. Ignore them for now.
Here you need to replace <some-random-key> with a password of your choice. Remember or write down this password, as you’ll need it later on. If you’re connecting to pre-configured servers provided by your VPN service, this command will be provided for you.

After the last line, your command prompt should tell you that it’s listening for obfsproxy traffic, as in the screenshot. Note in the screenshot I forgot to type in my own password on the first attempt.
You will have to navigate to the Scripts directory (first command), enter the Obfsproxy command (last command), and leave your command prompt open whenever you want to use Obfsproxy.
Proxy setup (optional)
Edit: This step is not necessary for Obfsproxy to function, but it is necessary if you want to use your Obfsproxy+VPN connection to watch Netflix and other streaming video sites from outside the US (or whatever country your VPN server is in). Otherwise, Netflix will be set to the incorrect region.
The last thing we need to do on the client side is set up a proxy connection. This differs for each application. You can set it up in the Windows Internet settings, but I prefer to do it on an app-by-app basis. On native apps that use the internet, you can usually set up a proxy somewhere in the settings. The fields are as follows:
- SOCKS host: 127.0.0.1
- Port: 8080 (or whatever you put in your OpenVPN config file on the remote line)
- SOCKS version 5 (SOCKS5)
On a browser, the easiest way to set this up is with a proxy extension. We’ll show you how to use Proxy Switchy Sharp on Chrome.
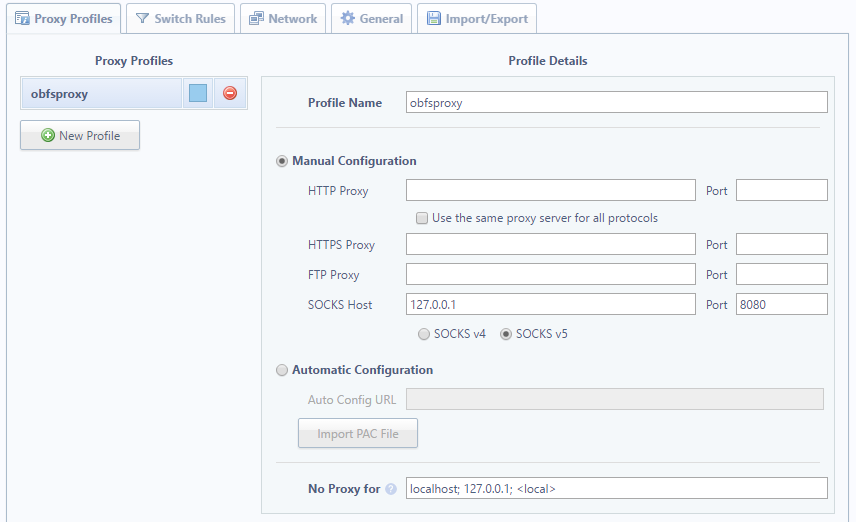
In the ProxySwitchy settings, create a new profile. With Manual Configuration selected, type in the above settings as pictured below. Name it whatever you like. We’re not going to turn this on until we’ve established a connection with the server, so hold tight.
Obfsproxy server configuration on Linux EC2 instance
Your PC is ready to connect, so now we need to prepare the server.
AWS Security Group
Before you install and run obfsproxy on the server, you may need to add a new rule to your server’s security group to make sure the EC2 instance’s firewall doesn’t block traffic. To do this, log into your AWS account, then click EC2. Under Network and Security, go to Security Groups.

Here you can choose to create a new security group and add it to your server or modify an existing one. Right click a rule and select “Edit inbound rules”. Under Type, select all TCP traffic (note: ignore the custom custom rule in the screenshot, as we’ve since updated this tutorial), then set source to “My IP” or the IP of whatever device(s) you plan to connect with. Then right click and go to “edit outbound rules.” Under type, simply select the dropdown option for “all traffic.”
If you made a new security group, click Instances in the left sidebar, right click your VPN instance, scroll down to Networking, and click Change Security Groups. Check your new security group and hit Save.
Obfsproxy server setup
Use PuTTy to connect to your server through SSH. If you don’t remember how to do this or you didn’t save a profile, please refer to our previous tutorial. Remember that in the Amazon Linux AMI server distribution, the username is “ec2-user”. Run OpenVPN using this command:
sudo service openvpn start
Make sure that your OpenVPN configuration file on the server (etc/openvpn/openvpn.conf) has port 1194 open, as per our previous tutorial.
Python should already be installed if you’re using the Linux 14.04 server distribution. In the PuTTy terminal, enter the following commands one line at a time, and hit enter after each:
sudo yum install gcc
sudo pip install obfsproxy
obfsproxy –log-min-severity=info obfs2 –dest=127.0.0.1:1194 –shared-secret=<some-random-key> server 0.0.0.0:8080
For the first command, older versions of Linux may use “apt-get” in lieu of “yum”.
Remember to replace <some-random-key> in the last command with the same password you used on the client side.
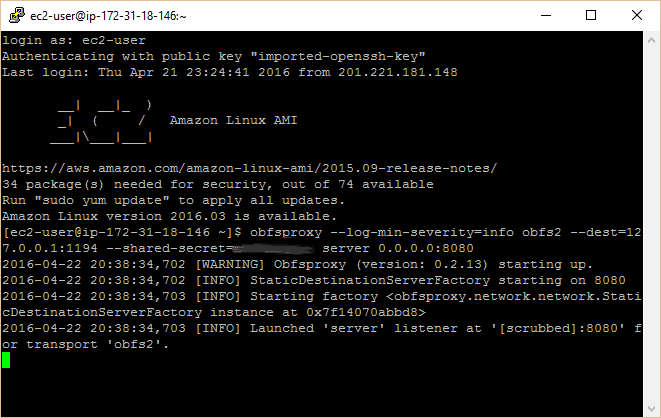
You should see a similar message on this terminal as on your command prompt, indicating that server is listening on port 8080 for obfsproxy traffic.
Connecting through Obfsproxy
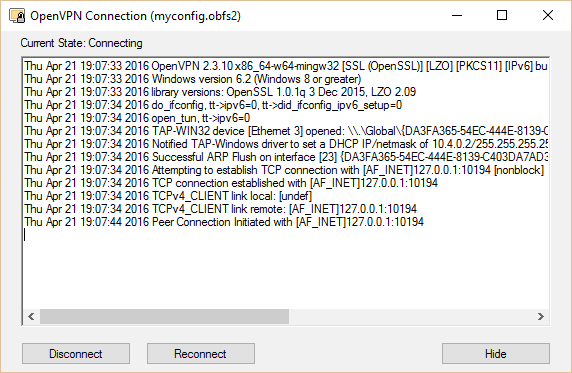
You are set to connect. With Obfsproxy running on both your local machine (command prompt) and your server (PuTTy), run the OpenVPN GUI. Right click it and connect using your new config. The OpenVPN icon should turn green and a notification with your assigned IP should appear.
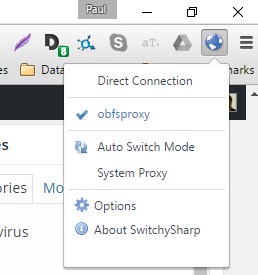
If you want to watch Netflix or some other geo-blocked content, enable the proxy settings in your applications. For Proxy Switchy on Chrome, click the icon in the top right corner and select the profile you created in the optional section above. You may also add the proxy in the Windows Internet settings.
Congratulations! Your OpenVPN traffic is now indistinguishable from normal HTTP traffic thanks to Obfsproxy.
Automating the process
As you might have concluded, running obfsproxy on the client-side every time you want to use it can get a bit tedious. To automate the process, one user has created a Windows installer that runs Obfsproxy as a service that starts on boot. You can download it and find instructions here.


Hi,
I installed a working openvpn server according to the previous tutorial.
Now I cannot follow this tutorial.
1) What is the ovpn.key file in the new client config file?
2) Does this mean we do not need the rest of the client files? client.crt, DH2048.pem etc?
Thanks
Hi Ahmed,
Apologies as this is probably a bit confusing. This tutorial was written following the older version of the previous tutorial. Notice the previous tutorial has two methods: a recommended method and the easy method. The recommended method was added after this article about obfsproxy was written, so some things might not match up. I would recommend using the easy method in the previous tutorial if you want to jump straight into this one.
Hope that helps,
Paul
Don’t know whether my previous note made it through the ether…
Have set up everything to achieve a working VPN with obfsproxy and OpenVPN. Everything okay except for proxy (the optional step) which in both Chrome and Firefox comes back with proxy server rejecting connection 🙁
Hi JonT,
Hard to say without seeing any log files, and to be honest it’s been a long time since I wrote this and have since terminated the EC2 instance that I used to create this tutorial. But I imagine there’s a port mismatch somewhere or a port is being blocked by the server firewall. Use iptables or the EC2 security groups to open all the relative ports and check to make sure the correct port is being set in the proxy extension.
Hope that helps!
Paul
Not using an Amazon service, but can get everything working except the (optional) proxy when the client browser gives error messages when trying to connect to any url 🙁
Hi,
I am trying to set up OpenVPN server with Obfsproxy. I am using Obfsproxy 0.2.13 on both sides (server and client).
On server (Debian 9), there is OpenVPN server listening on 443 TCP port. I am also using port sharing in OpenVPN so if someone connects to my server to 443 port with OpenVPN, he gets OpenVPN connection, but if someone connects to my server to 443 port with web browser (HTTPS), it will get website. (This is possible because OpenVPN can distinguish OpenVPN and other connections – others are relayed to webserver running on localhost on some other port.)
Then I run Obfsproxy on the server with the following command:
sudo obfsproxy –log-min-severity=debug –data-dir=/tmp/scramblesuit-server scramblesuit –password=ZKRSAUKWPH6A3GMINURTUG2I6GJQR4ZV –dest=127.0.0.1:443 server 0.0.0.0:8080
So basically, server is listening to port 8080 and relaying all connections to 443 TCP where they are taken over by OpenVPN.
Now the client side (Ubuntu 17.04).
I installed Obfsproxy via pip install and am running this command:
obfsproxy –log-min-severity=debug –data-dir=/tmp/scramblesuit-client scramblesuit –password=ZKRSAUKWPH6A3GMINURTUG2I6GJQR4ZV –dest xx.xx.xx.xx:8080 socks 127.0.0.1:10194
So basically, Obfsproxy is connecting to my server to port 8080 and opening socks on client’s localhost on port 10194.
And finally, OpenVPN client config has basically just socks-proxy line added:
client
remote xx.xx.xx.xx 443
proto tcp
socks-proxy 127.0.0.1 10194
dev tun…
…
Now the problem is, that when I run OpenVPN client, it can’t connect and the problem is in Obfsproxy client.
Here is the Obfsproxy’s log:
################################################
Do NOT rely on ScrambleSuit for strong security!
################################################
2017-09-26 19:54:16,672 [DEBUG] Setting the state location to `/tmp/scramblesuit-client/scramblesuit/’.
2017-09-26 19:54:16,673 [INFO] OBFSSOCKSv5Factory starting on 10194
2017-09-26 19:54:16,673 [INFO] Starting factory
2017-09-26 19:54:16,673 [DEBUG] socks_fact_0x7fc077f6b2d8: Starting up SOCKS server factory.
2017-09-26 19:54:16,673 [INFO] Launched ‘socks’ listener at ‘[scrubbed]:10194’ for transport ‘scramblesuit’.
2017-09-26 19:54:54,126 [DEBUG] socks_fact_0x7fc077f6b2d8: New connection.
2017-09-26 19:54:54,126 [DEBUG] Initialising ScrambleSuit.
2017-09-26 19:54:54,126 [DEBUG] Switching to state ST_WAIT_FOR_AUTH.
2017-09-26 19:54:54,126 [DEBUG] Initialising AES-CTR instance.
2017-09-26 19:54:54,126 [DEBUG] Initialising AES-CTR instance.
2017-09-26 19:54:54,126 [DEBUG] Dumping probability distribution.
2017-09-26 19:54:54,127 [DEBUG] P(271) = 0.623
2017-09-26 19:54:54,127 [DEBUG] P(321) = 0.321
2017-09-26 19:54:54,127 [DEBUG] P(1374) = 0.031
2017-09-26 19:54:54,127 [DEBUG] P(127) = 0.014
2017-09-26 19:54:54,127 [DEBUG] Dumping probability distribution.
2017-09-26 19:54:54,127 [DEBUG] P(0.00310045817413) = 0.012
2017-09-26 19:54:54,127 [DEBUG] P(0.00813930754249) = 0.703
2017-09-26 19:54:54,127 [DEBUG] P(0.00224023279255) = 0.269
2017-09-26 19:54:54,127 [DEBUG] P(0.00564475385899) = 0.011
2017-09-26 19:54:54,161 [DEBUG] circ_0x7fc077f845a8: Setting downstream connection (socks_down_0x7fc0781d9710).
2017-09-26 19:54:54,161 [DEBUG] circ_0x7fc077f845a8: Setting upstream connection (socks_up_0x7fc0781eab90).
2017-09-26 19:54:54,161 [DEBUG] circ_0x7fc077f845a8: Circuit completed.
2017-09-26 19:54:54,161 [DEBUG] Attempting to read master key and ticket from file `/tmp/scramblesuit-client/scramblesuit/session_ticket.yaml’.
2017-09-26 19:54:54,161 [DEBUG] File `/tmp/scramblesuit-client/scramblesuit/session_ticket.yaml’ does not exist (yet?).
2017-09-26 19:54:54,161 [DEBUG] No session ticket to redeem. Running UniformDH.
2017-09-26 19:54:54,162 [DEBUG] Creating UniformDH handshake message.
2017-09-26 19:54:54,176 [DEBUG] circ_0x7fc077f845a8: upstream: Received 88 bytes.
2017-09-26 19:54:54,176 [DEBUG] Buffered 88 bytes of outgoing data.
2017-09-26 19:54:54,185 [DEBUG] socks_down_0x7fc0781d9710: Recived 0 bytes.
2017-09-26 19:54:54,186 [DEBUG] circ_0x7fc077f845a8: downstream: Received 0 bytes.
2017-09-26 19:54:54,186 [DEBUG] Unable to finish UniformDH handshake just yet.
2017-09-26 19:54:54,297 [DEBUG] socks_down_0x7fc0781d9710: Recived 652 bytes.
2017-09-26 19:54:54,297 [DEBUG] circ_0x7fc077f845a8: downstream: Received 652 bytes.
2017-09-26 19:54:54,297 [DEBUG] Attempting to extract the remote machine’s UniformDH public key out of 652 bytes of data.
2017-09-26 19:54:54,297 [DEBUG] Could not find the mark just yet.
2017-09-26 19:54:54,297 [DEBUG] Unable to finish UniformDH handshake just yet.
2017-09-26 19:54:54,298 [DEBUG] socks_up_0x7fc0781eab90: Connection was lost (Connection was closed cleanly.).
2017-09-26 19:54:54,298 [DEBUG] socks_up_0x7fc0781eab90: Closing connection.
2017-09-26 19:54:54,299 [DEBUG] circ_0x7fc077f845a8: Tearing down circuit.
2017-09-26 19:54:54,299 [DEBUG] socks_down_0x7fc0781d9710: Closing connection.
Is this problem somehow connected with warning about session_ticket.yaml?
Directory /tmp/scramblesuit-client/scramblesuit/ on a client exists, but is empty.
Any help will be much appreciated.
Hi Matej,
It should work without the browser (see other comments). Tbh it’s been so long since I wrote this and I’ve since terminated the instance I used to create it, so I won’t be much assistance. I may take another swing at this to see how it can be improved at some point in the future but it’s not a priority at the moment.
Best,
Paul
running the command “sudo pip install obfsproxy” throws this error, any help
[root@ip-172-31-19-112 openvpn]# sudo pip install obfsproxy
Traceback (most recent call last):
File “/usr/bin/pip”, line 5, in
from pkg_resources import load_entry_point
File “/usr/lib/python2.7/dist-packages/pkg_resources/__init__.py”, line 3020, in
working_set = WorkingSet._build_master()
File “/usr/lib/python2.7/dist-packages/pkg_resources/__init__.py”, line 616, in _build_master
return cls._build_from_requirements(__requires__)
File “/usr/lib/python2.7/dist-packages/pkg_resources/__init__.py”, line 629, in _build_from_requirements
dists = ws.resolve(reqs, Environment())
File “/usr/lib/python2.7/dist-packages/pkg_resources/__init__.py”, line 807, in resolve
raise DistributionNotFound(req)
pkg_resources.DistributionNotFound: pip==6.1.1
Thank you for the tutorial. I’ve been able to get OpenVPN+Obfsproxy working, but the browser proxy is not working, and I’m not sure I understand why it would work. We’ve set up obfsproxy on the server end to forward everything coming in on 8080 to 1194, but 1194 is the vpn server. It doesn’t have any idea what to do with normal web traffic coming at it. Maybe there’s some iptable route that’s missing?
why change the proxy settings in browser since openVPN put all internet traffic through it?
Hello Mr Paul this arcticle is wonderful How can we use this on IOS?
I haven’t tested obfsproxy on mobile. I’m not sure if there’s a way to do it on iOS.
Preliminary setup
“Download it here”
The file was deleted.
Thanks for the heads up. I’ve updated the link.
HI, this work from a openvz severs?
I have two different ips from my isp both are different:-
1. Wan ip which is reflected in my router
2. Public if which is showed when i google whats my ip
Internet—>>—ISP router (No access)–>>–My router (DD-WRT)
It seems that the ISP is doing double nat (Cascading routers)
I don’t have access to ISP router
I tried Openvpn and SSH over the same network (when the client is connected to the same router on which OpenVPn and SSH server are running) it works fine but when i try the same over some other network over the internet it fails
I ran the Public ip for open ports online at it seems that only port 21,22,23 & 80 are open from my isp.
Now how can i connect to openvpn server?
Tried using SSH it fails…
Not tried OpenVPN traffic using Obfsproxy as there is no guide to how to steup it using dd-wrt
Any articles that are suggested
Any reverse Openvpn, ssh etc.
Thanks
Hey.
I tried PrivateTunnel, which has option for http and obfs proxy. When I select obfs proxy, Netflix still can detect that I’m using VPN. Do you know why?
Do you think PrivateTunnel’s obfs proxy doesn’t work or Netflix found a way to detecting obfs proxy?
Thanks
Obfsproxy by itself won’t unblock Netflix, but it allows you to port forward your traffic, which is why you need to use it in combination with ProxySwitchy or a similar browser extension.
Can you show or publish a tutorial for how to do the same thing on Raspberry Pi.
I have successfully setup OpenVPN Server on my Pi and would like to know how to obfuscate it.
Hi Tayo,
I don’t have a Raspberry Pi to test this with at the moment, but we’ll consider it for a future tutorial. At any rate, installing OpenVPN and connecting to servers via a terminal in most Linux distros is easier than on Windows.
Best,
Paul
This doesn’t seem to be working anymore. At least not from Canada. I might be that I’m going through an AWS EC2 instance. Maybe they block those IPs?
I tested it a couple days ago (after you posted this comment) and it was working fine for me, but I suppose it’s possible they blocked your IP and not mine. If you simply reboot the EC2 instance, you will get a new IP address, assuming you don’t have an elastic IP set up. Make sure you make all the necessary changes in your OpenVPN config to go with that.
this article is wrong.. you don’t need to setup socks proxy on your browser.. obfs is already obfuscating the traffic as an outer tunnel to OpenVPN
Hi getitright,
I went back and looked at the setup and now I remember why I use the socks proxy on a browser. That step is necessary if you want to use obfs to watch Netflix from outside the US. If you don’t, Netflix will be set to the wrong region. I’ve added a note to clarify that step being optional.
Best,
Paul
I come from China. There are considered in the android mobile phone run Obfsproxy? Hope in the android use openvpn + Obfsproxy if I can
https://proxy.sh/panel/knowledgebase/1167/Combine-OpenVPN-with-obfsproxy-for-stealth-mode-Android.html