Display ads are a huge annoyance that everyone could do without, but blocking them has always been harder to do on mobile devices than desktop. Pi-hole solves this problem by turning your Raspberry Pi into a DNS server that will block mobile ads on any device you connect to your wi-fi network.
Pi-hole also blocks in-app advertising in a lot of cases, and can remove the ads from YouTube videos. So if you’re looking for a comprehensive way to block mobile ads on phones and tablets, here’s how I set things up.
Related: How to block ads and malware with host files on Mac, Windows and Linux
What is Pi-hole?
Pi-hole is a custom DNS server for Raspberry Pi devices running the Raspberry Pi OS (previously known as Raspbian). It blocks ads from being displayed on the devices on your network, just like the popular browser extensions Adblock Plus and uBlock Origin. It can block YouTube ads and some in-app advertisements on mobile devices.
Unlike browser extensions, Pi-hole blocks ads for every device connected to it. There’s usually no need to do any additional configuration on the device itself. For example, you could buy a new tablet and, as soon as it is connected to your wi-fi, it will immediately stop displaying ads in the web browser and most apps. Pi-hole stops ads before they are downloaded, so your network will perform better.
Most DNS servers work by translating a URL into an IP address. Pi-hole does that and more. It waits until your computer or device requests a URL for an ad, and then returns no address for that ad. That effectively stops ads from being displayed.
Pi-hole also supports advanced privacy settings which work hand-in-hand with a VPN to keep your browsing information secure.
Installing Pi-hole
Pi-hole makes it as easy as possible to download and get up and running: with a one-line script that starts up a menu-based installer. If you have any experience with Linux and networking, you won’t need too much help. Here’s how I installed Pi-hole, step by step.

The first thing you’ll need to do is open up a console window if you’re using a graphical version of Raspbian. If you haven’t installed a window manager, you can do this right from the command line.
Pi-hole uses curl to download the installation script, which is then executed by the bash shell. Here’s the command you need to type: sudo curl -sSL https://install.pi-hole.net/ | bash
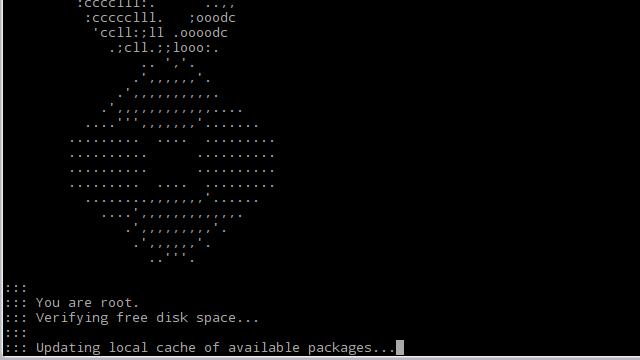
The installer will check to make sure you’ve got the proper privileges and confirm you have enough disk space.
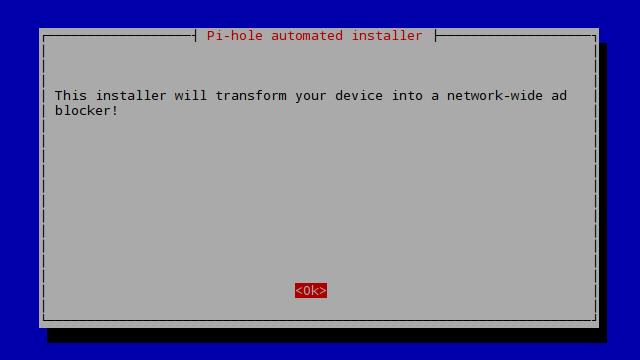
Then you’ll be asked to press Ok to begin the Pi-hole installation.
Setting up DNS on Pi-hole
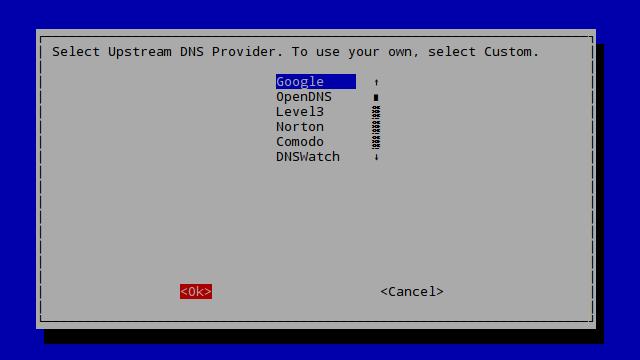
The very first step of the installation process is setting up Pi-hole’s DNS passthrough.
Pi-hole will handle all of the DNS requests to block mobile ads itself, but it passes the rest along to another DNS provider. Google and OpenDNS are both safe choices.
If you need advanced privacy features like DNSSEC and DNScrypt, Pi-hole recommends you select Google or Norton DNS servers.
I chose to use Google’s DNS servers with this install and added in OpenDNS and custom servers as a backup in a later step.
If you’re using a virtual private network (VPN), you’ll need to select Custom and enter your VPN provider’s DNS servers. If you haven’t decided on a VPN provider, we recommend using NordVPN. Its DNS server addresses are 103.86.96.100 and 103.86.99.100. Contact customer support if you can’t find the DNS server addresses for your chosen VPN provider.
Setting up your network
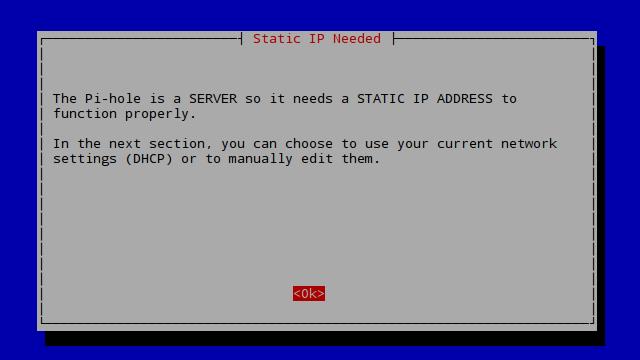
Once you’ve told Pi-hole where to send your DNS traffic, the next step is telling Pi-hole about your local network. You’ll need to set the gateway address, and assign Pi-hole a static IP.
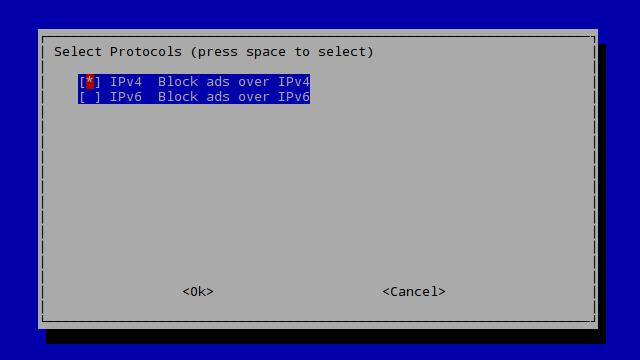
Pi-hole will block mobile ads over both IPv4 and IPv6 networks. Because I don’t use IPv6 on my LAN, and most people don’t either, I think it’s a good idea to uncheck IPv6 for now. Disabling IPv6 will slightly reduce Pi-hole’s memory footprint.
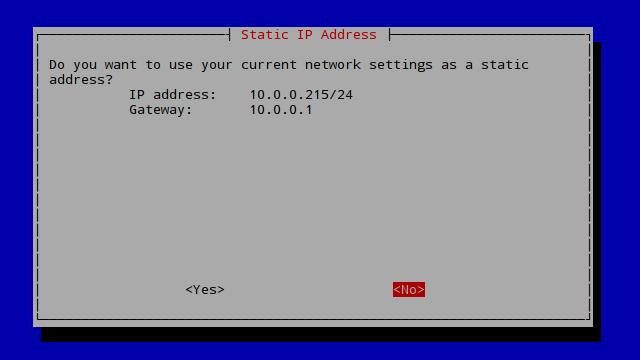
Next you’ll be given the option of just making your assigned IP address static. There are a handful of reasons why you should click No and manually assign an address. The most important being that you don’t want to assign a static address from within the DHCP pool because it could lead to a conflict when your router tries to hand out the address again.
But before you move on, make a note of your Gateway IP address, you’ll need it soon.
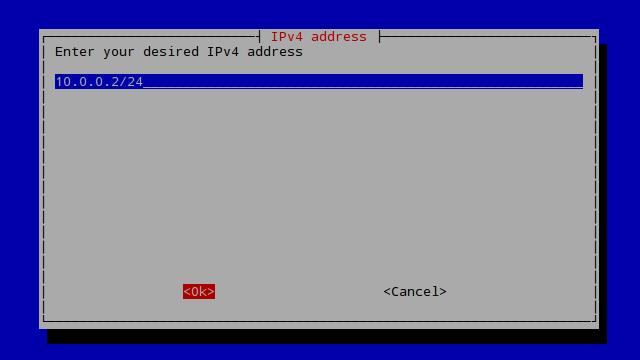
I like to set the IP address to x.x.x.2/24. In most cases this will be 192.168.1.2/24 or 10.0.0.2/24. Traditionally your gateway router is assigned x.x.x.1/24 and DNS servers are given an address very close to that.
You’ll also want to make a note of the Pi-hole IP address you’ve chosen. You’ll need it later.
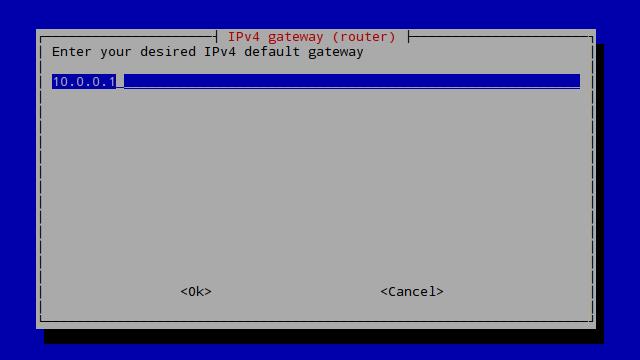
Now you’ll need to specify your router’s IP address, it’s the same one that Pi-hole showed you in a previous step. Type it in and click Ok.
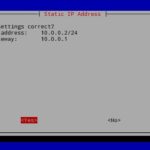
You’ll be asked to confirm your static IP address. If everything looks right, click Yes.
Finishing the installation
The final portion of the installation is focused on enabling or disabling a few core services in Pi-hole.
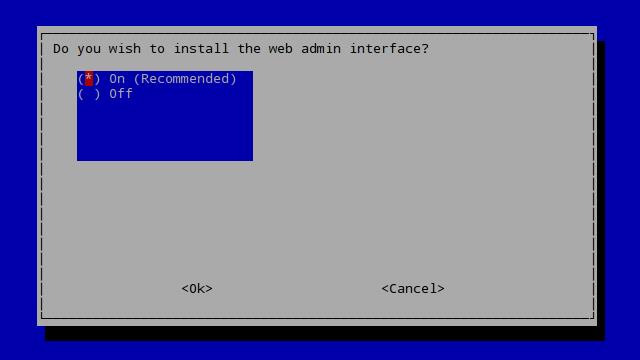
Make sure you install the web interface. You’ll need it to manage Pi-hole after it’s installed.
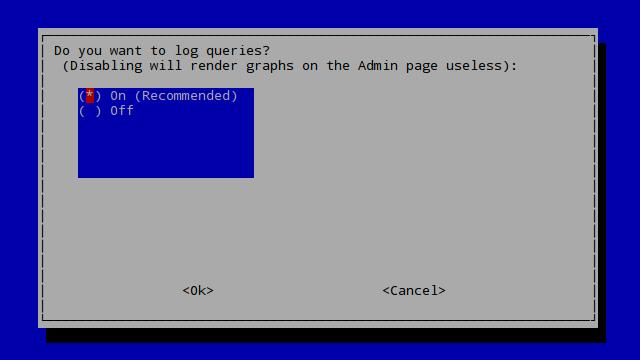
I also enabled logging to make my graphs work properly. If you’re running a bunch of different servers on your Raspberry Pi, or if it’s an old model, you can shut off logging to free up a bit more memory.
You will want to disable logging if you’re using Pi-hole with a VPN in order to protect your privacy. Pi-hole keeps real-time logs of which sites it blocks, and which ones are allowed through, in order to generate usage graphs–and these logs aren’t encrypted.
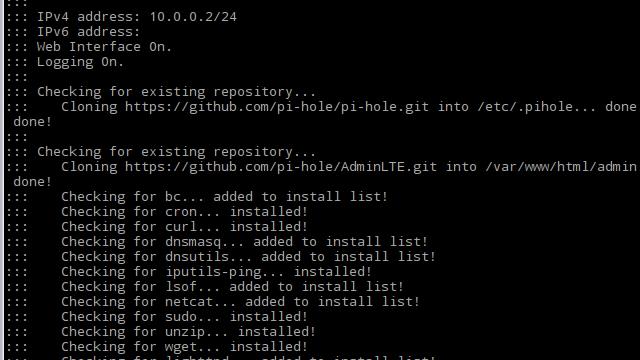
The installation will begin using the settings you chose. You can watch its progress in the console, but if you’re using a stock Raspberry Pi OS build it will complete successfully.
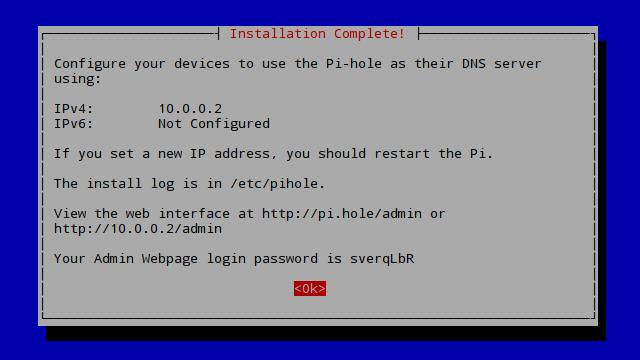
When Pi-hole is installed, you’ll see a short summary of the settings. Make a note of the administrator password that Pi-hole chooses for you. You’ll need it to login and configure your server in the next step.
Before you click Ok to finish the installation, it’s a good idea to bookmark the link to Pi-hole’s web interface on your computer.
Configuring Pi-hole
Pi-hole will block mobile ads as soon as it’s installed, but I like to make a few changes on the web console to increase security and reliability.
Start by opening the web interface and logging in. You’ll need to access it using the URL you were shown at the end of the installation. In my case, the web interface is at http://10.0.0.2/admin but your network may be different.
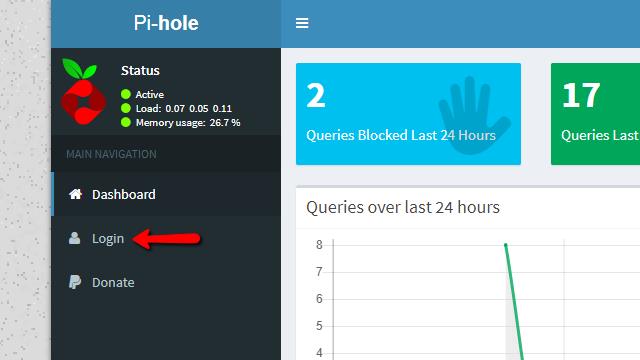
Once the Pi-hole web interface is open, click the Login link.

Enter the administrator password that was given to you at the end of the Pi-hole installation and click the Log in button.
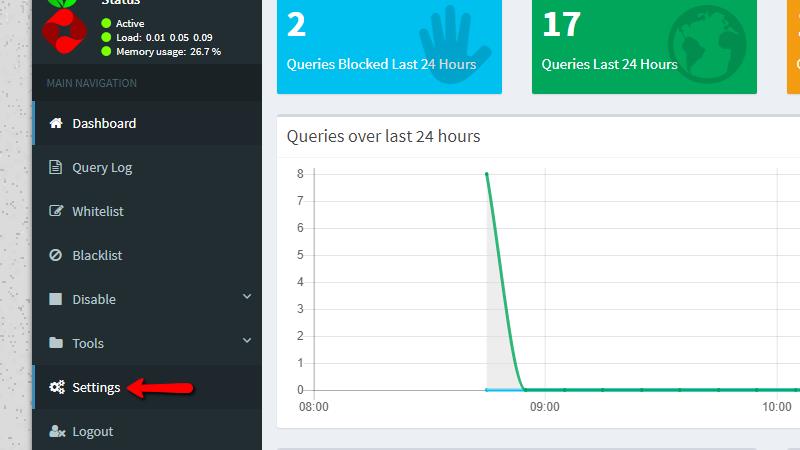
Now you’re able to view the full web interface and make changes. Click the Settings link to get started configuring Pi-hole.
In order to provide some redundancy, add a few more upstream DNS servers. Since I used Google’s DNS servers during the installation, I like to check the OpenDNS boxes, and check one Custom box to add my router.
These servers will only be used if Google’s DNS servers are offline. Pi-hole fails over seamlessly to the backup servers, so you won’t experience downtime.
Remember to click the Save button when you’re finished making changes.
Whitelisting sites
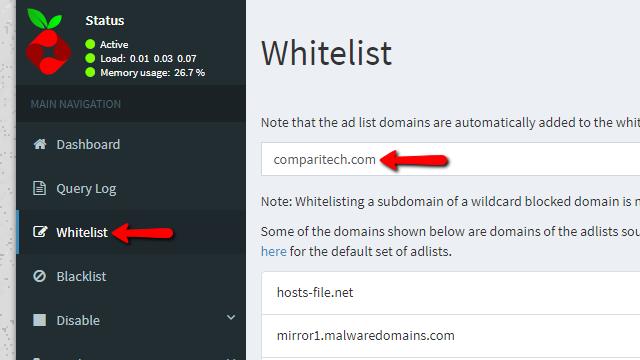
If you have any sites that need to be whitelisted, so ads won’t be blocked when you visit, you should add them now. For instance, many users whitelist their online banking and email websites.
One of the reasons I prefer Pi-hole over uBlock Origin or Adblock Plus, aside from mobile device support, is the way that you can establish a single centralized whitelist.
When you’re finished, click the Save button at the bottom of the page to save your changes. It’s a good idea to restart your Raspberry Pi after making these changes to ensure that they’re active.
Updating the block lists
Pi-hole keeps track of what ads to block by using lists of known ad servers. You can and should add to these lists, and you need to update them as part of a new Pi-hole installation.
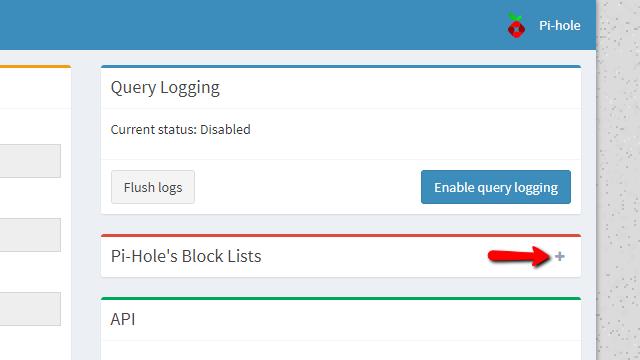
You’ll need to connect to the Pi-hole web interface and log in with your password. Then open the Settings menu, and look for Pi-hole’s block lists. It will be collapsed by default, so click the plus to expand it.
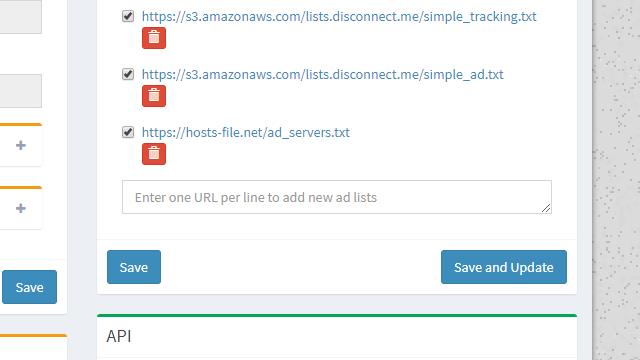
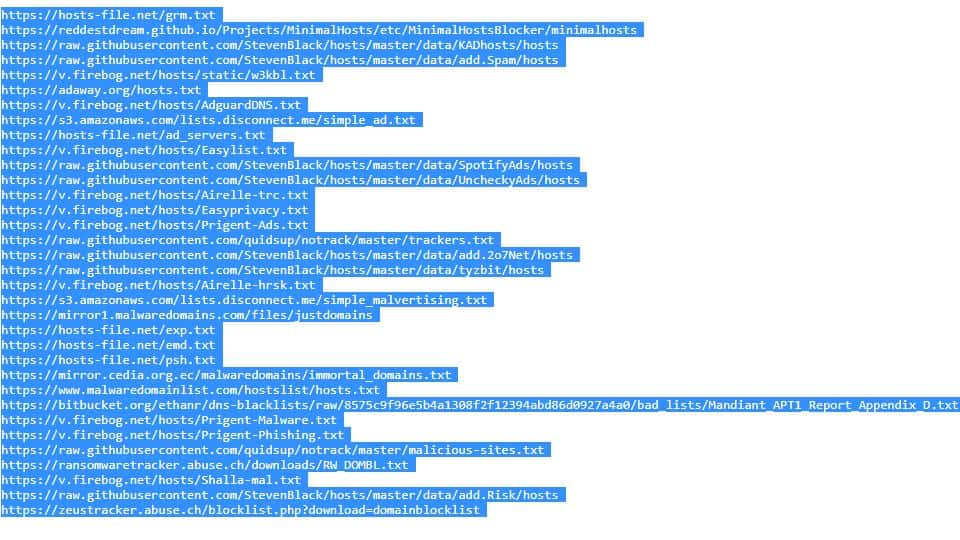
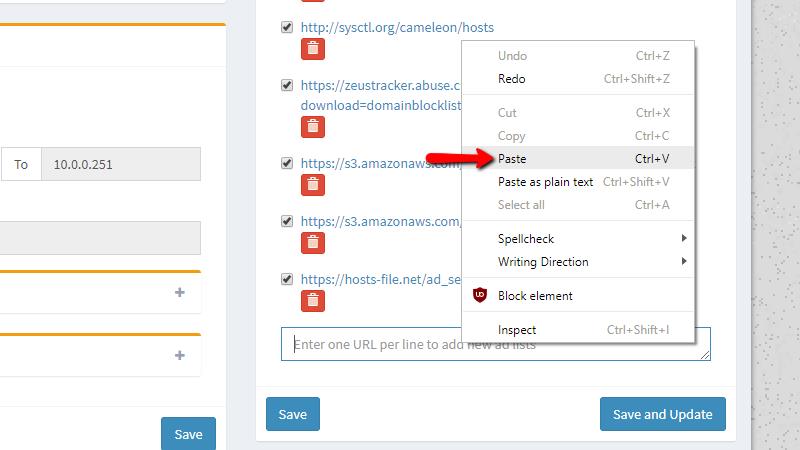
Scroll to the bottom of the list and look for the text box at the bottom of the page. Copy and paste your new block list entries here.
I recommend Wally3k’s block lists as a start. Open the site in a separate tab, and you’ll see that you need to choose a list to add. Ticked lists is the most selective, and isn’t likely to interfere with your browsing. Using All lists will block the most ads, but you’ll need to whitelist websites like PayPal. Non-crossed lists is roughly in the middle.
While it can be tempting to add every blocklist you come across, doing so will likely result in a large number of duplicate entries. This wastes resources and can lead to false positives.
Once you’ve decided which list to use, click the link.
Press Ctrl+A to highlight the entire document, then copy it.
Switch tabs and paste the entire list in Pi-hole.
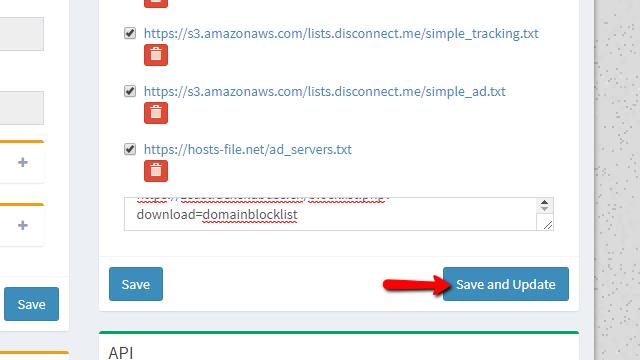
Click the Save and update button when finished. Pi-hole will add the new lists and update itself.
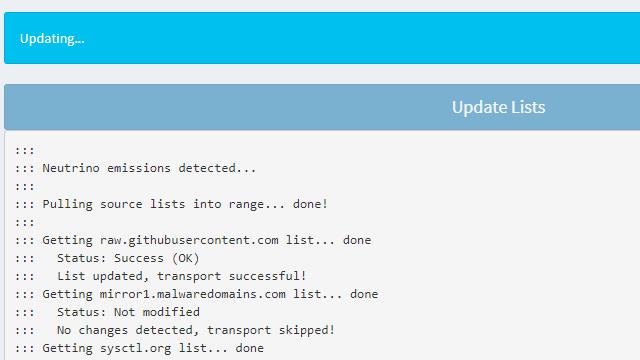
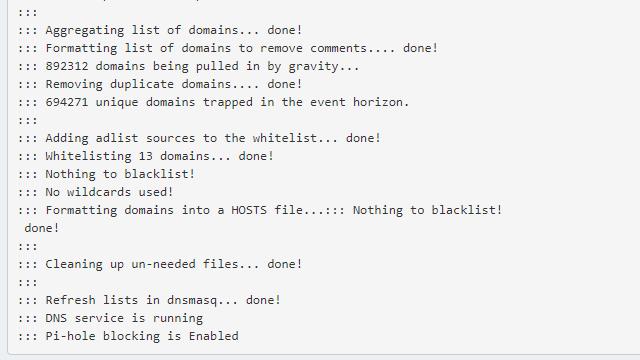
You’ll be shown the console output of Pi-hole’s update process for easy troubleshooting.
When the update is finished, Pi-hole will display a message telling you that blocking has been enabled again. You can close the web interface if you’re finished.
Using the Pi-hole teleporter
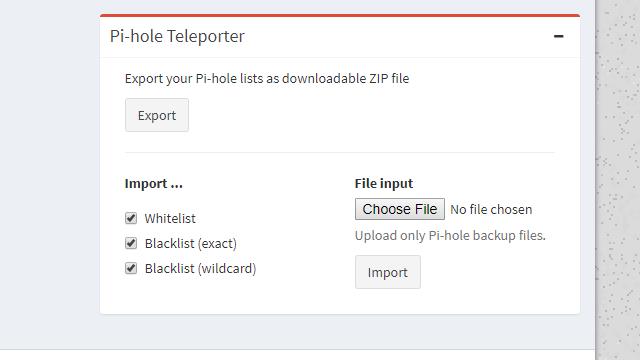
If you’d rather not copy and paste list entries, you can import them using the teleporter. The Pi-hole teleporter will let you backup and restore your lists, or import a list you’ve downloaded.
Be sure to check the proper boxes before you begin the import process with teleporter. Blacklists, unless they’re otherwise indicated, are usually exact and not wildcard. Pi-hole will update the block lists automatically after an import.
Now that you’re using the latest lists, you’re ready to add clients to your Pi-hole server.
Using DHCP to automatically block mobile ads
The next step is to tell all the devices on your network to use your Pi-hole server. Your DNS server is assigned by your router at the same time it gives out IP addresses with DHCP. So editing your router’s DHCP settings will let you set Pi-hole as your DNS server, seamlessly enabling Pi-hole for your entire network.
If you don’t have any access at all to your router and cannot make changes that affect the entire network, skip to the next section for help setting up your devices individually.
Using Pi-hole with your router’s DHCP to block mobile ads
The easiest way to block mobile ads on your home network is to add your Pi-hole DNS server to your router’s DHCP settings. If you do, every device and computer on your network will be told to use Pi-hole by default, and you won’t have to make any changes at all to the individual machines.
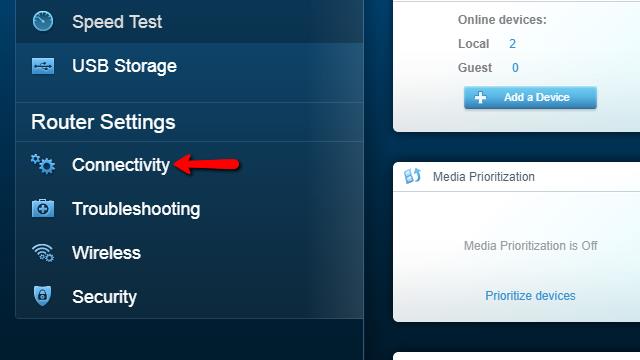
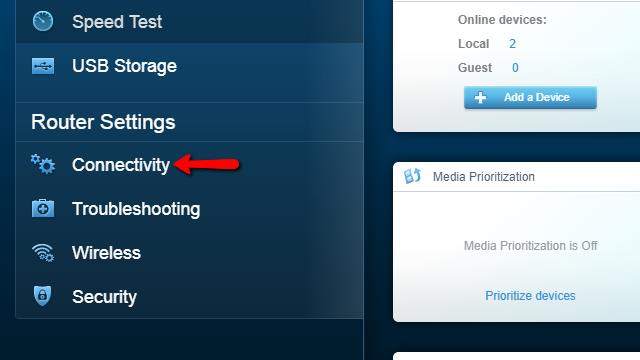
Start by opening your router’s web interface in a browser, then find the DHCP settings. On my Linksys router, DHCP settings are in the Connectivity menu.
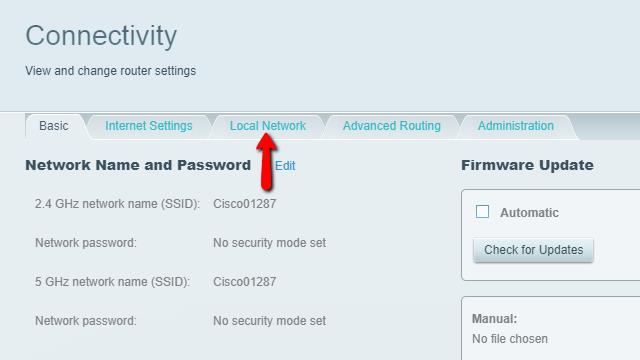
Once the menu is open, click the Local network tab.
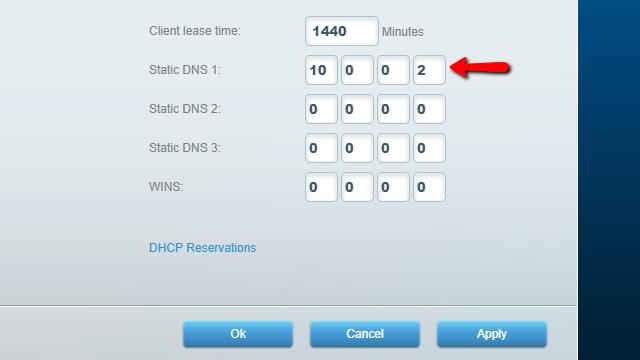
Then set the primary DNS server to your Pi-hole’s IP address.
When you’ve finished setting up your router to block mobile ads, make sure to click Ok to apply the DHCP settings. You’ll need to disconnect each computer and mobile device from your wireless network, then reconnect it for the changes to propagate.
Using Pi-hole instead of your router’s DHCP to block mobile ads
A lot of routers, especially ones provided by your ISP, will only use the DNS servers that they are assigned. In that case, you should disable your router’s DHCP server and turn on the one built into Pi-hole.
Open your router’s web interface and find your DHCP server settings. On my router, they were in the Connectivity menu. Yours may be different.
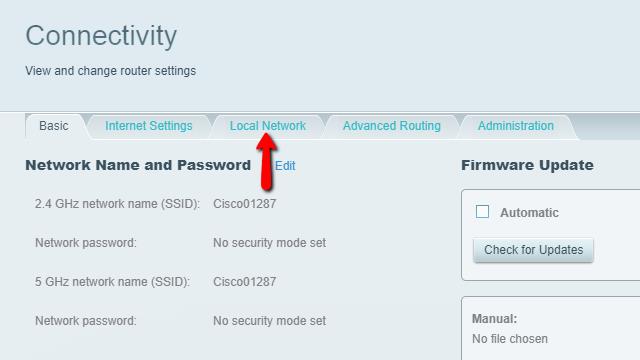
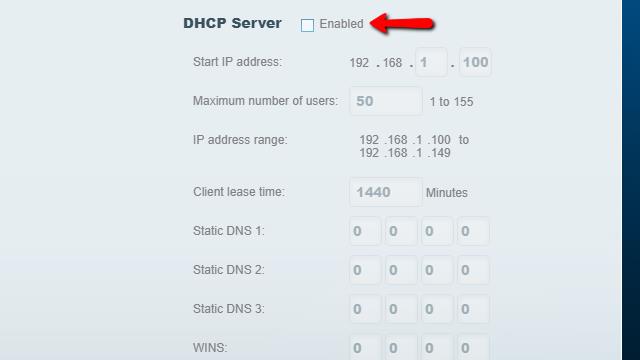
I found the DHCP server settings in the Local network tab.
I then unchecked the DHCP server box to disable DHCP on the router.
Be sure to save your settings, then close out of your router and log in to the Pi-hole web interface. All that’s left is to enable DHCP in Pi-hole.
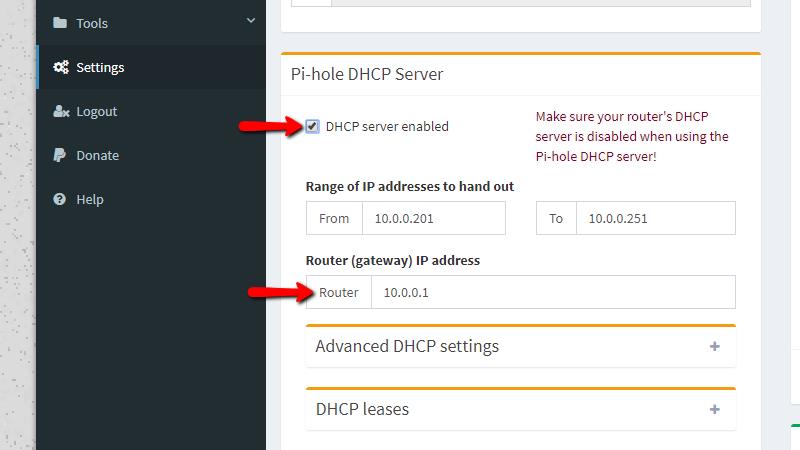
In Pi-hole, click the Settings link and scroll down to the Pi-hole DHCP server menu. Check DHCP server enabled to turn on Pi-hole’s DHCP service, and double check that the IP address of your Router is correct. Click Save when you’ve finished.
Now Pi-hole is responsible for handing out IP addresses on your home network. It will tell your devices to use Pi-hole as their primary DNS server and automatically block mobile ads.
Manually blocking ads on each device
If you can’t set up DHCP to use Pi-hole to block ads, you can still configure each device’s DNS settings individually. Here’s how to manually block ads on your computer and mobile devices with a Pi-hole DNS server.
Block ads in Windows
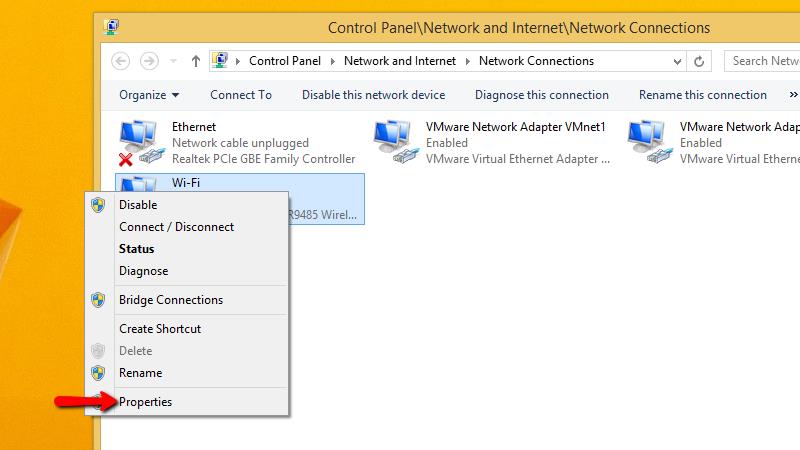
From the control panel, you’ll need to to open the Network and internet menu and select Network connections. This screen will show you all of the ways that your computer can connect to a network and let you make changes.
Find the connection you use, in my case Wi-fi, and right-click it. Select Properties from the menu.
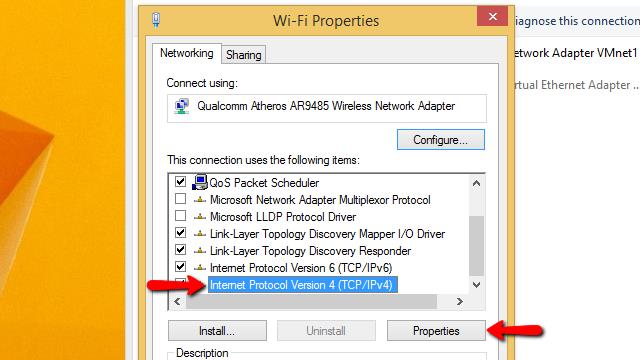
Scroll through the connection properties until you find Internet protocol version 4 (TCP/IPv4) and highlight it, then click the Properties button.
Click the Use the following DNS server addresses radio button, and type in the IP address of your Raspberry Pi with Pi-hole as the Preferred DNS server. Click Ok when you’re finished.
Now Windows will use Pi-hole as its primary DNS server, and automatically block online ads.
Block mobile ads in iOS
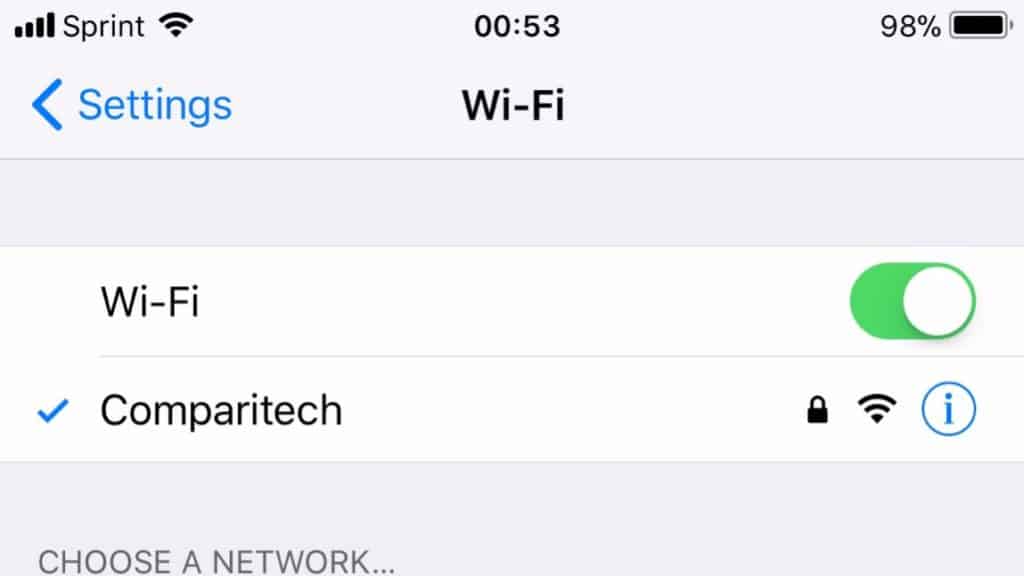
In order to block mobile ads in iOS 11, you’ll need to change your device’s network settings. Open the Settings app and tap Wi-Fi to open your device’s network settings.
Then tap the blue Information icon next to your wi-fi connection.
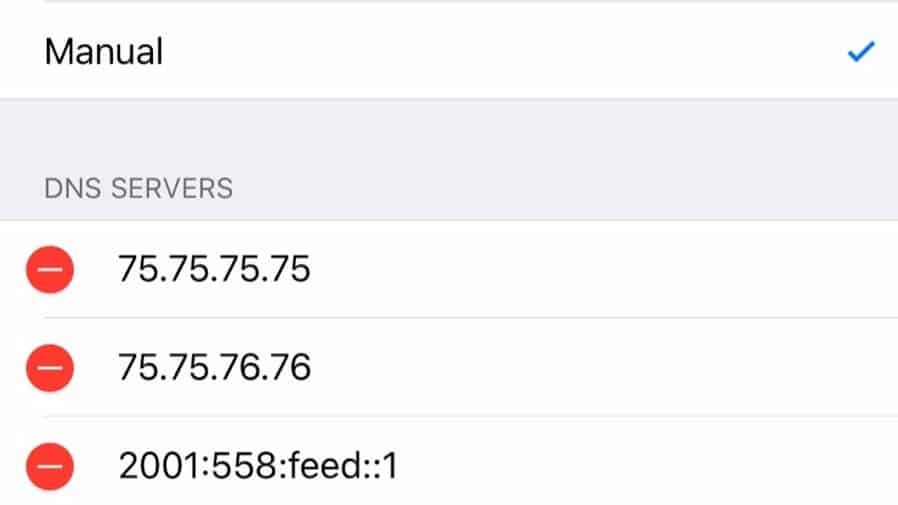
Change Configure DNS from Automatic to Manual so that you can set your primary DNS server to Pi-hole.
iOS will save the DNS settings from Automatic mode. You’ll need to remove the servers that are already there before you add Pi-hole to the list.
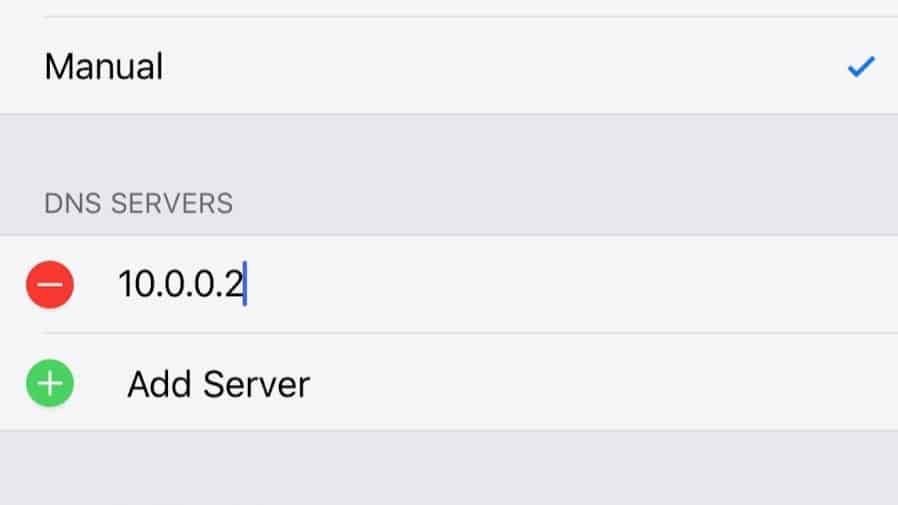
Click Add server and type in the IP address of your Raspberry Pi. You should also add a backup DNS server, so you can still visit websites when Pi-hole is offline. I recommend the IP address of your gateway router, which will use your ISP’s servers.
When you’re finished adding DNS servers, click the Save button. You may need to restart your web browser app to begin blocking ads with Pi-hole.
Block mobile ads in Android
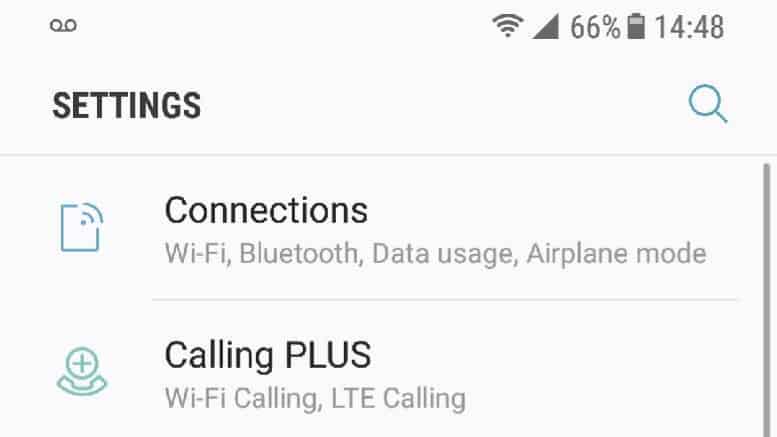
If you use an Android device, you can manually add Pi-hole as your primary DNS server in order to block mobile ads. You’ll need to open up the Settings menu to get started.
From the settings menu, click Connections.
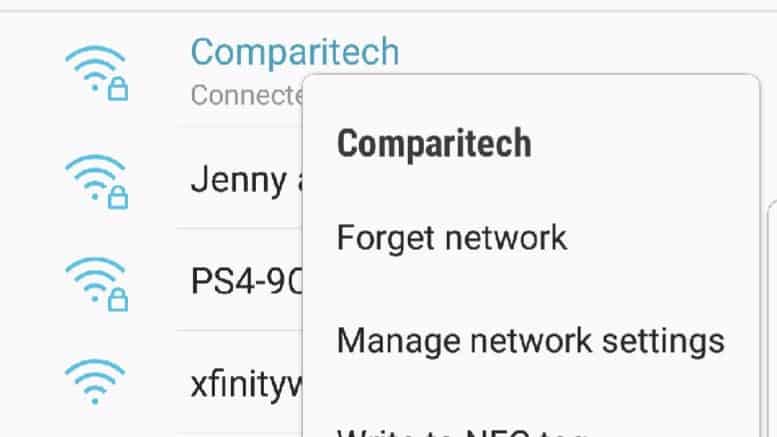
Tap and hold on your active network connection, then select Manage network settings from the menu.
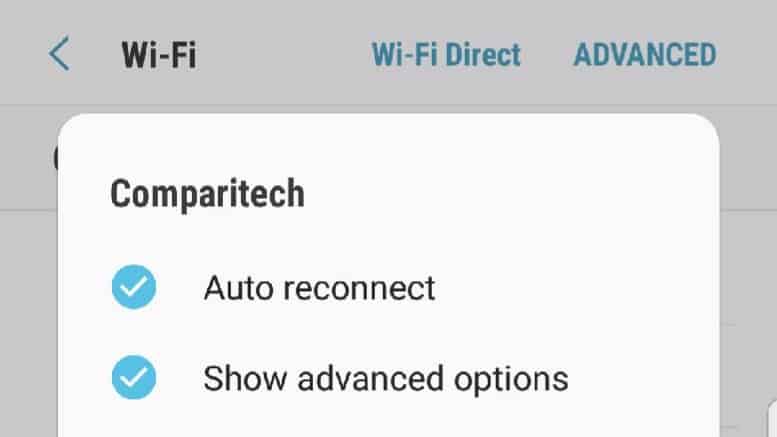
Make sure Show advanced options is checked.
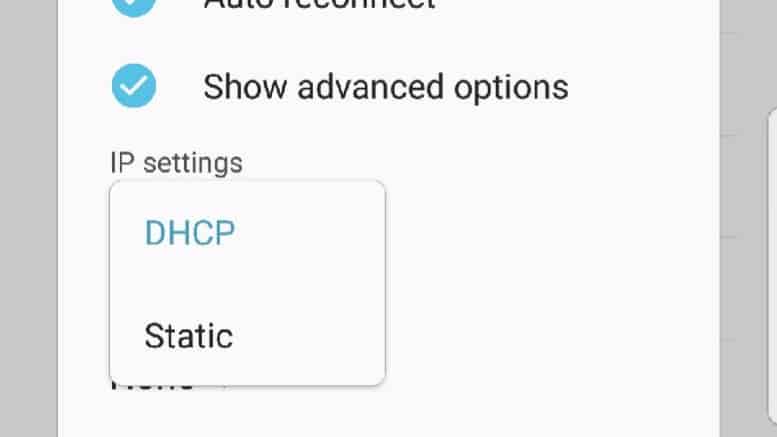
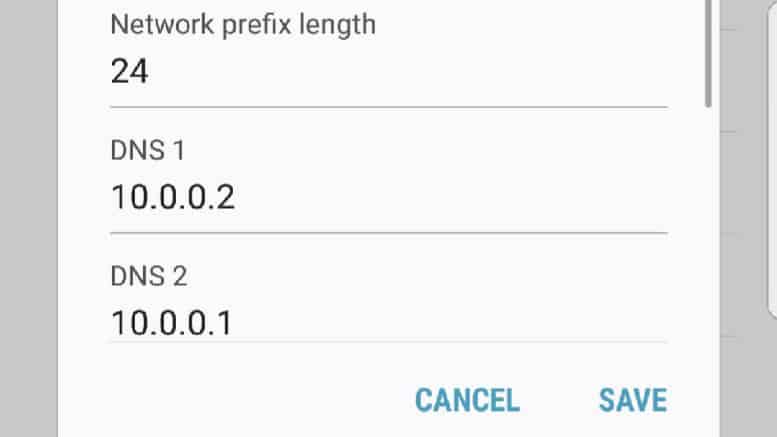
Then change the IP settings from DHCP to Static.
Set Pi-hole to be the primary DNS server and click Save, and Pi-hole will start blocking mobile ads on your Android device.
Troubleshooting Pi-hole
Here are a couple of tips for troubleshooting Pi-hole if you run into problems.
It’s not blocking ads
On two different Android devices, I needed to restart Chrome before the ads went away. You should also double-check your device’s network settings to make sure Pi-hole is set as your primary DNS server.
Some ads are still getting through
Pi-hole determines which ads to block based on the blocklists you add. Some will not be included in these lists, in which case you’ll need to do a little detective work prior to adding the domain via the Pi-hole Web interface.
To find where the ad is being served from, you can consult the Pi-hole query log ehilr browsing to the site displaying the ad. Use the pihole -t command to view the log in real time and identify the domains being queried. Alternatively, use Chrome’s developer tools. Right clicking on the offending ad and choosing Inspect will reveal the domain serving it.
I whitelisted a website and Pi-hole stopped blocking ads
You probably have an invalid or overly-broad wildcard in your whitelist. Whitelisting *.com or something similar can cause Pi-hole to stop working, so be as specific as you can when you allow a site to display ads.
I can’t block ads in apps
Some apps come with embedded ads that are actually part of the programming. Since there’s no need to lookup an IP address and load them from the internet, there’s no way for Pi-hole to block these mobile ads.
A good rule of thumb is that, if your app will display ads properly even in airplane mode, Pi-hole won’t be able to block that ad.
Unfortunately nothing can be done about apps with embedded ads using Pi-hole.
I need to generate debug information
On the official Pi-hole forums, which is the best place to go for support, you’ll be encouraged to post debug information along with a description of your problem. Here’s how to generate debug information for Pi-hole.
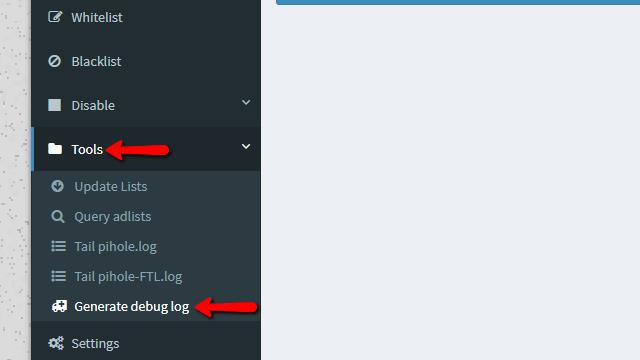
From the main menu, click the Tools menu item, then Generate debug log from the drop menu.
Click the blue Generate debug log button to begin the process.
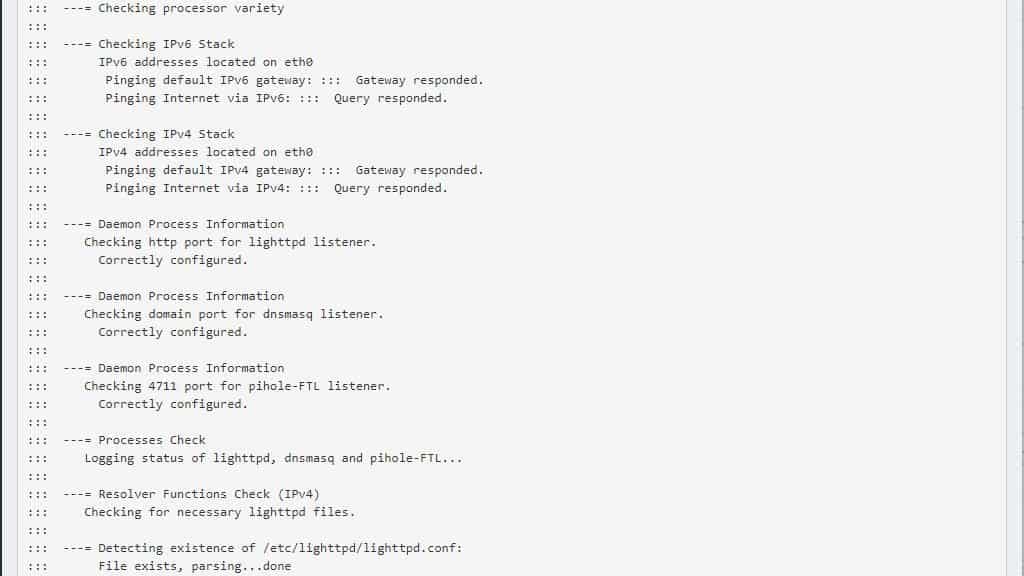
After a few moments, you’ll see your debug log start to scroll past.

It will take a minute to generate the complete log, but you can follow the progress on your screen. You’ll see a message when Pi-hole has finished generating the log.
If you have serious problems with Pi-hole, you should attach the log at /var/log/pihole_debug.log to your request for help.
Uninstalling Pi-hole
If Pi-hole just isn’t for you, you can remove it from your Raspberry Pi OS install by running a single command.
Open a terminal window, or connect to your Raspberry Pi over ssh, and type the command: pi-hole uninstall
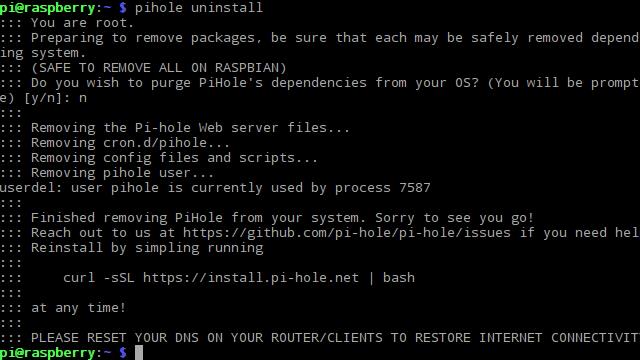
You’ll be prompted to remove all of Pi-hole’s dependencies along with Pi-hole itself, but you should enter n when prompted. Pi-hole depends on some pretty common software, like git and DNS packages that shouldn’t be removed.
That’s all there is to uninstalling Pi-hole. You should restart your Raspberry Pi and router after you’ve finished, then reboot each device on your network.
You’re blocking mobile ads with Pi-hole
I’ve been using Pi-hole to block mobile ads for about two weeks now, and I absolutely love it for a couple reasons. I think it’s the easiest way to stop ads on your devices, since most of the other alternatives involve jailbreaking your phone or tablet. I also appreciate that ad blocking is automatically pushed out to each device using DHCP.
Even though I was only able to test Pi-hole on a Raspberry Pi 3, based on what I’ve seen Pi-hole is lightweight enough to perform well on older devices too.
If you’ve got a spare Raspberry Pi laying around, or are already using a Pi on your network for another service–for instance, as a VPN-enabled security gateway–I think you’ll get a lot of use out of Pi-hole. Mobile ad blocking is one of those services that everyone who connects to your wi-fi will appreciate, and Pi-hole is the best tool for the job that I’ve run across.
Popular: How to build your own VPN








If I set up a Piehole on my home network, can I also then setup my Android phone to access the Internet via VPN back through my home network, enabling me to block ads on Android wherever I am? Just not sure if that would work.
I realize it could be slow, but my home Internet connection is 100Mbps x 100Mbps, so I don’t think it would be terribly slow…
yes, maybe not by default – but i also use my RASPI to connect via VPN using PIVPN . i can confirm that when i am outside my network, that blocking adds on my mobile does work while im connect to my lan via VPN
Hey David, thanks for reading. Yep, you hit the nail right on the head. You could combine Pi-hole with, say, PiVPN, and block mobile ads whenever you’re connected to the tunnel. You can also introduce an outbound VPN connection and encrypt that ad-free mobile traffic if you like.
Only guidance I have for you here is to use relatively weak encryption if possible, which I know sounds silly. But it’s not your home internet speed that will bottleneck you, it’s the limited processing power of the Pi decrypting your VPN traffic. 1.5 MB/s is about the fastest I’ve gotten thru the raspi.
Run this project on a new raspi4 and I bet you’ll see much faster speeds.
I typically use adblock on my computer but I’ve noticed that certain websites will cause issues when adblock is active, causing pop-ups that only disappear when you disable adblock and refresh the page. Do you know if these still show up? I guess i can rephrase that as, does this method block ads before adblock can or is it the same process as adblock but done for everything on the network? Another thing is, if hulu.com can’t access ads, it will run several 30 second “ads” (usually just a black screen with text) talking about how they can’t access the ads, which ends up taking longer than the ads themselves. do you think this will still be the case, or is it more likely that the ads will be blocked to begin with? I think it only appears when adblock is turned off, but it still can’t access the ads, if that helps.
I just installed this on my Pi v3 last night, it works great!
Will look into some options and lists you show in the article.
Thanks!
I’m glad to hear it! The Pi makes a perfect little multi-purpose network appliance. You can install a VPN and transmission (+sonarr, radarr)for a seedbox. Or plug in a bunch of external hard drives, bridge them with LVM, and share out the volume group.
I have a lot more coming on Pi, and it’s all really fun and useful.
Comprehensive lists can be found at:
https://tspprs.com/
New and updated list at https://blocklist.site/app/
This is a very good link indeed. I saw you post it on a different site aswell and to be honest I didn’t trust the link at first, but it increased my blocked domains by about a million and everything still seems to work fine so thanks!
Thanks, great link!