
)

MacOS has a security feature called FileVault that enables you to encrypt your entire hard drive for added security. You need to enter your macOS password to decrypt the drive and access your data when enabled. That happens whenever you log into your Mac. It’s a great feature that you should use, and we’ll show you how to password protect files and folders in macOS (OSX).
Full disk encryption (FileVault) is excellent in itself. Still, there are times when you want to password-protect individual files or folders on your drive so that even when your drive is decrypted, those individual files and folders remain inaccessible.
In this post, we’ll provide an overview of the various ways to password-protect files in macOS.
Password-protecting individual files
Some apps have built-in password-based file protection. If you simply want to protect a few files, this is a practical way of achieving that. Let’s go over the process as it applies to three popular native Apple apps: Pages, Numbers, and Keynote.
Password-protecting Pages documents
- Start by creating and saving a Pages document.
- Open the Pages document you just created.

- From the top menu bar, navigate to File > Set Password.

- You’re prompted to enter a password for the file and to confirm it. You can optionally set a password hint and have the password stored in your Mac’s keychain. I don’t recommend doing this because if you do, the document will automatically open without prompting you for a password (Keychain does that without your – or the potential snooper’s – intervention). Once you’ve entered your password, click Set Password.

- The document is now password-protected. If we try to open it, we are prompted for the password.

- Once the correct password is entered, the document is displayed.
Password-protecting Keynote documents
- Start by creating and saving a Keynote document.
- Open the Keynote document you just created.

- From the top menu bar, navigate to File > Set Password.

- As above, you’re prompted to enter a password for the file and to confirm it. You can optionally set a password hint and have the password stored in your Mac’s keychain. I don’t recommend doing this because if you do, the document will automatically open without prompting you for a password (Keychain does that without your – or the potential snooper’s – intervention). Once you’ve entered your password, click Set Password.

- The document is now password-protected. If we try to open it, we are prompted for the password.

- Once the correct password is entered, the document is displayed.
Password-protecting Numbers documents
- Start by creating and saving a Numbers document.
- Open the Numbers document you just created.

- From the top menu bar, navigate to File > Set Password.

- As in the two previous examples, you’re prompted to enter a password for the file and to confirm it. You can optionally set a password hint and have the password stored in your Mac’s keychain. I don’t recommend doing this because if you do, the document will automatically open without prompting you for a password (Keychain does that without your – or the potential snooper’s – intervention). Once you’ve entered your password, click Set Password.

- The document is now password-protected. If we try to open it, we are prompted for the password.

- Once the correct password is entered, the document is displayed.
So, that’s how you can password-protect individual files in some native macOS apps. It’s pretty straightforward and affords you an extra measure of security. But what if you want to protect multiple files and don’t want to go through the hassle of individually password-protecting each one? Or what if the application you’re using doesn’t support password protection?
In those cases, you can create an encrypted disk image. An encrypted disk image is, essentially, an encrypted (protected by a password) folder. All the individual files inside that folder are encrypted and you need to decrypt the disk image (folder) by entering the correct password to access the contained files.
We’ll show you how to do just that.
Creating an encrypted disk image
I’ll be using a folder I created called MyDiskImage. In it, I have three folders: Pages, Keynote, and Numbers. Each of those folders contains a Page, Keynote, and Numbers document, respectively. There’s also a text file in the root directory, so all scenarios are covered.

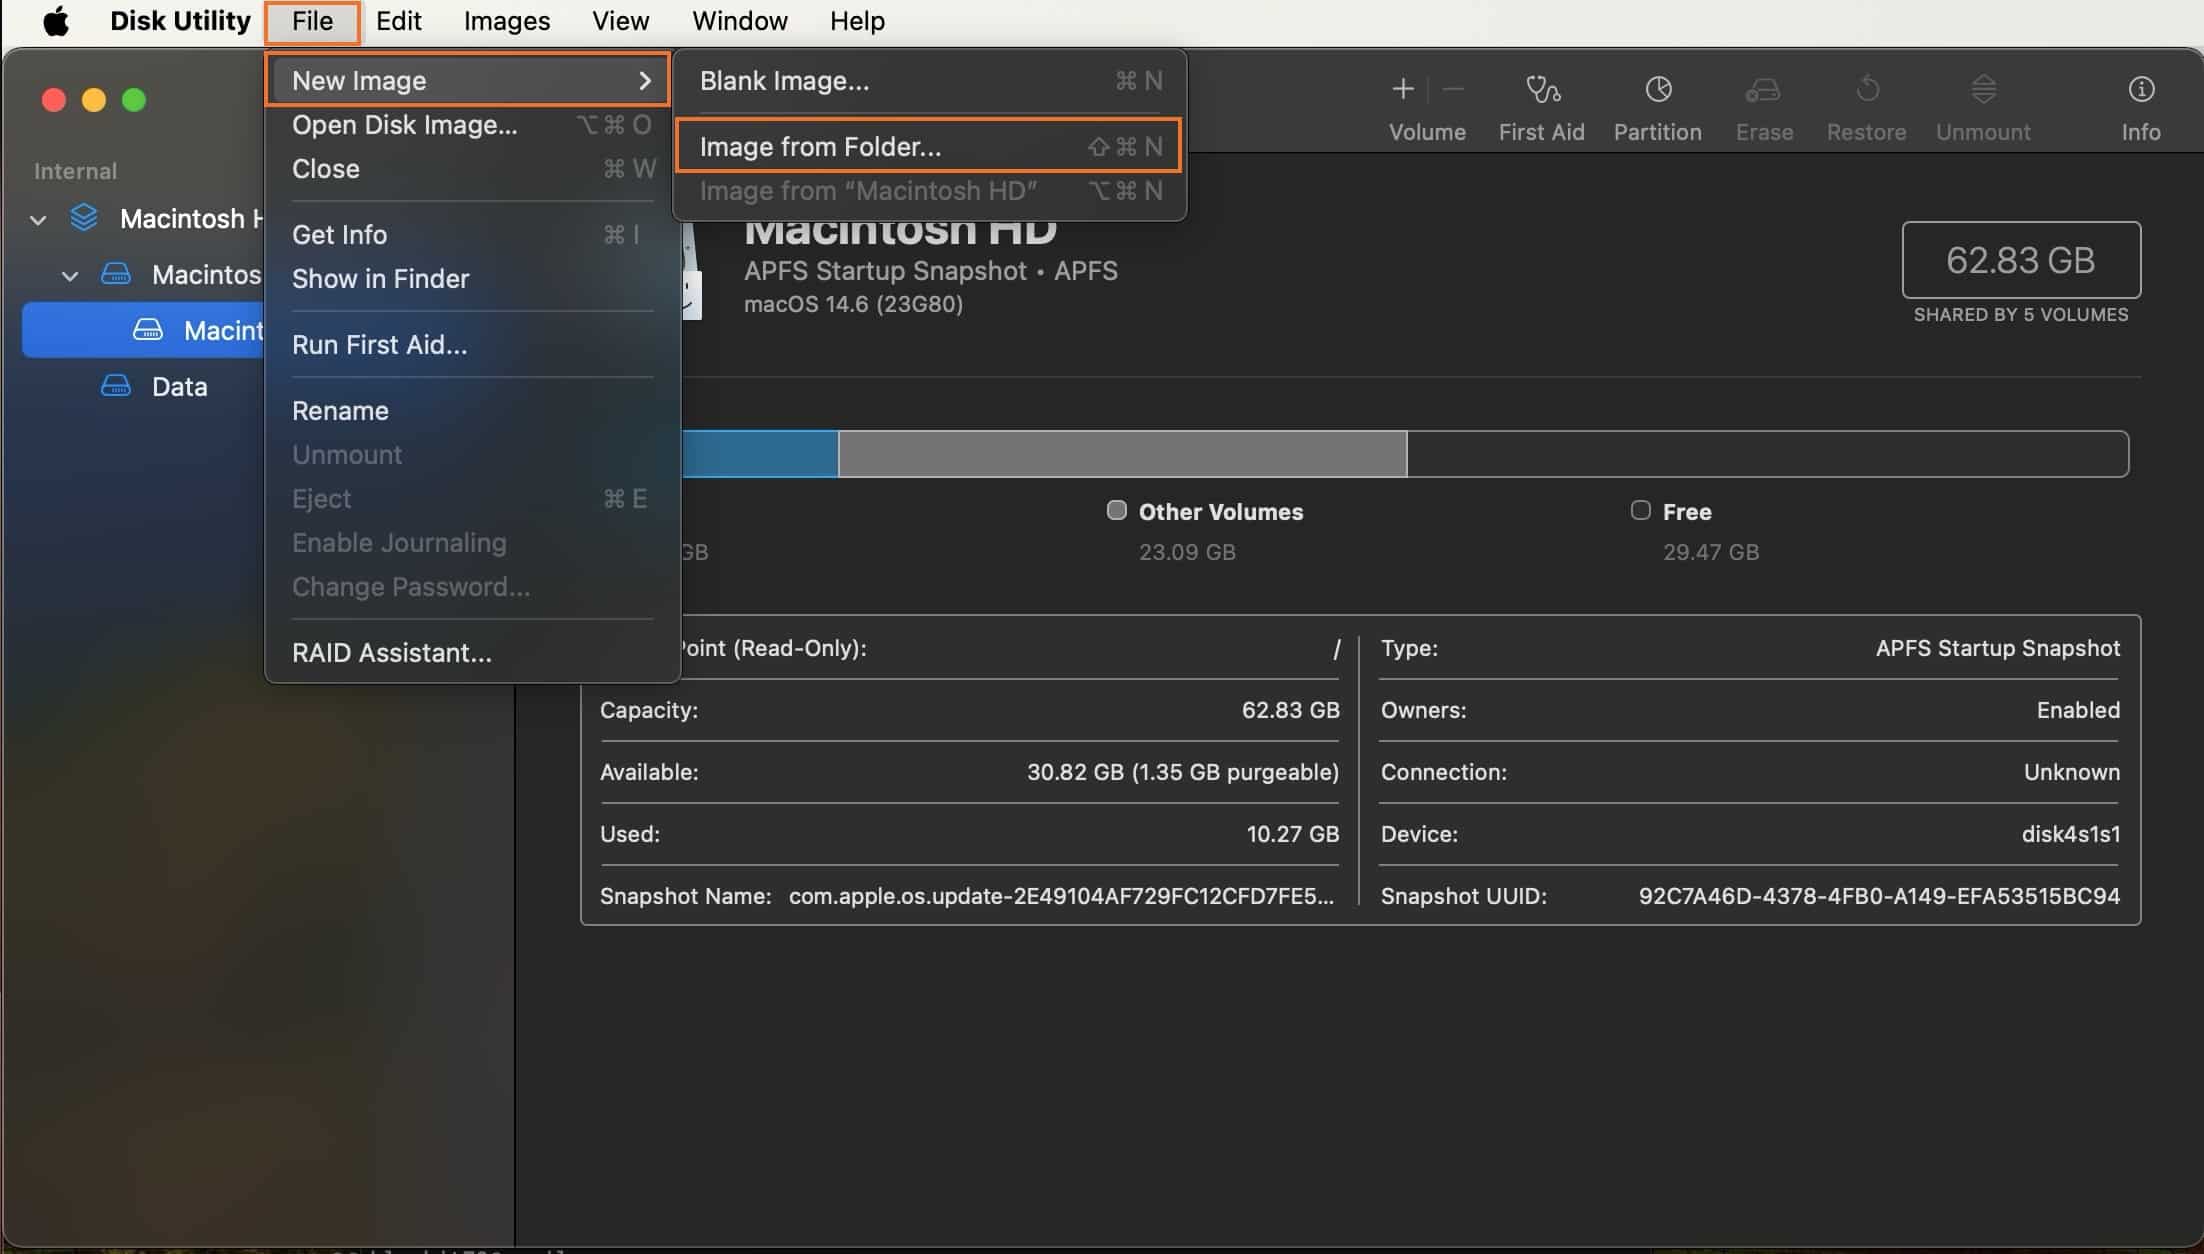
- Launch the Disk Utility app, which is located in the Applications > Utilities folder.

- From the top menu bar, navigate to File > New Image > Image from Folder… You’re prompted to select the folder from which to create the encrypted disk image.
- In my case, it is a folder called MyDiskImage, located in a Temp folder in my home directory. Select the folder and click Choose.

- You’re taken back to the Disk Utility app, where you’re prompted to configure the disk image. By default, the disk image will be created in the same location as the original folder. You can change this if you like. For our example, we’ll leave things as they are.

- From the Encryption drop-down menu, select 256-bit AES encryption (more secure, but slower). You can also choose 128-bit AES encryption (recommended), if you like. But in this example, we’ll be using the more secure option.

- You’re prompted to enter and confirm a password to protect the disk image. When done, click Choose.

- From the Image Format drop-down menu, select read/write, so that you can continue editing your protected documents. The other options create a read-only image.

- Once you’ve set these two parameters, click Save.

- The Disk Utility app begins the process of creating the encrypted disk image. Once done, you’ll see Operation successful displayed. Click Done.

- We can see that our disk image has been created in the same location as our original folder.

- If we double-click it, we’re prompted for the password.

- Once we enter our password and click OK, our disk image is opened and displayed in the Finder window sidebar. Selecting it displays our decrypted files.

- Clicking the Eject icon next our disk image name closes the image and you’ll be re-prompted for the password if you want to reopen it.

With an encrypted disk image, you can password-protect as many files and folders as you like, whether the app that generated those files natively supports password-protection or not.
Enabling FileVault
While we’re on the subject of protecting files and encryption, here’s a quick overview of how to enable FileVault in macOS.
- Launch the System Settings app and select Privacy & Security from the left panel.
- Scroll down and select FileVault displayed on the right.

- The FileVault page is displayed. Click Turn On.

- You’re prompted for your macOS username and password. Enter them and click Unlock.

- You’re presented with two options:
- Setup your iCloud account to reset your password from there.
- Have macOS generate a recovery key that you will store and use if you ever need to reset your password and recover access to your drive. This is the option we’ll choose in this example.

- Your recovery key is generated and displayed. Take note of it and store it in a safe place. Then, click Continue.

- The process of encrypting your entire drive begins, and a progress bar is displayed.

- When the process is complete, you’ll see Encryption finished displayed in the FileVault page, and you have the option to disable it at the top right.

Wrapping up
So that’s how you can password-protect files and folders on your Mac. It’s not difficult by any means, but that functionality isn’t advertised very much, and if you don’t know you can do this natively, you may go on the hunt for an unnecessary app.
While FileVault doesn’t password-protect your files or folders, it does password-protect your entire hard drive. It’s a totally different use case, but it’s highly recommended that you enable that feature whether you want to password-protect individual files and folders or not.
As always, stay safe.
Read more relevant articles:
- A guide to MacOS VPNs
- A guide to MacOS antivirus
- Test your password strength