
Navigating the world of internet cookies can feel like traversing a minefield, especially when user privacy seems to be at constant risk. While ensuring seamless online interactions and remembering your preferences, cookies also open the doors to intrusive advertisers and potentially unwarranted scrutiny.
Understanding the dilemma and discomfort of being under the watchful eye of the unseen, we’ve conducted exhaustive research and rigorous testing to demystify the complex world of cookies for you. We know you need privacy and control, and we are here to provide a comprehensive guide on how to clear cookies from any browser that you use.
This guide is not just a beacon of knowledge but a practical tool, allowing you to navigate the delicate balance between online convenience and privacy confidently. Explore, learn, and arm yourself with the strategies needed to secure your digital existence and experience the web with peace of mind. Welcome to a journey toward secure online interactions and how to clear your cookies from your device.
Note: Tests for Google Chrome, Edge, Opera, and Mozilla Firefox were all run on a Windows 10 desktop PC running the latest updates as of February 21, 2019.
(Version 72.0.3626.109)
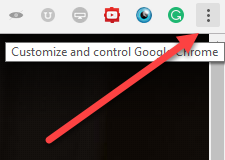
To start your journey toward being free and clear of cookies once and for all (or at least to have a better grip on which ones get through), click the button with three dots in the top right hand corner of your browser window:
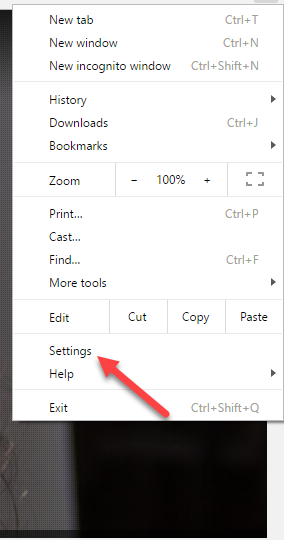
From here a drop-down menu will appear, containing a number of different options to choose from. To get to the cookie management tools you’ll need to use, click on the Settings option, shown below:
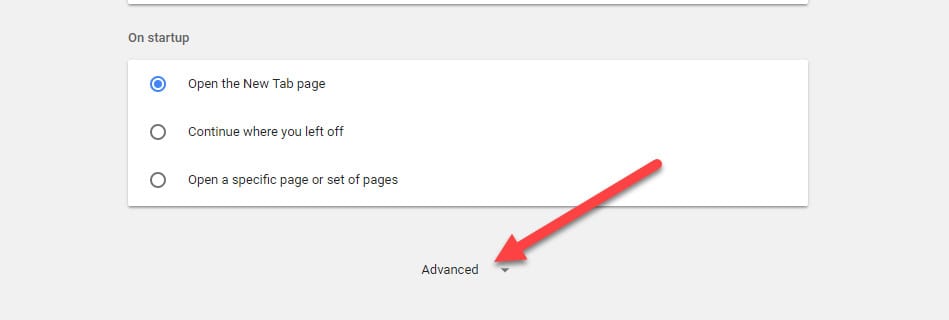
This will take you to the following Settings window, which will take up an extra tab on your browsing session. Way at the bottom of this page, you’ll find a button which reads Advanced, click this to move on:
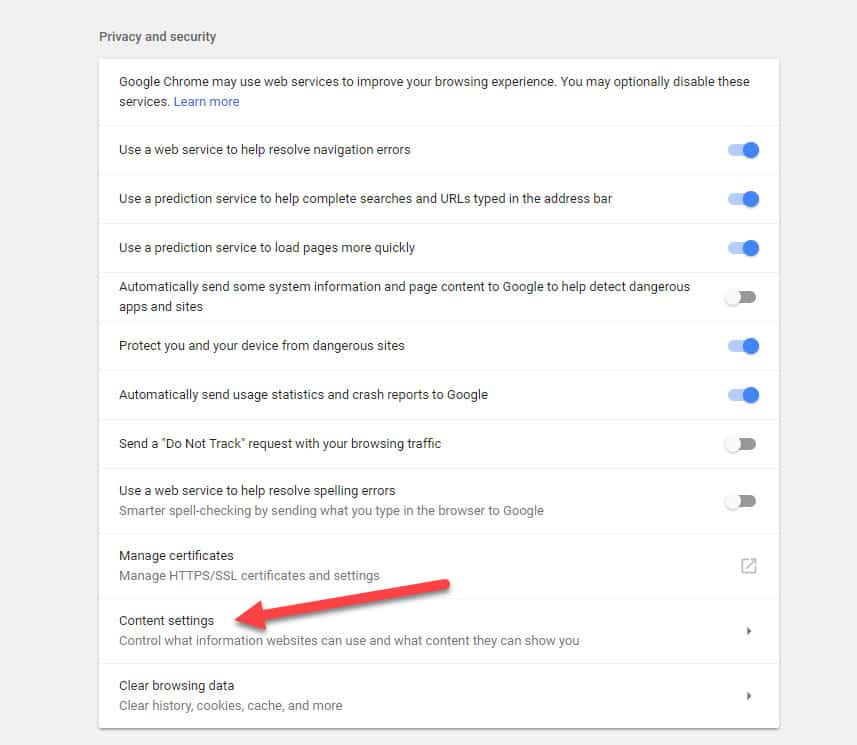
Once the Advanced Settings options open up, you’ll see a section called Privacy and security:
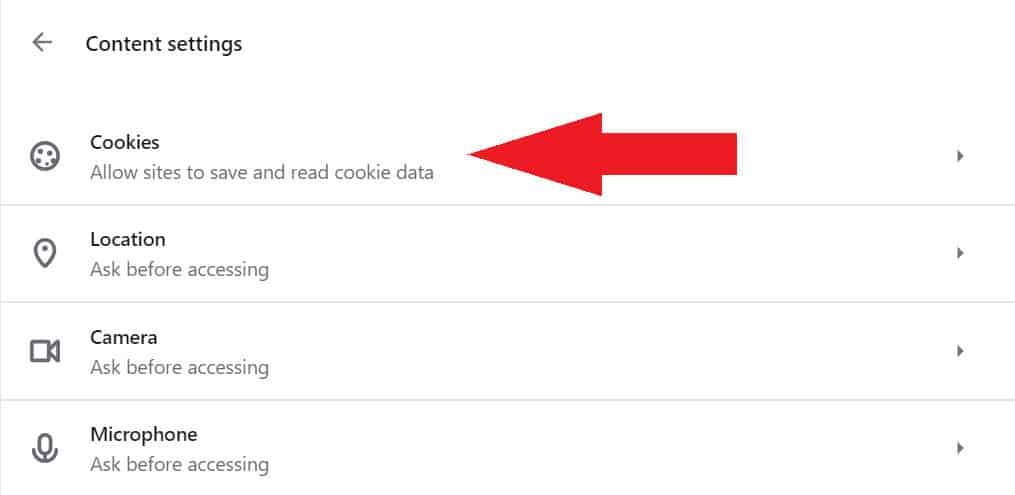
From here, click on the Content settings button, shown above. That should bring you to the following window, which is where we’ll be handling everything related to Chrome’s Cookies settings.
There are a lot of different settings to work with here, but to start it helps to know exactly which sites have been keeping cookies on you, and how many each one has stored. To do this, click on the button that reads See all cookies and site data:
The length of the list that pops up will depend on how long you’ve been using your browser at the default cookie setting of Allow local data to be set.
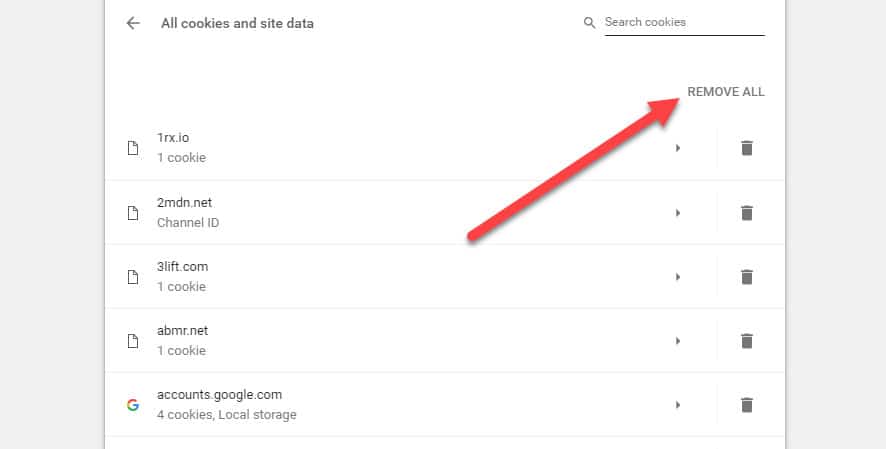
To clear all your cookies in one swift go, simply click the Remove all button that appears next to the search bar:
However, if you only want to remove cookies from certain websites, you can enter the name of that website into the search bar and only results from that specific domain will appear:

If you click the Trash that appears on the far right, the cookie will be instantly deleted:

Note: There won’t be any confirmation window when you choose to delete a cookie, so make sure you definitely want it gone before clicking if you don’t want to lose any important data or logins.

There’s also an option to remove all the cookies associated with the searched domain at once, by clicking the Remove all shown button seen above.
Note: As of this time of writing, Chrome currently has an issue where the browser will crash if you attempt to clear individual cookies. This is a known issue that has been around for several months and is currently unresolved. Possible workarounds include restarting your computer and waiting a few minutes after loading the cookies page before attempting to delete individual cookies.
Clear your cookies in Chrome (the quick way)
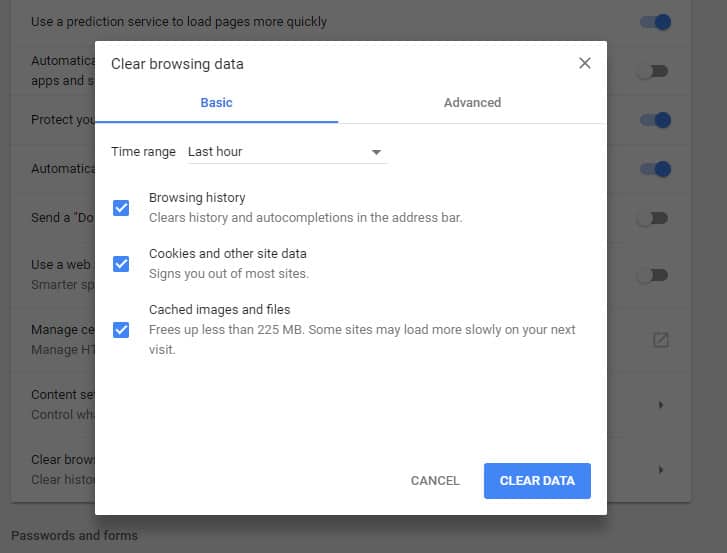
An alternate (and faster) method of clearing your cookies can be found back at the original Advanced Settings menu. Under the Privacy and security section there is a button labeled Clear browsing data, seen below: Once you click this you’ll be taken to a window where all the individual pieces of your browsing history are laid out in a checklist:
To clear your cookies from here, only tick the box for Cookies and other site and plugin data, making sure to uncheck any other data that you’re not willing to lose at the end of this process.
Once the cookies box is selected, you can specify how far back the deletion should go by clicking the drop-down menu above. Here you’ll find the choices of anything recorded in the past hour, the past day, the past week, the last 4 weeks, and All time, (which is really just since the first time you installed the browser or ran a hard reset on the previous settings).
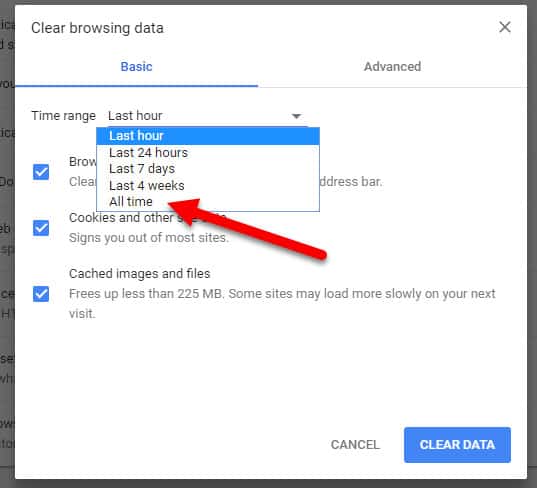
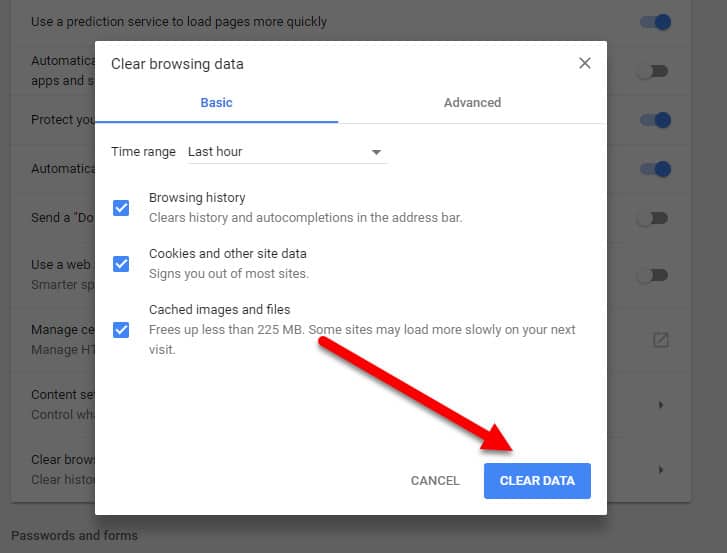
After you’ve selected the duration of time you want to cover and the data you want to delete, click the button in the bottom-right corner to confirm you want it gone:
Managing your cookies in Chrome
Lastly, if you’re tired of constantly having to go back into your settings menu to carefully pick out pesky cookies that have overstayed their welcome, you can set your Chrome up to automatically manage cookies in a way that better suits your preferred privacy level.
To do this, start back at the Privacy section, and click on the button labeled Content settings, and then Cookies:
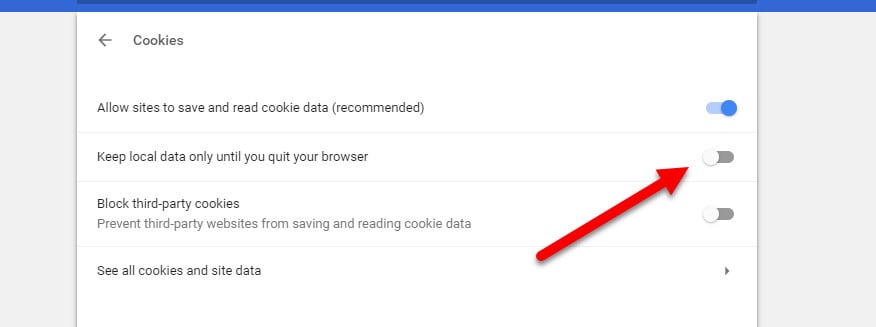
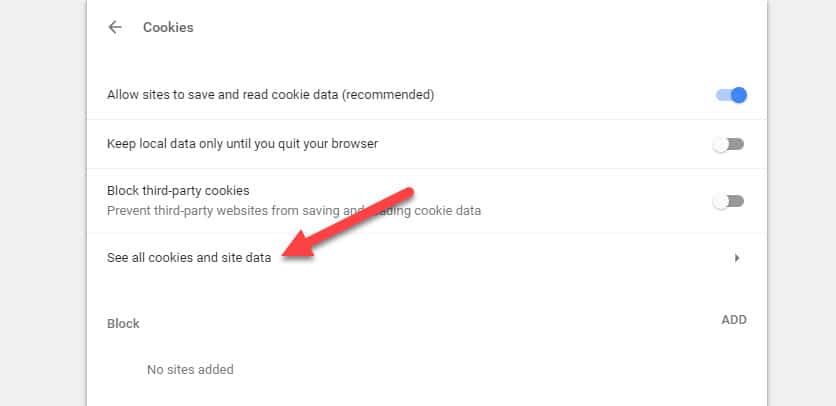
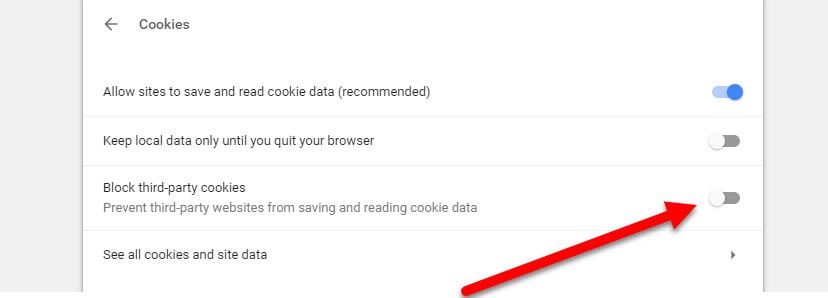
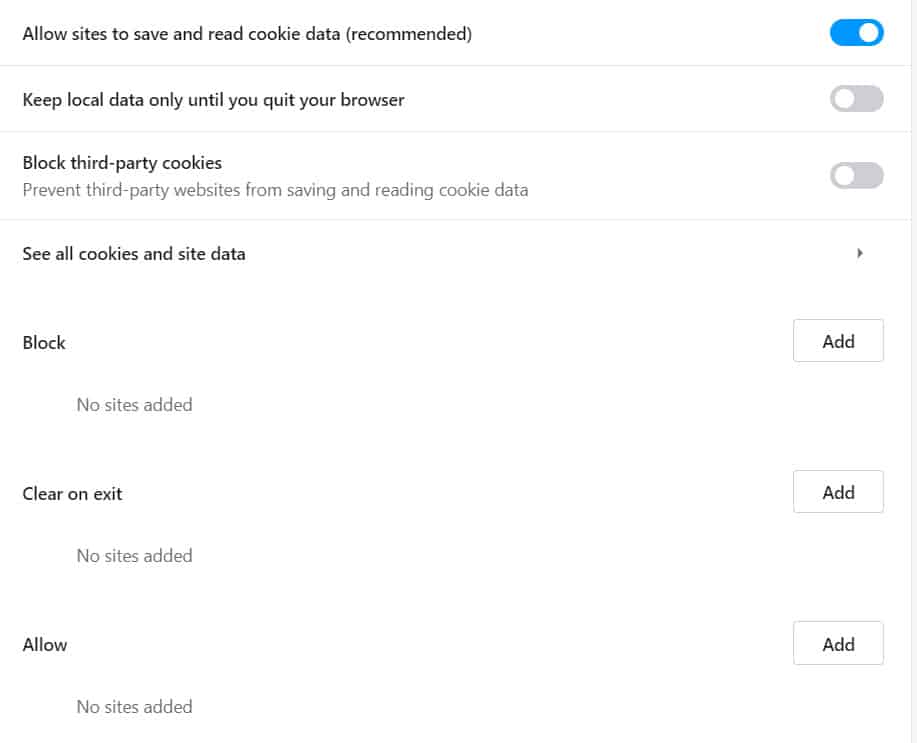
From here you’ll find yourself back at the original cookies menu, seen below:
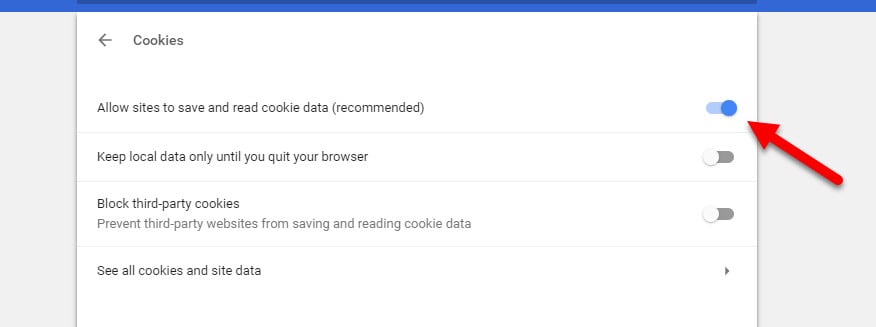
At stock builds, Chrome installations will always choose Allow local data to be set (recommended) as the default option for how the browser handles incoming cookie requests. This means that your browser will be a catch-all for any cookie that comes its way, a big problem for people concerned about how to better control their privacy.
From this menu, you have several options to choose from when it comes to Chrome’s cookie behavior. The first is to Keep local data only until you quit your browser, which does pretty much exactly what it sounds like. This makes it so each time your browser is closed out, any local data that was stored during that session is automatically deleted, no questions asked.
The next is to Block sites from setting any data, which, just as the name implies, will put a hard block on all cookie requests regardless of the site (this can be mitigated through the exceptions tab however, which we’ll address shortly).
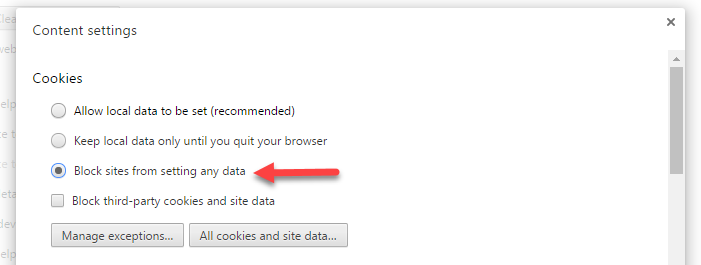 The last option on the list is to only Block third-party cookies and site data. This choice is a bit more complex than the others, and you need to understand the difference between third-party cookies and first-party cookies to get the full picture.
For example, if you visit CNN.com, any cookies you get from CNN would be considered the “first-party” cookie. If that particular page has a Facebook “Share” button on it, however, that cookie will also be stored on your system and is classified as a third-party cookie.
While that example sounds relatively innocuous on the surface, some third-party advertisers will take advantage of certain platforms in order to get more malicious cookies delivered to your computer. This option helps to mitigate that threat, while still making it easier to manage the rest of your first-party cookies from more reputable online destinations.
(Version 65.0.1)
Clearing your cookies in the Firefox browser is a fairly similar process to what you’ll find with Chrome, with a few key differences.
To start, click on the button in the top-right corner with three horizontal lines:
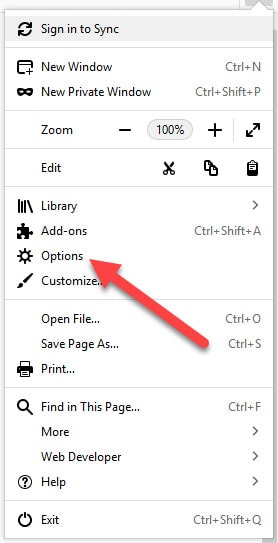
Here you’ll find a menu with a gear icon inside, seen above. Click that gear to get to the Options menu.
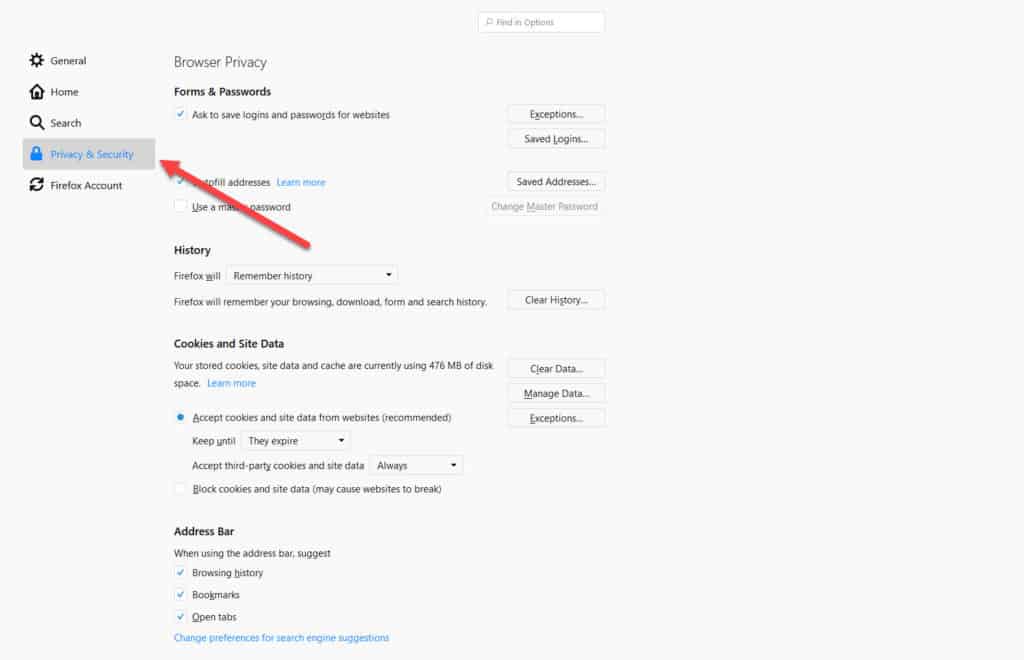
Once you’re in the options menu, look to the far left of the window and scroll down to the Privacy and Security tab:

In here you’ll find the Cookies and Site Data section. Under there is a button to Manage Data. Click this to get to the next screen:
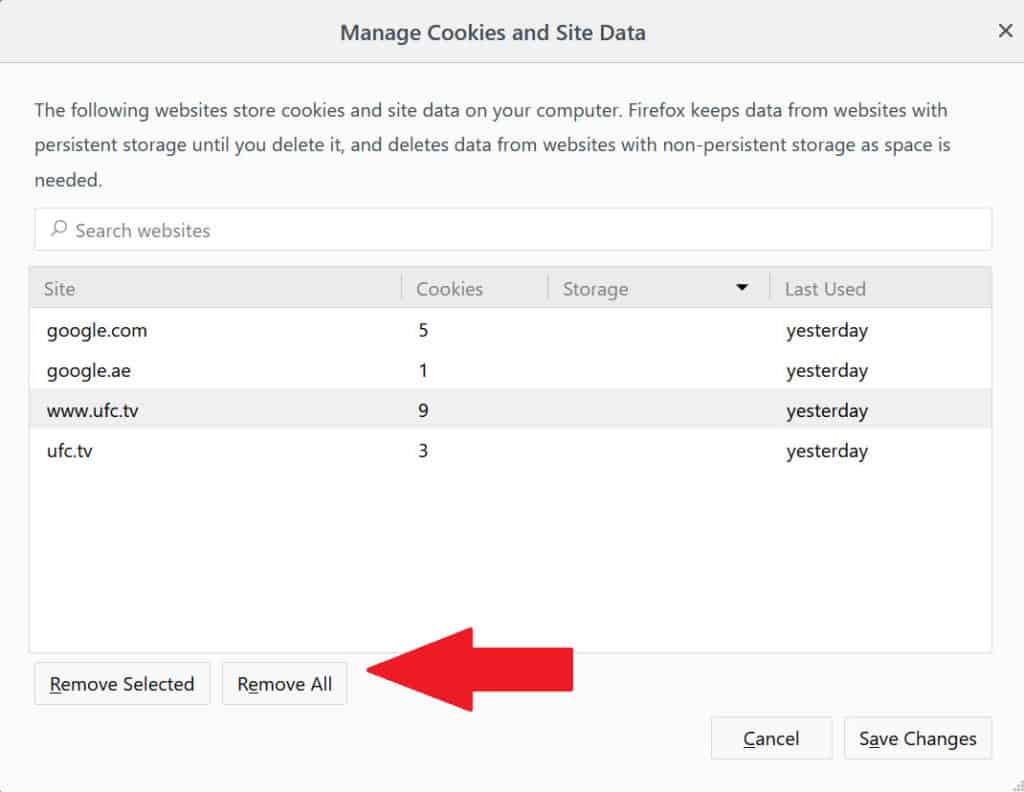
To simply remove all the cookies that Firefox has stored over the course of all your browsing sessions, just click the button labeled Remove All. Be careful, because there won’t be any confirmation window to ask if you’re sure that’s the move you want to make.
To delete individual cookies, you can either scroll through the entire list or just use the search bar at the top to find the specific site you’re looking for:
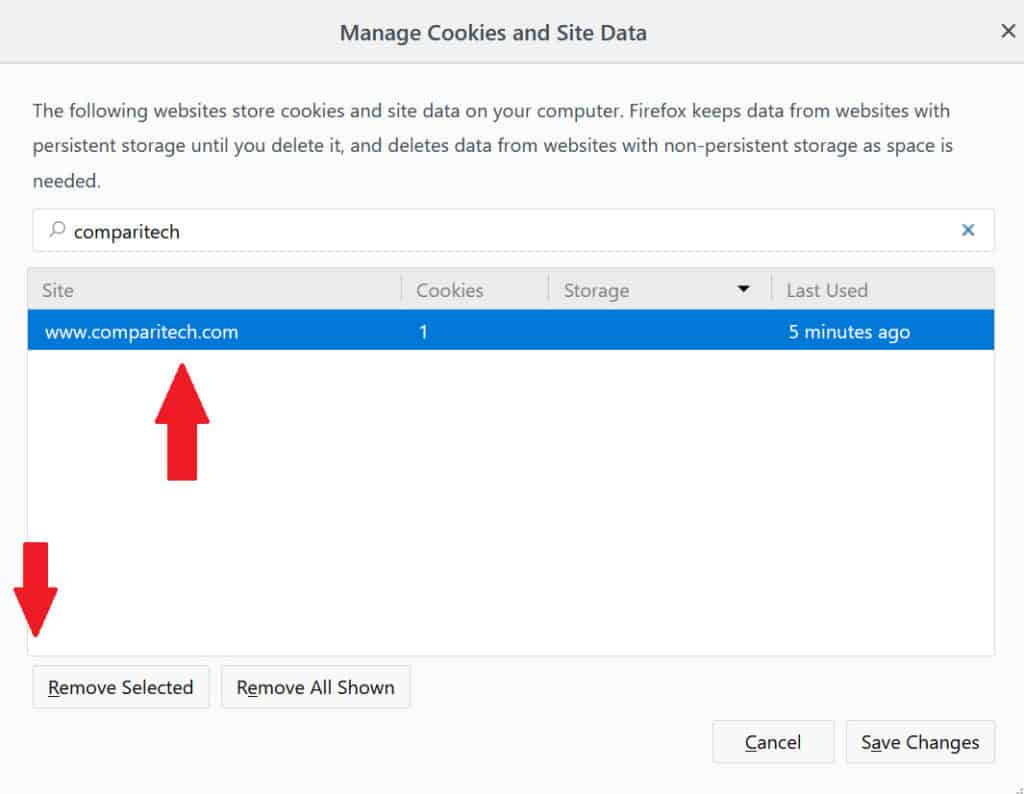
After you’ve found the cookie you want to delete, just click the Remove selected button in the bottom-right corner and you’re done!
Managing cookies in Firefox
If you want to change how Firefox handles cookie requests in the future, this can be done from back at the original Privacy window.
Under the History section, you’ll find a drop-down menu. Click on this and choose the option to Use custom settings for history.
From here a new set of options will appear under the History tab, each of which controls a different piece of the overall cookie pie. First, there’s the option to toggle cookies entirely:
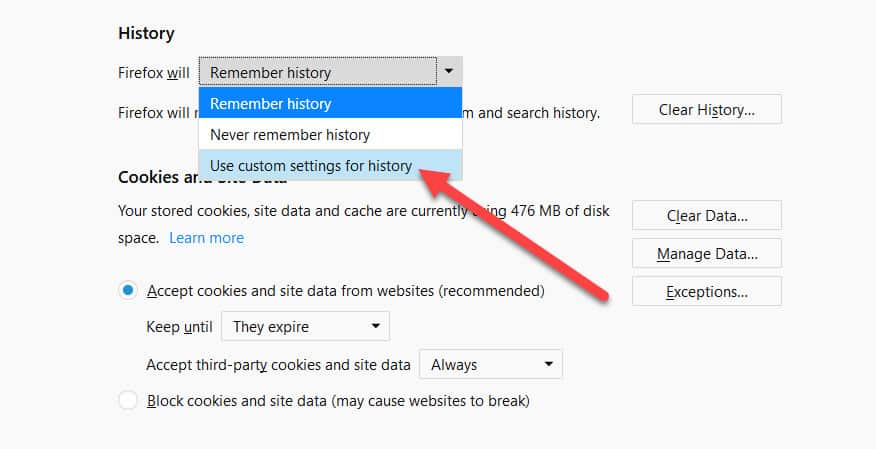
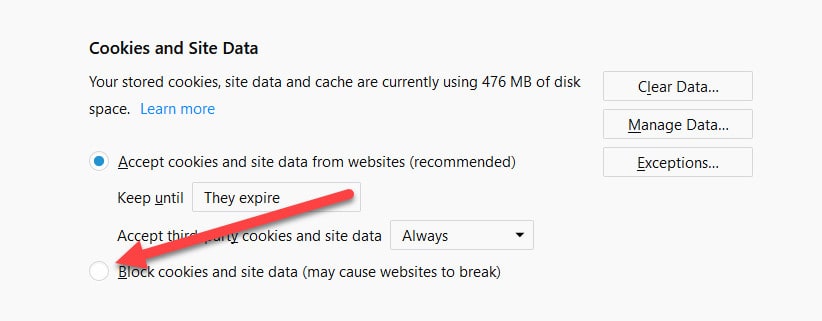
This is done from the box highlighted above. If you click that off, no sites will be able to ever install any cookies on your system while you’re using the browser.
If that’s a little too over-the-top for you, you can also control more specific action, like how third-party cookies are handled:
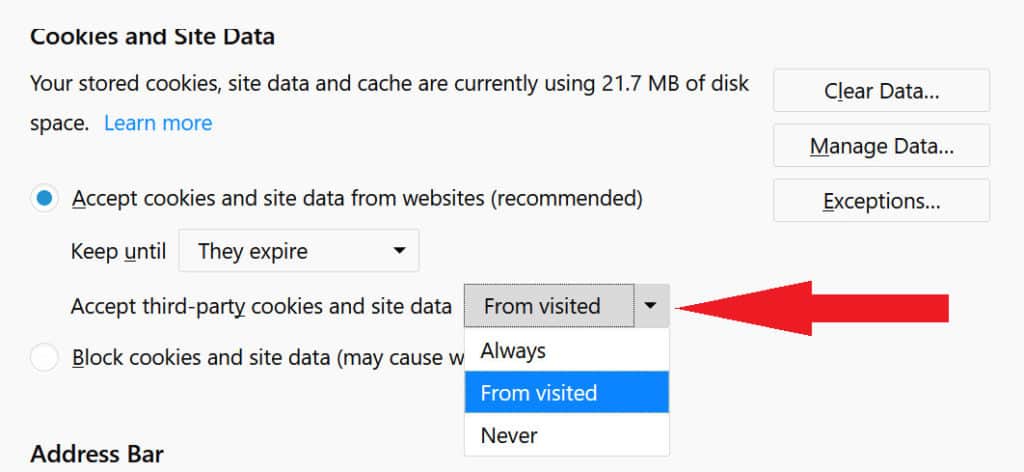
By clicking the menu seen above, you can select Always accepting third-party cookies, which lets everything through without any checks or balances. The next option is From visited, which will only store cookies from third-party providers that you’ve previously trusted with the option to add cookies.
The last option – Never – does exactly what it sounds like, and prevents any third-party cookies from ever being stored on the machine.
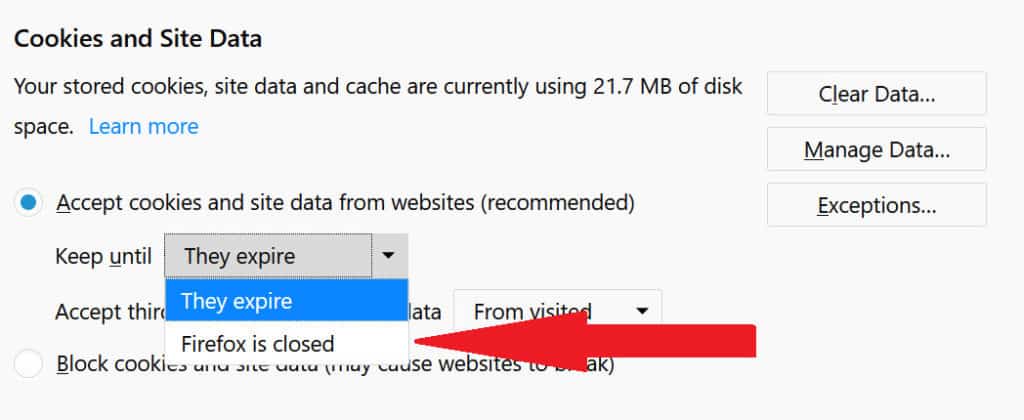
There’s also another choice to make here, one which decides how long those specific cookies are kept on your system. The two options here are Keep until they expire, and Keep until I close Firefox:
Keep until they expire is the riskier way to go, because sometimes the license for a cookie can be several years long, meaning they won’t leave your desktop until that time period runs up.
The other choice is Keep until I close Firefox, which is what we recommend for the more privacy-conscious users out there. As it sounds, this will only store third-party cookies until each browser session ends.
If you do choose to Accept cookies from sites, you can do more to control how certain sites or cookie requests are handled on a site-by-site basis. To do this, start by clicking the Exceptions button, shown above.
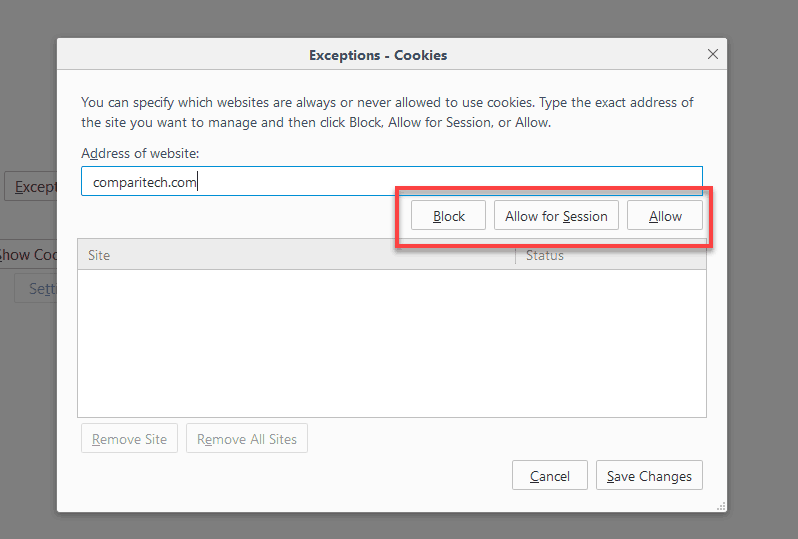 From there you should see the following window. To add a site to your Exceptions list, start by typing it into the search bar seen above, then select whether you want to Block, Allow for Session, or Allow.
Block will continue to block cookie requests from that site, while Allow and Allow for Session will let the site get through (in case the original Allow all box had been unchecked).
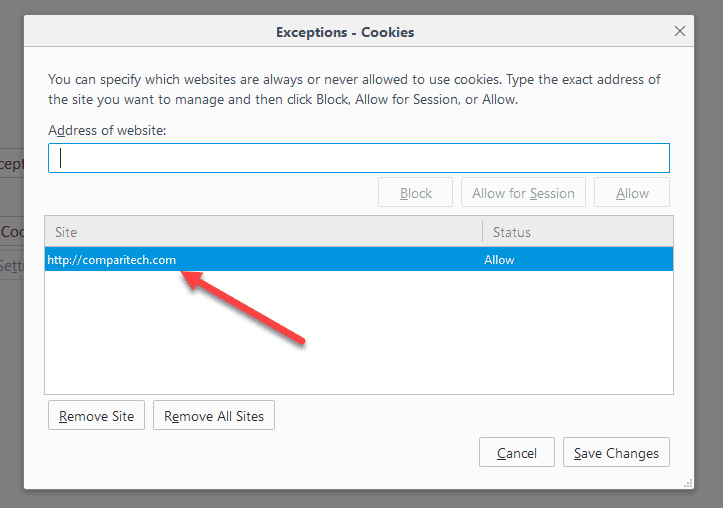 If Allow for session is chosen, that site will only be allowed to store cookies until you close the browser window, at which point the slate will be wiped clean once again.
(Version 42.17134.1.0)
Much like the rest of the browsers we’ve mentioned so far, the start of your cookie control adventure starts by clicking the menu option in the top-right corner of your primary Edge window:
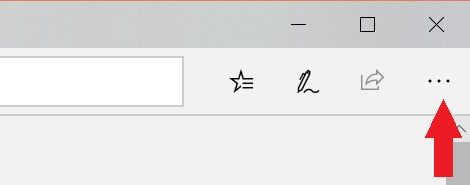
From here a menu should drop down, and at the way bottom you’ll find the option to open Settings:
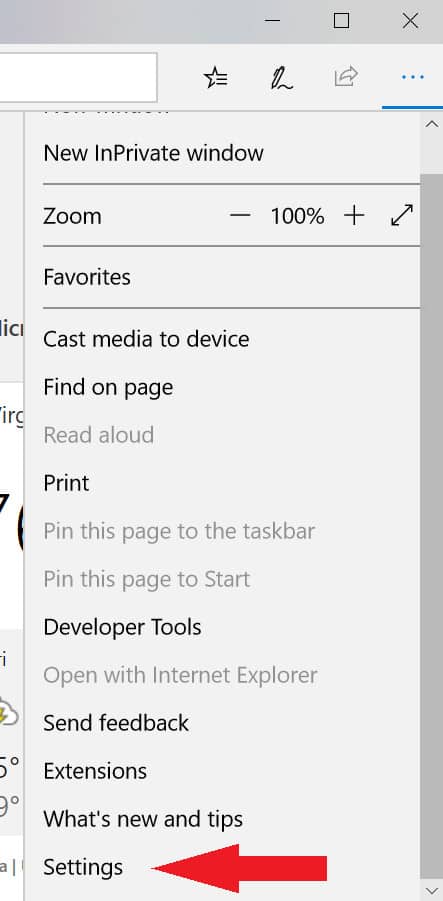
From here the window on the left-hand side of your browser will simply swap over to the Settings tab. Scroll to the bottom, where you’ll see the option to Choose what to clear under the Clear browsing data section:
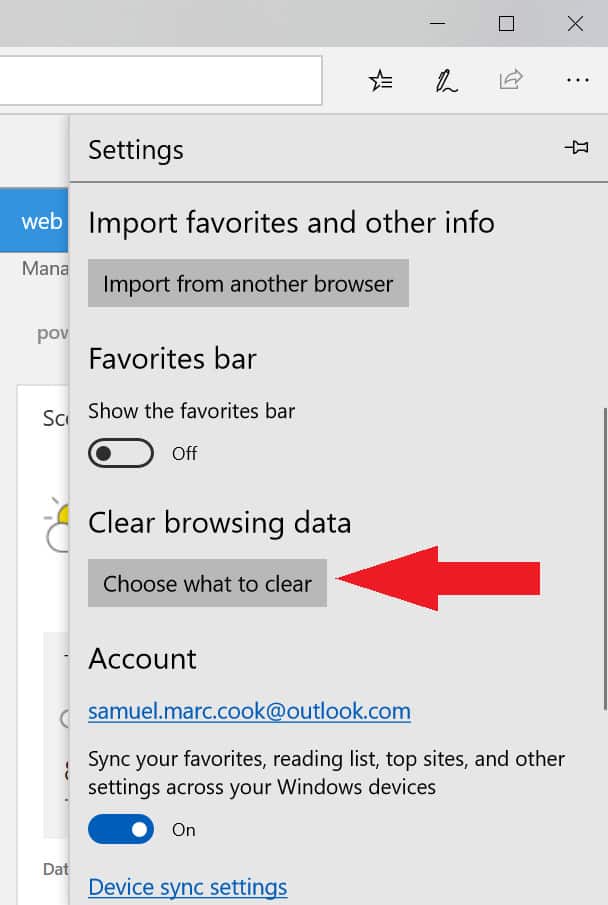
From here, click the Choose what to clear button, seen above. That will take you to the prompt we have highlighted here:
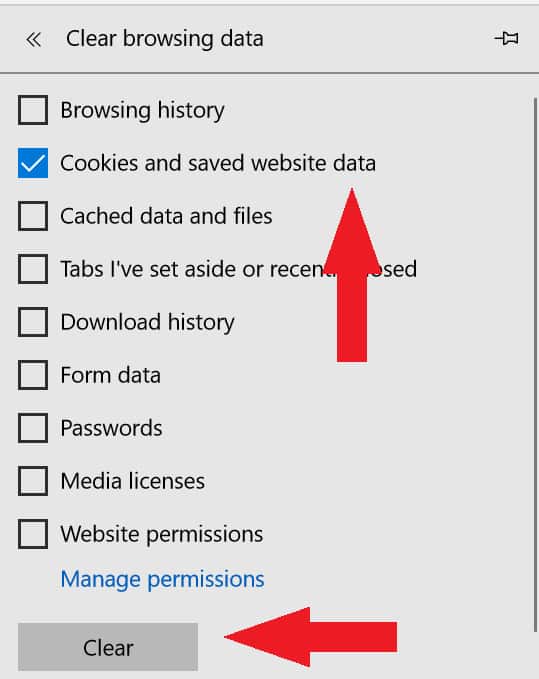
If you’d like to clear the entirety of all the cookies stored on your system, select the box for Cookies shown above, then click on the button labeled Clear at the bottom of the page.
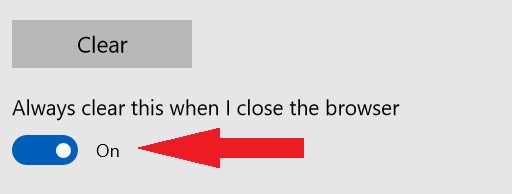
If you’d like to control what information your browser will delete after you close each session, you can select any of the boxes shown above (Browsing history, Form data, etc), and then switch on the toggle for Always clear this when I close the browser, just below the Clear button.
Managing your cookies in Edge
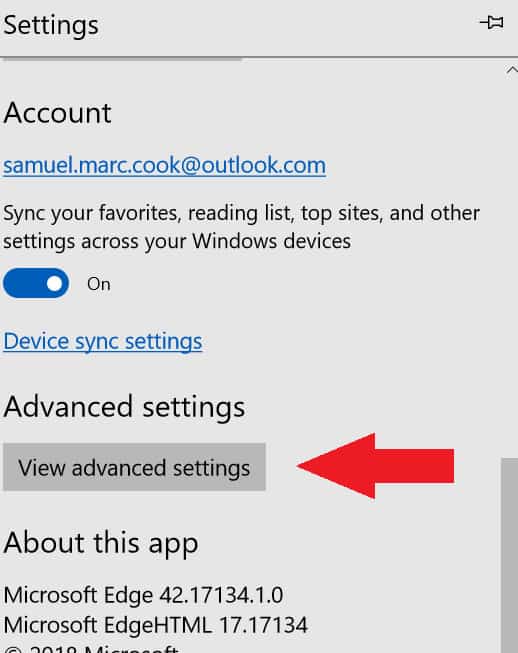
To manage how Edge handles incoming cookie requests, go back to the original Settings menu and scroll all the way to the bottom, where you’ll see the option to open up Advanced settings by clicking the link shown below:
From here the same style of window should pop up on the side menu. After this happens scroll all the way to the bottom of that menu, to find the following drop-down menu:
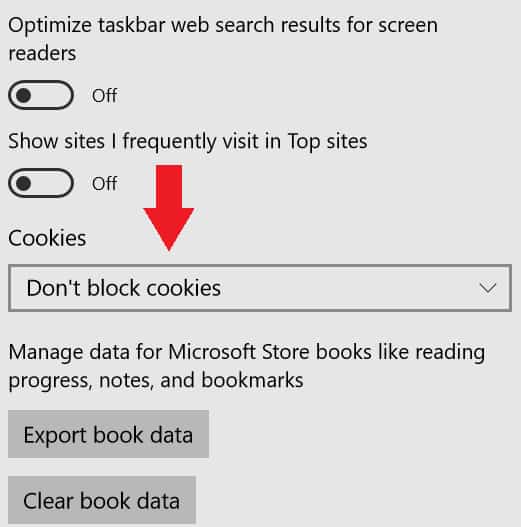
From here you’ll have three choices of how cookies are handled. Don’t block cookies (the default option), Block cookies, and Block only third-party cookies:
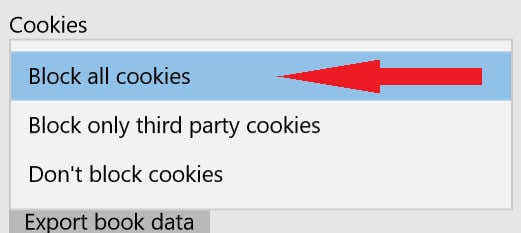
We’ve already explained in the other browsers how you can expect each of these settings to behave, but unfortunately, unlike all the other browsers on this list, Edge doesn’t allow you to make any specific exceptions regarding which sites get through and which don’t.
Every choice is a catch-all for all sites you visit, so make sure you know how you want Edge to operate before making any final decisions with it!
(Version 11.1.2)
To clear your cookies in Safari in OSX, start by opening up the settings menu by clicking Safari in the top menu, and then Preferences from the drop-down shown below:
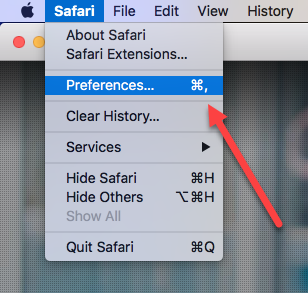
From here you should get to your main settings window. Once that opens, click on the Privacy tab, the one with an icon containing a gray circle with a hand in the middle:

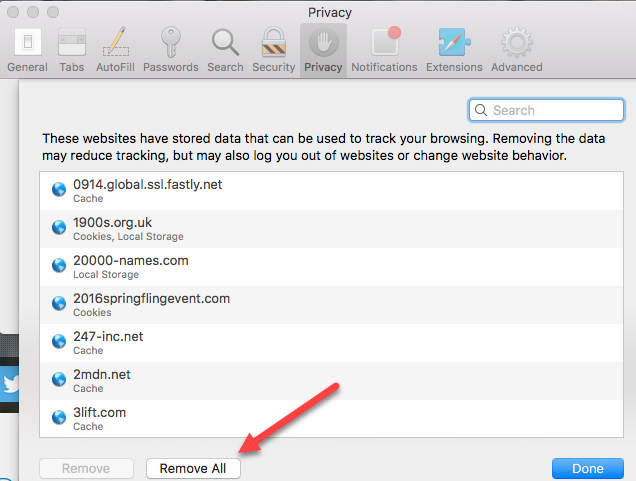
This is where all your cookie data and preferences can be configured. To clear your cookies completely, first click on the Manage Website Data… button to get to the screen below:
As was the case with other browsers, from here you’ll see a full list of all the cookies that are currently stored as a part of your browsing session.
To delete all cookies kept on the system, click on the button at the bottom of the window labeled Remove All:
To remove individual cookies, you can start by typing the site you’re trying to manage into the search bar, highlighted here:
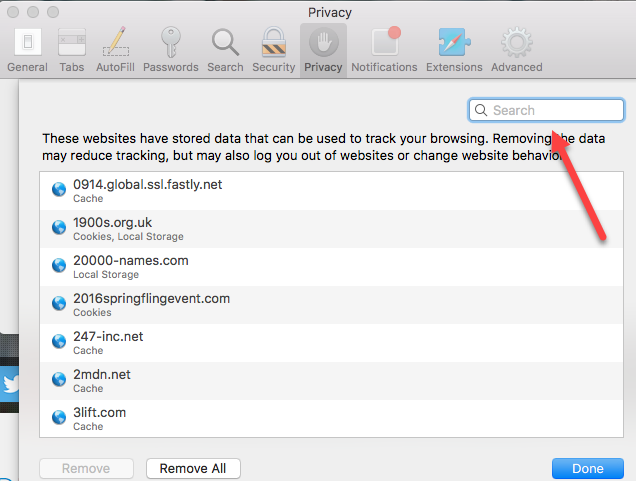
Once you’ve done that, a list of any cookies associated with the domain you typed in will appear.

Select the one you want to delete, and click the Remove button:

And you’re done!
Managing cookies in Safari
Safari has simplified how users manage cookies. In the same Privacy tab mentioned above, you get two settings, each with two options.

The first is Website tracking, which by default prevents cross-site tracking. That includes those pesky persistent tracking cookies. You can opt into Do Not Track by checking the box for Ask websites not to track me.
Next Cookies and website data, you can opt to go for the nuclear option and Block all cookies, but note this may cause issues on many websites.
(Version 58.0.3135.65)
Because the Opera browser is based off the same underlying Chromium architecture that the standard Google Chrome browser is, almost everything about how to clear and manage your cookies is just about identical in process and implementation.
There are a few subtle differences though, namely how you actually get to the menu where you can change around your settings. To start, click on the red O (for Opera) in the top-left corner of your browser window:
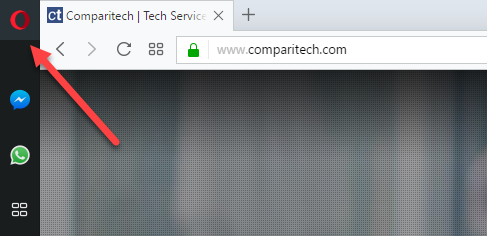
Now a drop-down menu will appear. From here, scroll down first to More tools and hover over it. Once you do a secondary menu should appear on the right, reading Clear browsing data. Click on this to get to where you need to go:
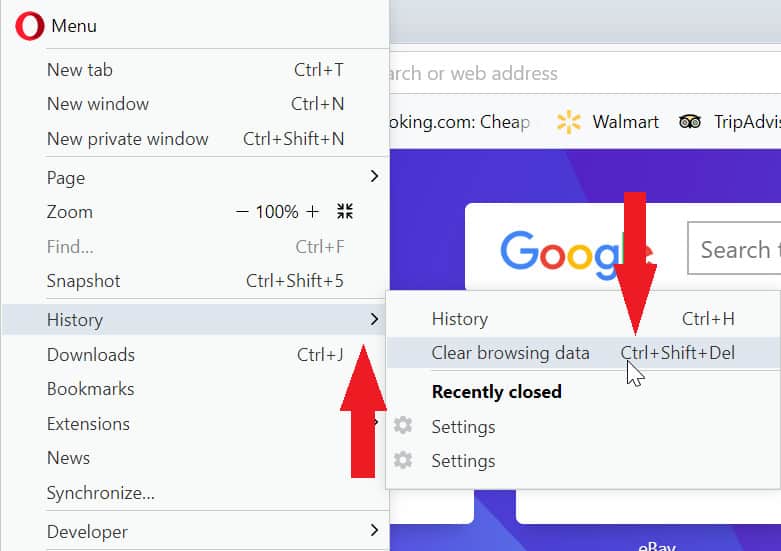
Once you click this, you’ll be brought to a very familiar looking screen which gives you the option to decide what data should be deleted, and from how far back:
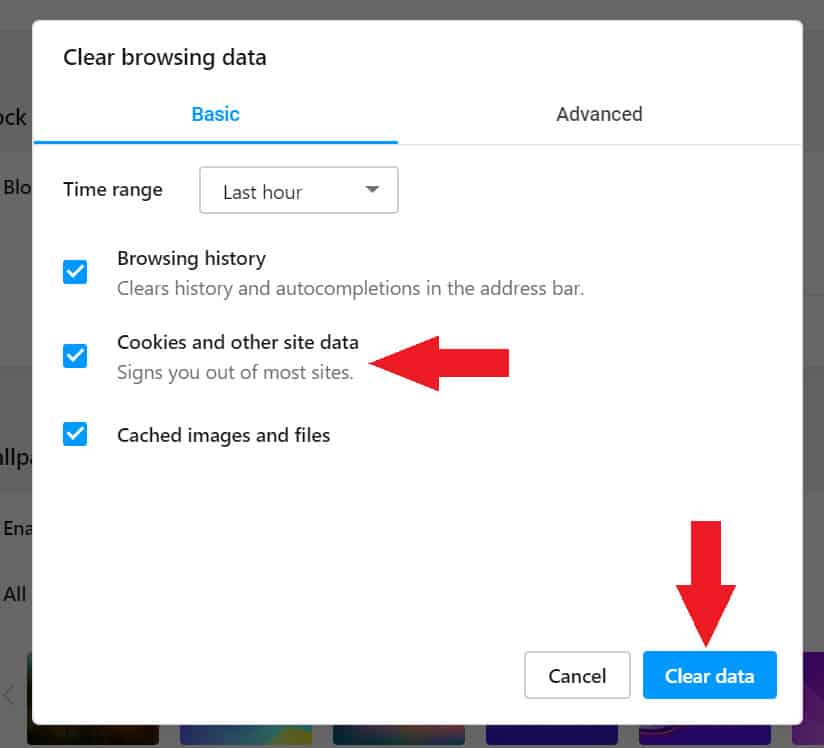
You’ll also get an option for “Basic” data removal or “Advanced”. The “Advanced” menu increase the data categories, but for cookies, all you need is to use the “Basic” menu.
If you need any additional help on how to handle things beyond this point, refer back to the Chrome section to find out everything you need to know.
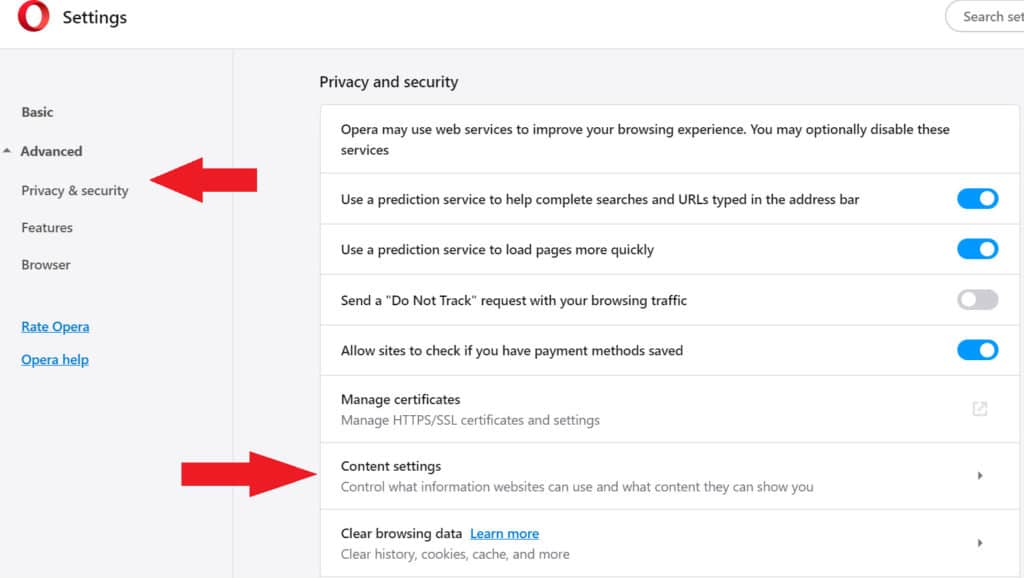
Finally, managing cookies in Opera will take a few more steps. If you hit Cancel from the Clear browser data screen, you’ll be at the main settings menu. If not done already, click on Advanced on the left to expand your options, then click on Privacy & security. From there, click on Content settings.
Next, select Cookies from the content screen.
From there, you can choose to adjust your cookie settings more specifically. Opera allows you to turn off autosaving cookies, as well as other options such as blocking third-party cookies, and managing site-by-site coookies.
If you click on See all cookies and site data, you can delete specific coookie from individyual websites.
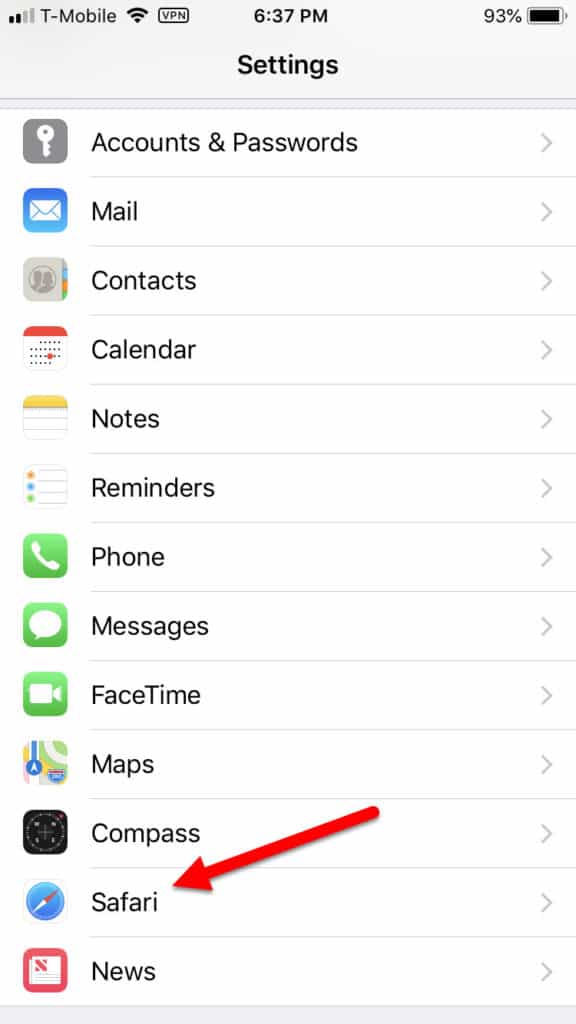
To clear cookies on an iOS device, start by opening up the Settings app, and then scroll down to the Safari button and tap it:
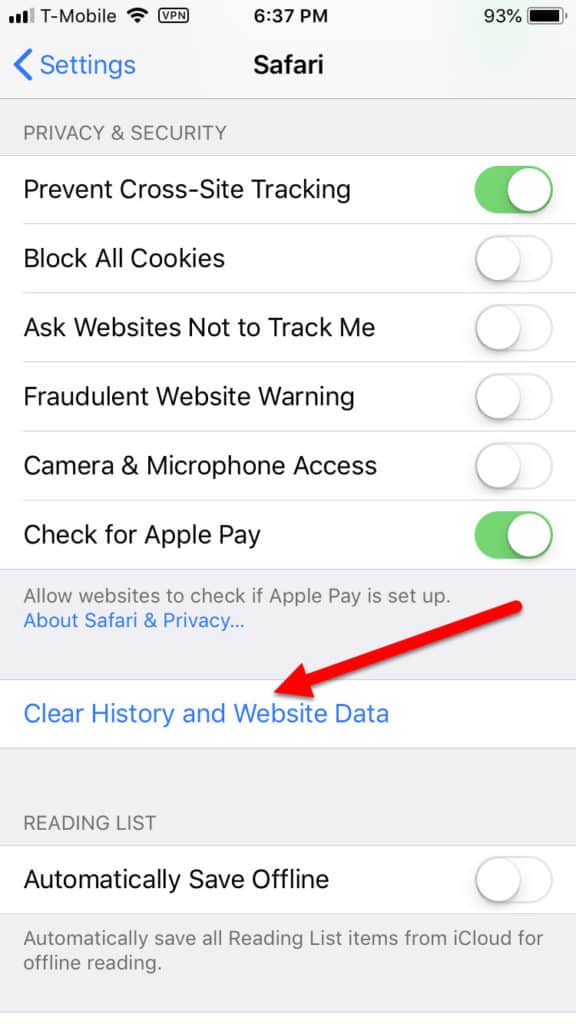
From here, scroll down to the button labeled Clear History and Website Data:
Tapping this will clear all the cookies from your Safari browser. That’s it, you’re done!
Managing cookies on iOS
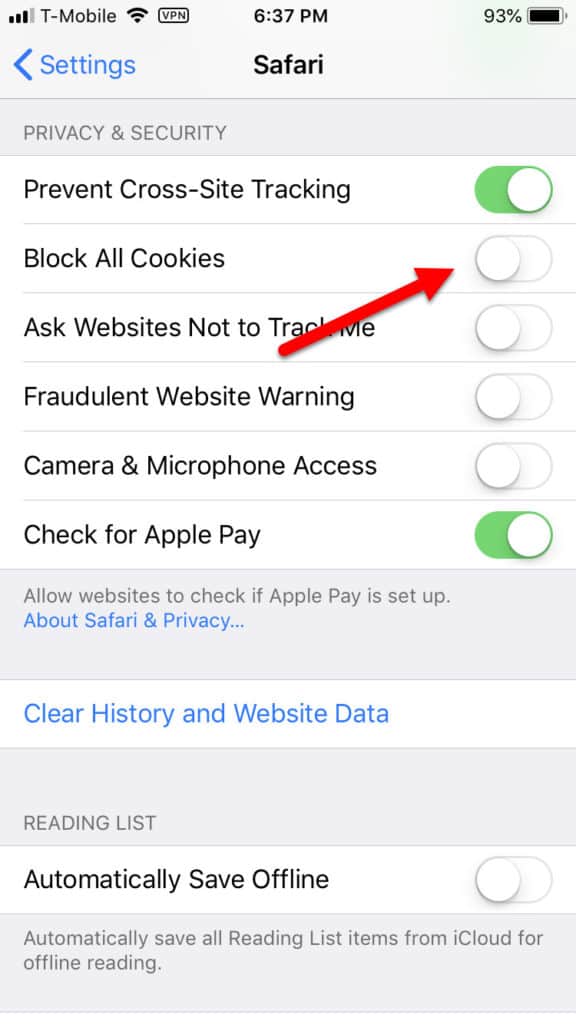
Right now there is only one cookie management tool in Safari on iOS, and that’s to block all cookie storage outright.
To do this, scroll down in the same Safari tab mentioned above, and then toggle the option to Block all cookies:
Once this is toggled Safari will be prevented from storing any new cookies on your iOS device.
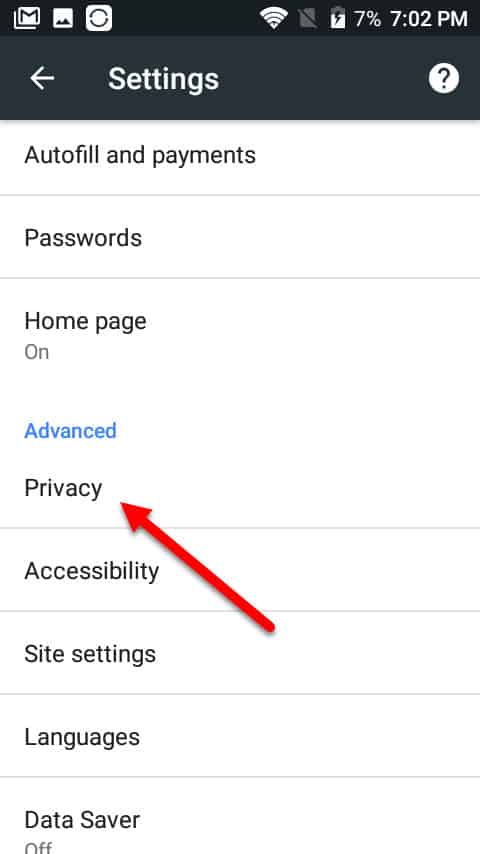
To clear cookies on Android, start by opening up the Chrome browser from your home screen. Next, tap the three buttons in the top right corner of your screen:
From here, scroll down to the tab labeled Privacy:
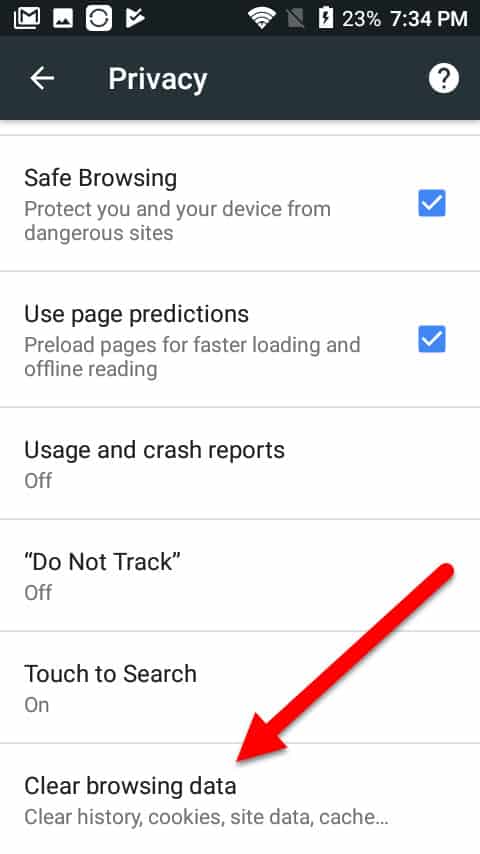
Next, scroll all the way down to the tab labeled Clear all cookies and browsing data and tap it:
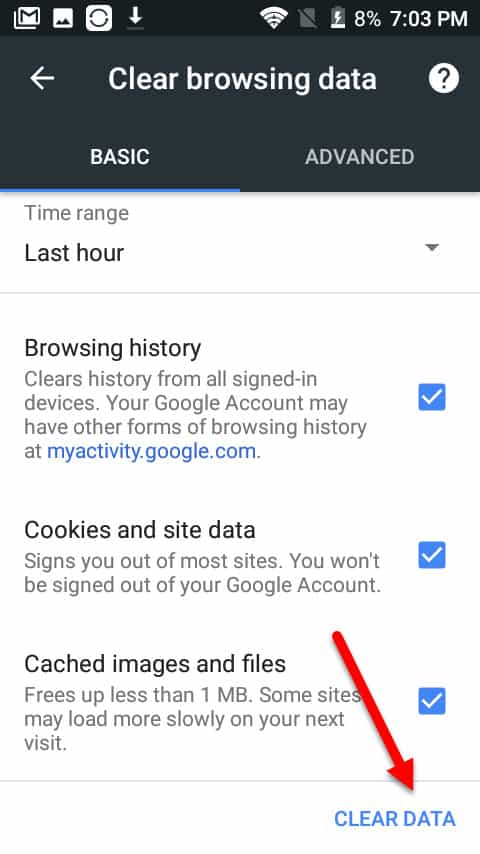
From here you’ll be able to see what cookies Chrome has stored on your Android device, as well as the option to clear them:
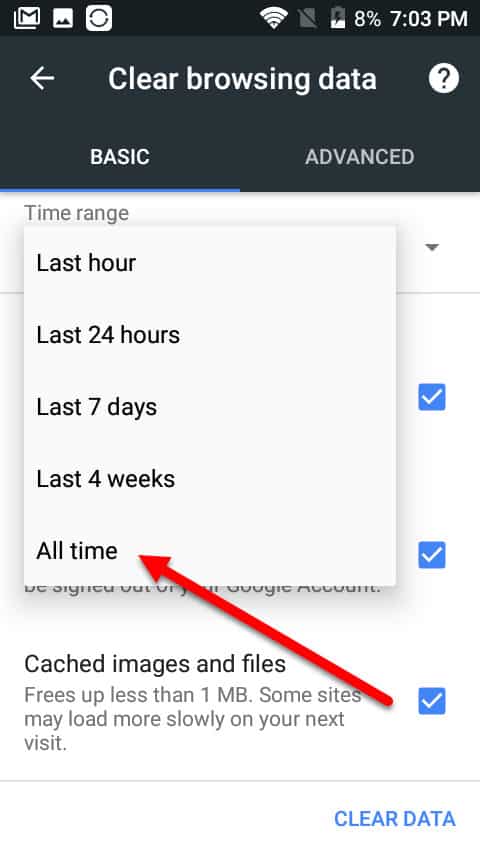
Start by choosing the time scale you want to clear from, and then tap Clear Data in the bottom-right corner to delete it:
Managing cookies on Android
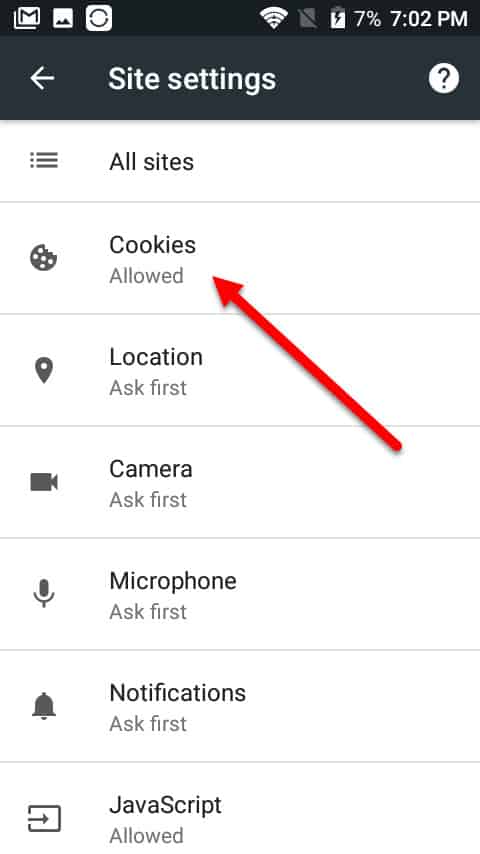
To manage your cookie behavior, scroll down to the tab labeled Site settings from your Chrome settings window:
Next, tap into Cookies:
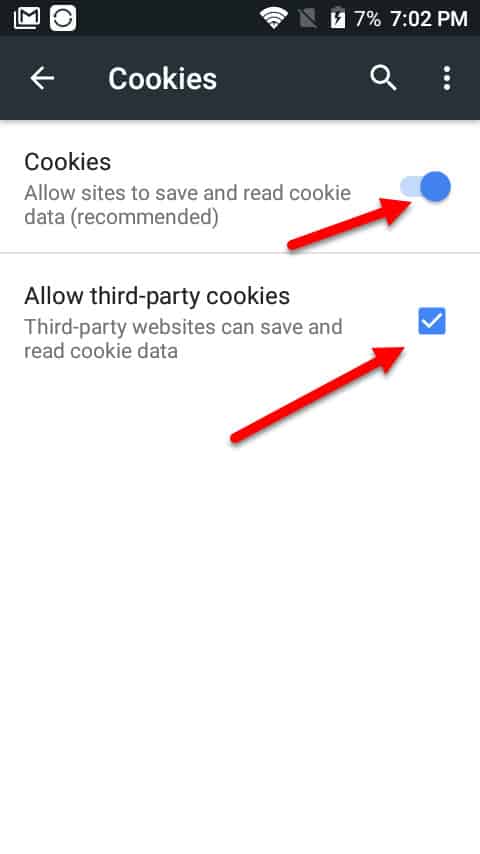
From here you’ll have one of two options, either to Allow third-party cookies, or to disable Cookies altogether by switching the toggle off:
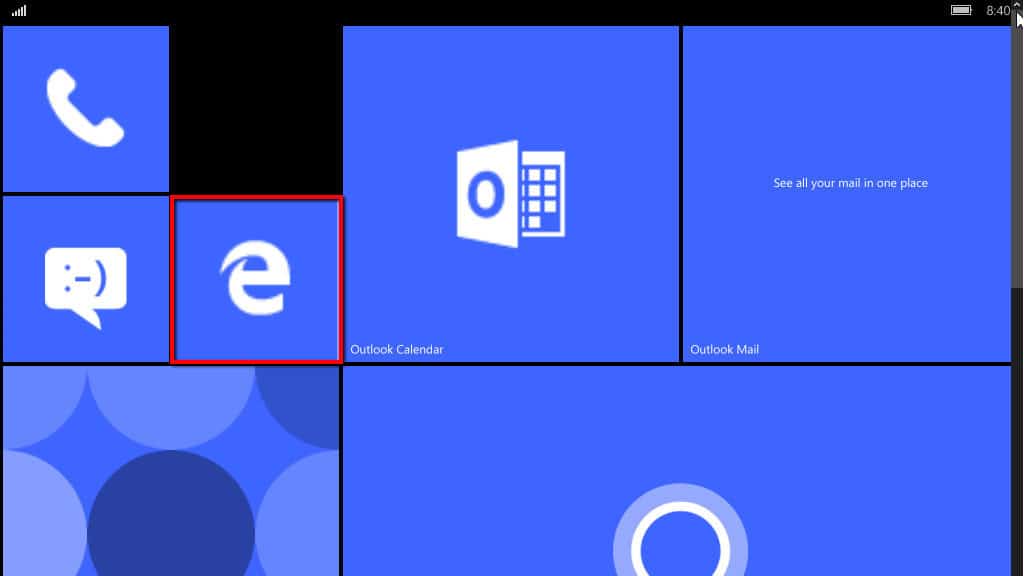
To clear your cookies on Windows 10 Mobile, start by tapping the Internet Explorer/Edge icon on your home screen:
Next, tap the three dots located in the bottom-right corner of your screen:
From the menu that pops up, tap Settings:
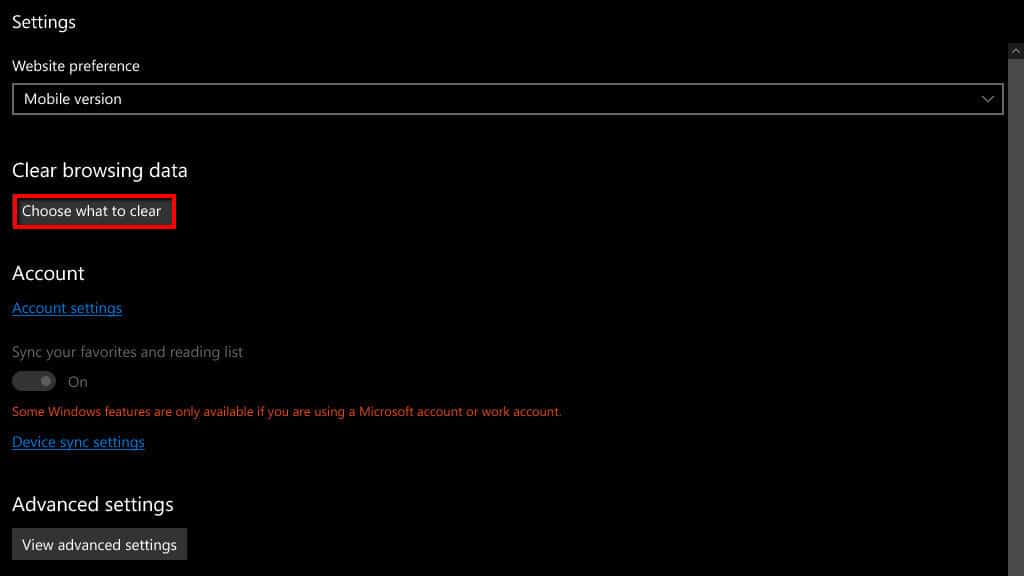
Under Clear Browsing Data, tap Choose what to clear from the section highlighted below:
From the menu shown below, check only the box labeled Cookies and saved website data:
Tap Clear at the bottom of the page to clear the cookies:
Then tap All clear! To be taken back to your home page. All done!
“Supercookies”, or Unique Identifier Headers, are tracking cookies that remain on your system even after you’ve cleared all other cookies using the steps above. They can be placed on your system by by your internet service provider at the network level, making them impossible to prevent from the user end.
Supercookies are browser-agnostic, so it doesn’t matter which browser you’re using or if you switch browsers—they will still be used to track you.
Supercookies require unencrypted connections to work, so even though you can’t prevent them wholesale, you can diminish their effectiveness by using the HTTPS Everywhere browser plugin from the Electronic Frontier Foundation. This plugin for Firefox and Chrome always opts for an encrypted HTTPS version of a website if one is available.
Not all websites use HTTPS, however, so the alternative is to connect to a VPN. This will encrypt your internet connection no matter what website you visit, rendering the supercookies useless.
Flash cookies, also known as local shared objects (LSO), are cookies used by Adobe Flash applications that exist on some websites. They can’t be removed like normal cookies, so they are sometimes categorized as supercookies.
In the past, users would have to install a third-party extension like Better Privacy to prevent LSOs from being saved on their systems. Today, however, all major browsers prevent Flash applications from loading unless you explicitly tell them to do so.
Still, you might have accidentally picked up a Flash cookie by clicking on a Flash object in a web page, or you might have some left over from a time before browser makers set Flash to click-to-activate by default.
If Adobe Flash isn’t installed, you can skip this section and move on.
Here’s how to delete them:
- Open this link in a new tab
- You should see the Adobe Flash Player Settings Manager at the top.
 However, if you only see the option to download Flash in Chrome, then your browser has probably blocked Flash from loading, or it’s not installed. In the former case, you need to allow it through:
- Click the padlock icon in your address bar and click Site Settings.
- Set Flash to Allow
- Go back and refresh the page
- In the Websites section, you can see which sites you’ve granted permission to use Flash and that are storing data on your device. Click Delete website to remove them one at a time or Delete all sites to wipe all of them.
Note that if you play Flash games or use other Flash applications, you might lose saved data.
See also: Compare internet providers in your area (US only)
“Chocolate Chip Cookies” by Wikimedia Foundation licensed under CC BY 2.0








What about “Handlers” on Chrome? Allow sites to ask to become Default Handlers for Protocols (recommended)? What does that mean? Should it Be On or Off?
From Safari, Firefox, and Chrome browsers, which is the Best safest browser to use? I’ve noticed Even if I select “Always Block” on Safari, Cookies still get through?